To log in, the user account must be **created and enabled** by an administrator with **backoffice** permissions.
--- ### First-time login **1.** Open the **welcome email** you received after creating your account and click the **activation link**. [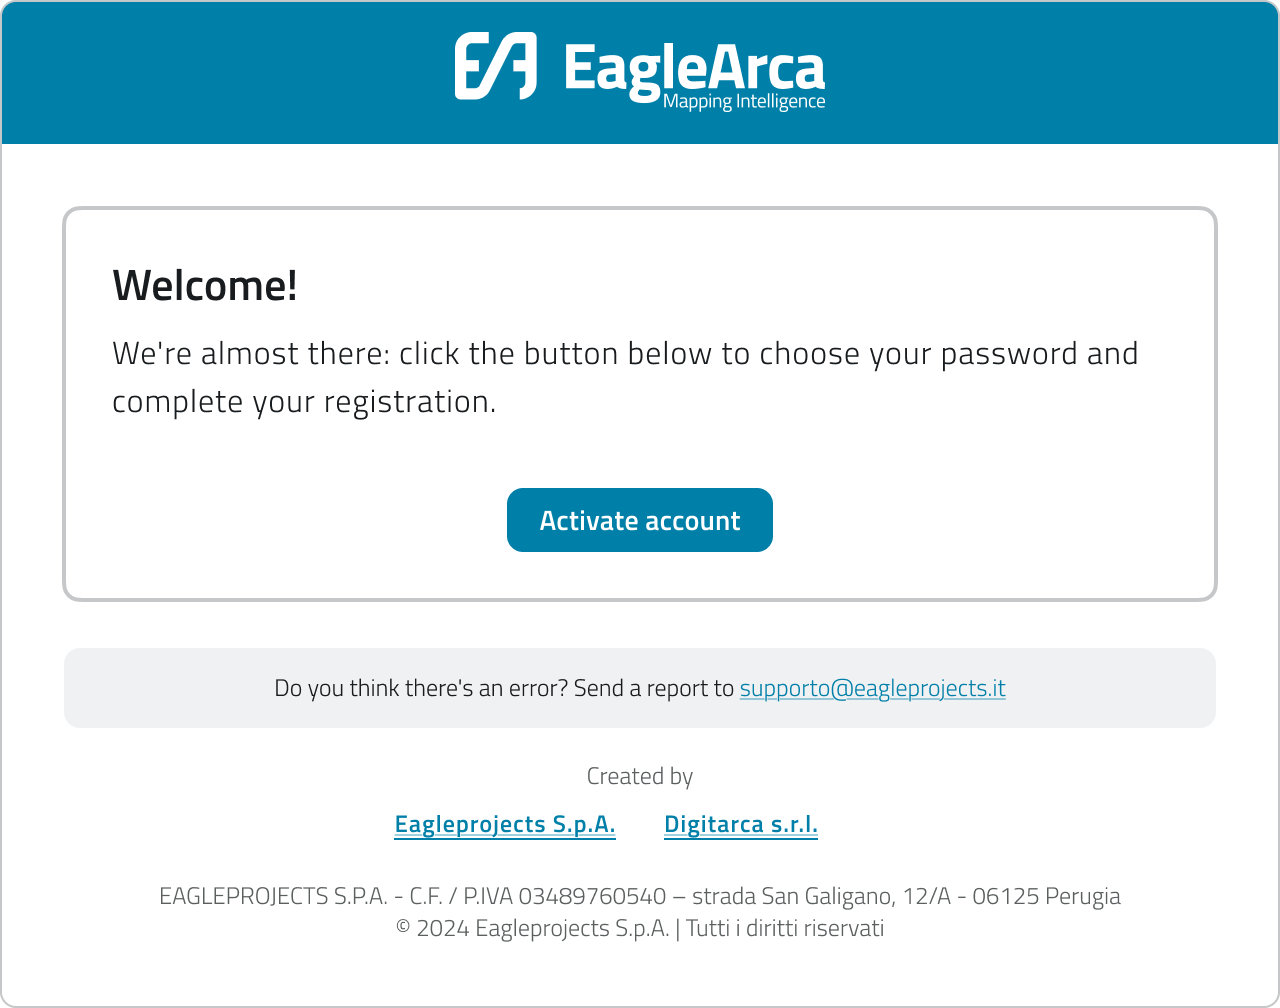](https://wiki.eaglearca.com/uploads/images/gallery/2026-03/scaled-1680-/Oau1-mail-first-access.png) **2.** Set your **new password**, making sure it meets the minimum requirements: - at least 8 characters - one uppercase letter - one number - one special character **3.** Confirm to **save the password**. **4.** You will be redirected to the **login pag****e**: enter your email address and password, then click **Login**. [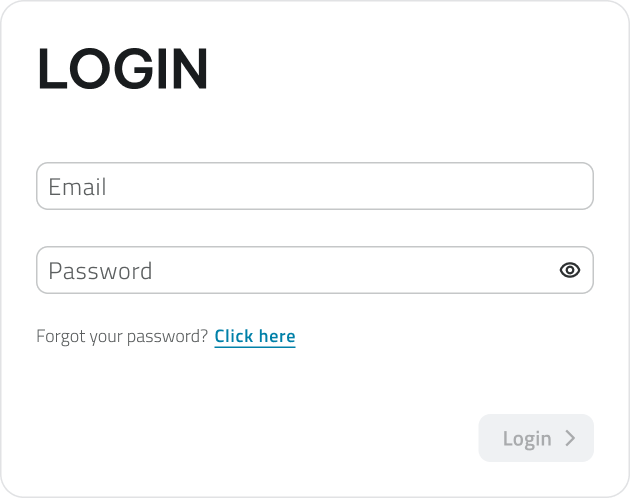](https://wiki.eaglearca.com/uploads/images/gallery/2025-11/scaled-1680-/Y3Z2-login.png)The activation link is valid for a limited time. If it has expired, please request account creation again.
**💡 TIP**: If the **welcome link has expired**, ask the project contact for a new invitation or reset. --- ### Reset your password **1.** Go to the EagleArca **login** page. **2.** Click on **Forgot your password?** [](https://wiki.eaglearca.com/uploads/images/gallery/2025-11/scaled-1680-/8a13-link-password-dimenticata.png) **3.** Enter the **email** address associated with your account and click **Send**. **4.** Check your email inbox and open the **reset link** you received. [](https://wiki.eaglearca.com/uploads/images/gallery/2026-03/scaled-1680-/4-mail-reset-password.png) **5.** Set and confirm your **new password**, making sure it meets the minimum requirements: - at least 8 characters - one uppercase letter - one number - one special character then click **Change Password**. [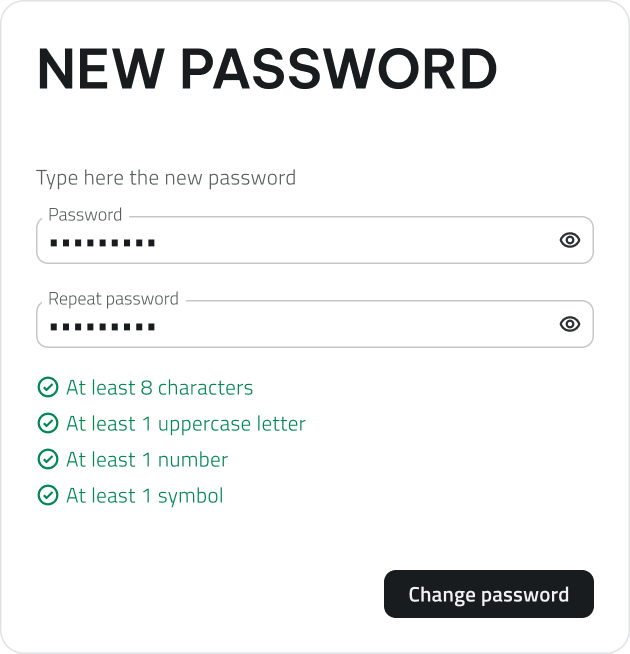](https://wiki.eaglearca.com/uploads/images/gallery/2025-11/scaled-1680-/Lkg5-password-requirements.png) **6.** Go back to the login page and sign in with your new password.If you don't receive the email, check your **Spam** or **Junk folder**.
--- ### Select organization and app **1.** After logging in, the **app selection page** opens. - Choose the **organization** from the top menu. - Select the desired **app** (Backoffice or App Inventory). - Click **Open** on the app card. [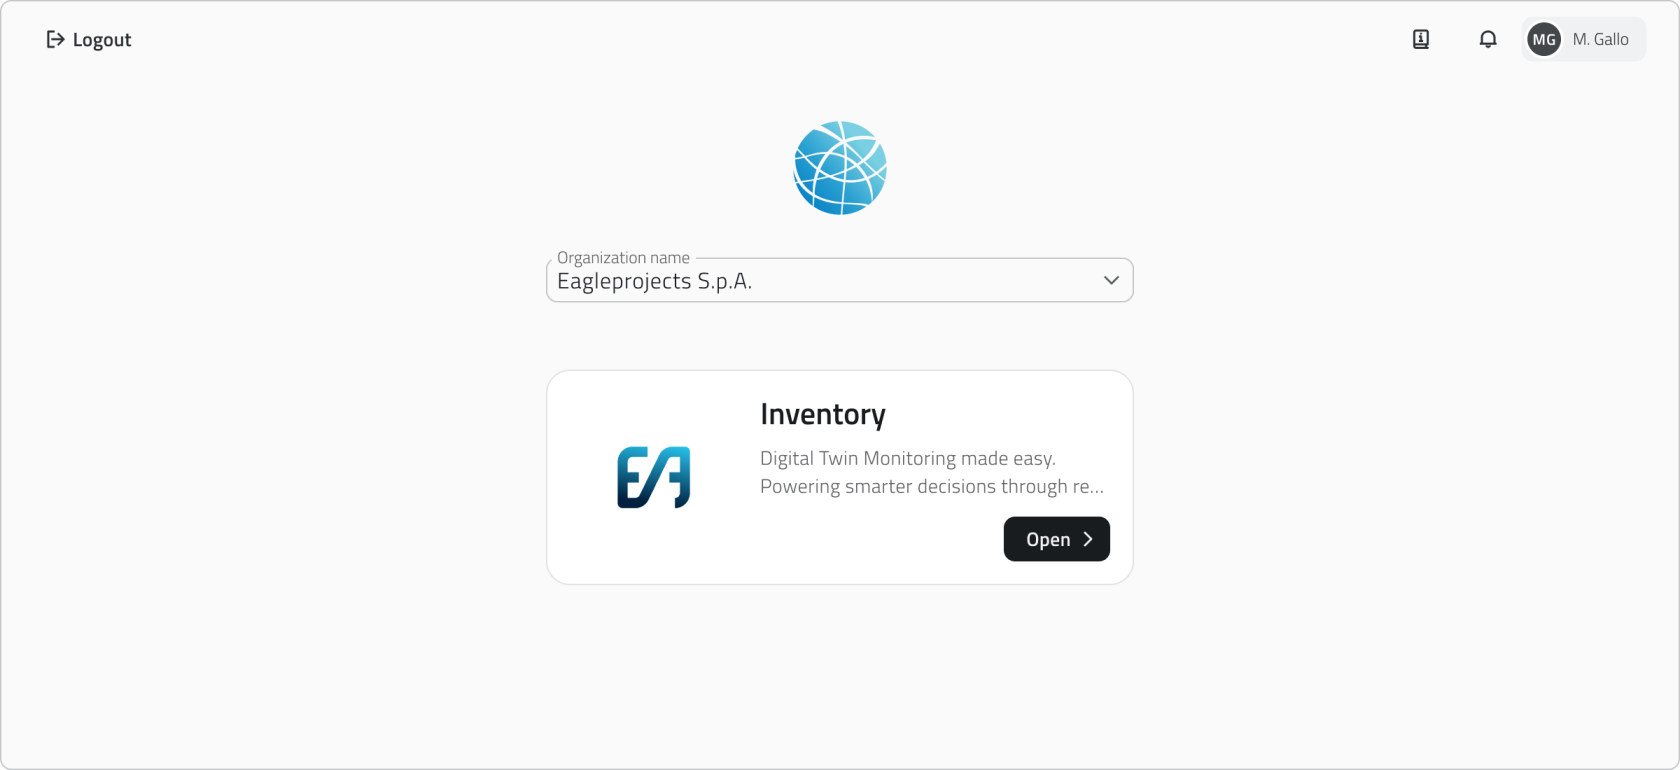](https://wiki.eaglearca.com/uploads/images/gallery/2026-03/scaled-1680-/qTi6-app-selection.png) **2.** If you are associated with **only one organization and one application**, access is granted automatically. - With **App Inventory** permissions, you access the application directly. - With **Backoffice** permissions, you enter the configuration console. **3.** If you access an organization but **you are not associated with any app**, an **empty page** is displayed. - The page indicates that no apps are available for the selected organization. - You are asked to **contact the administrator** to obtain the necessary authorizations. **4.** To change organization or app after entering, click the current **organization and app name** at the top left and select a new item. [](https://wiki.eaglearca.com/uploads/images/gallery/2025-12/scaled-1680-/VnY7-header-organization-app.png) --- ### Access the project Once you open the Inventory app, the **project selection home page** appears. You can change the view (to cards, list, or table) using the selector in the top-right corner. Projects can be filtered using the search bar. [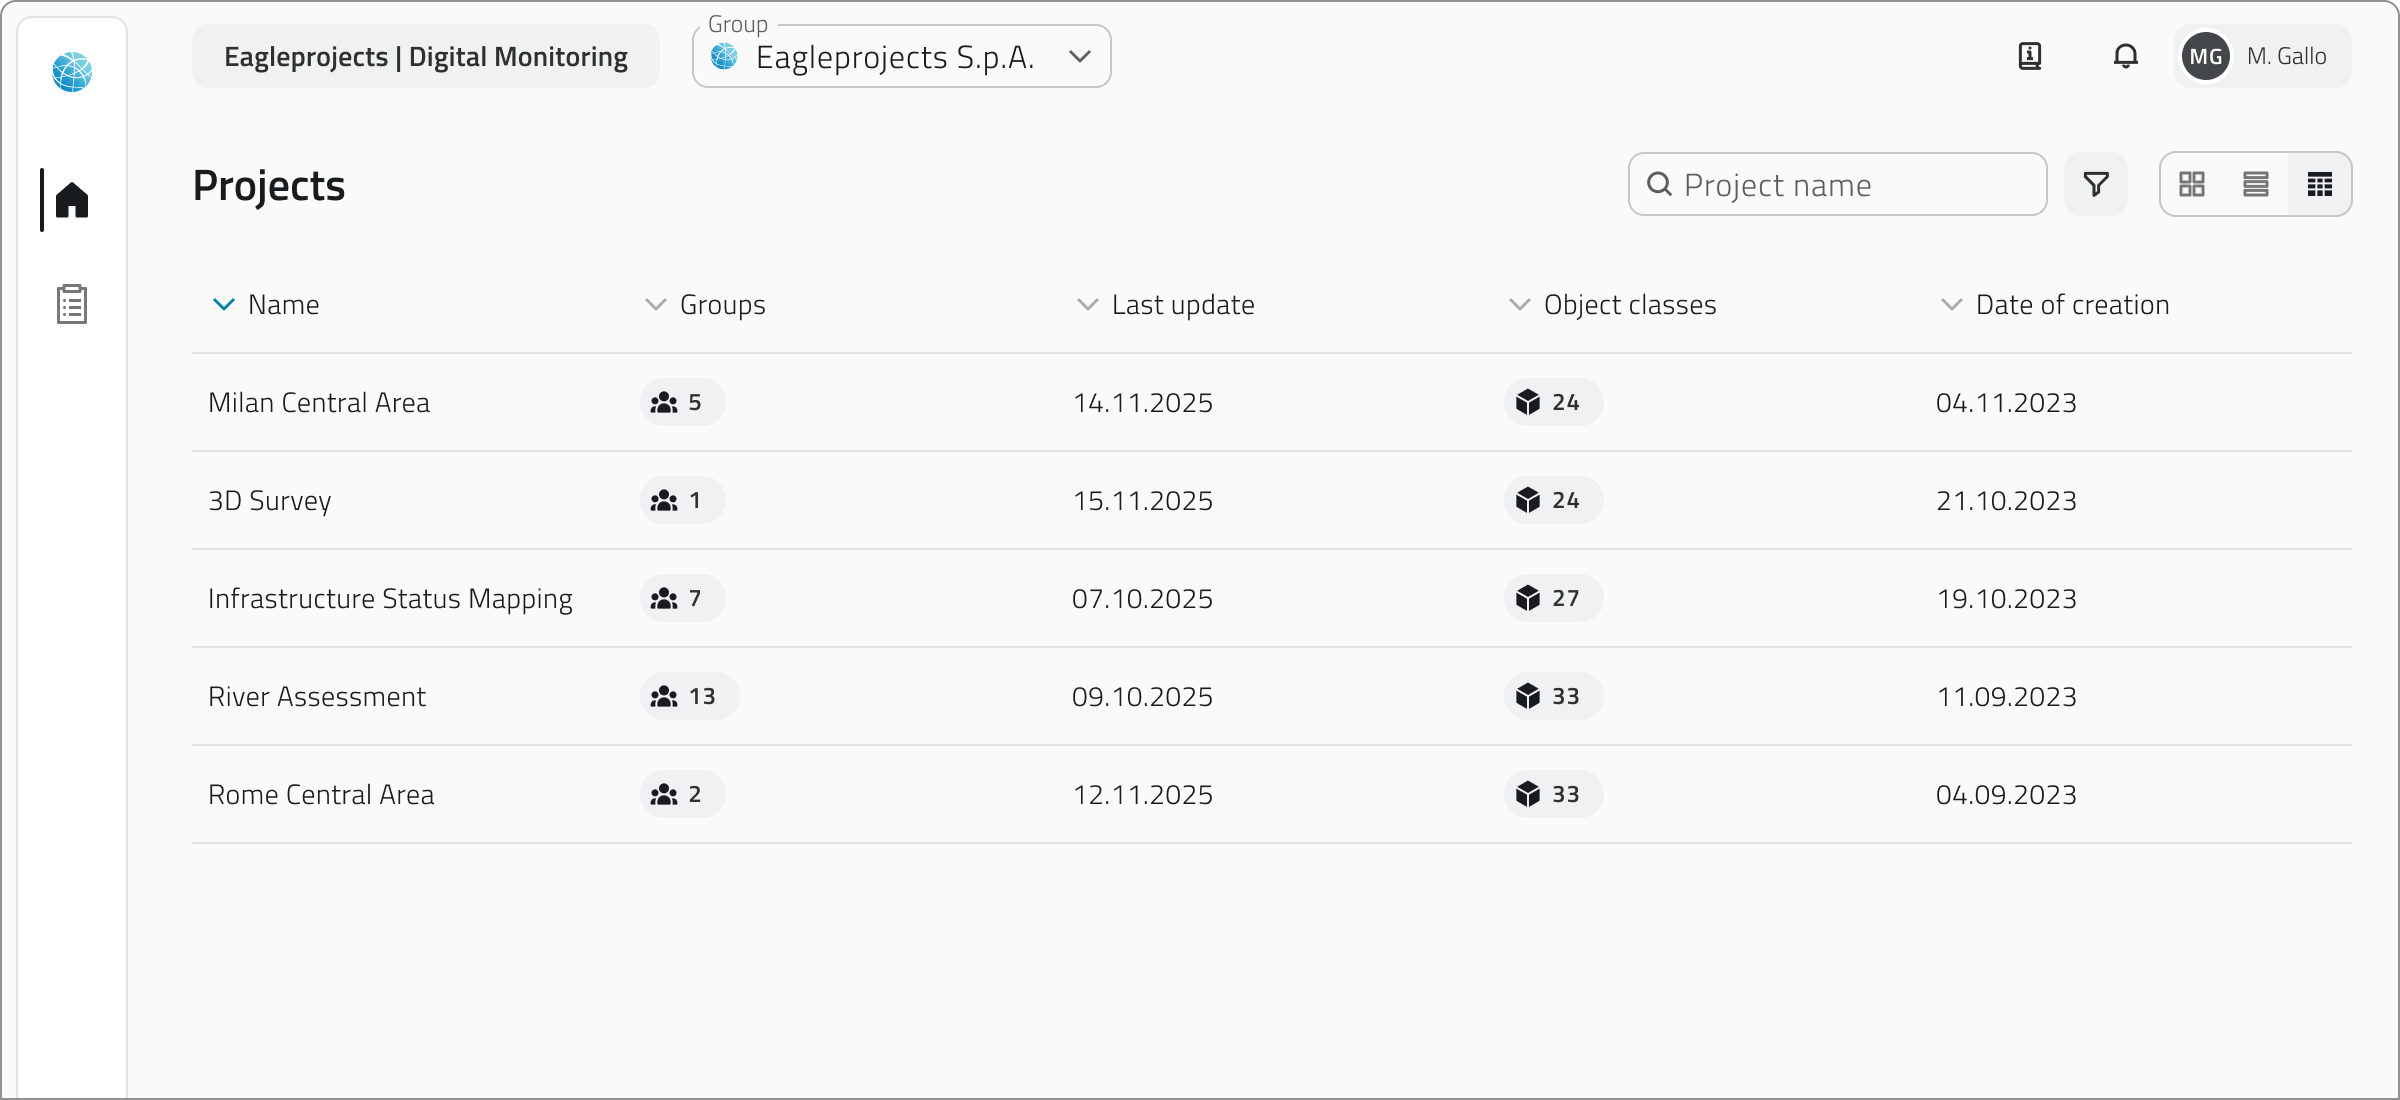](https://wiki.eaglearca.com/uploads/images/gallery/2026-03/scaled-1680-/TyJ8-layout-searchbar.png) Each project represents a separate workspace, containing its own groups, object classes, and data. - To view a project's details, click on it to open a side panel with the information. - To open a project, click the **Open** button, which appears when you hover over the item or at the top of the details panel. - Please wait for the main view to load. [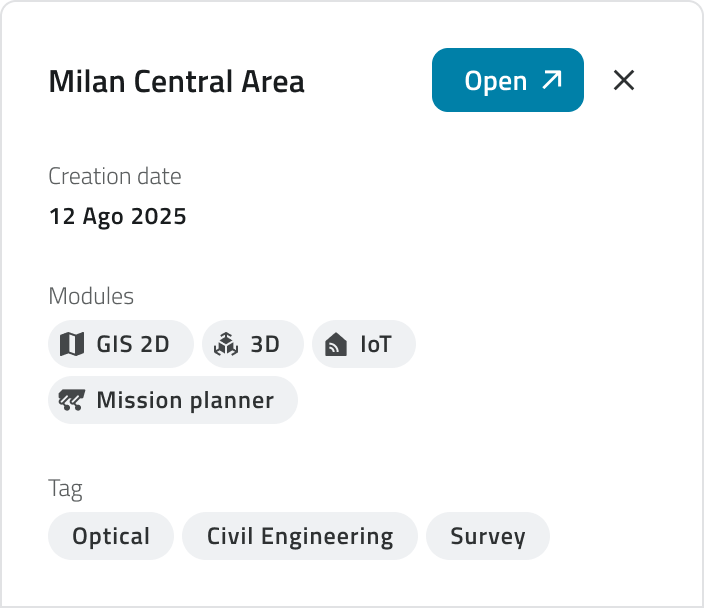](https://wiki.eaglearca.com/uploads/images/gallery/2025-12/scaled-1680-/9-project-detail.png)Project availability depends on the groups and roles assigned to you: if you don't see a project in the list, check with an administrator to make sure your account is properly assigned.
--- ### Managing concurrent sessions **Only one session can be active** per account at a time. If you try to log in while your account is already logged in from another browser or device, the platform will display a message indicating that a session is already active. [](https://wiki.eaglearca.com/uploads/images/gallery/2026-03/scaled-1680-/cdF10-active-session-detected.png) In this case, you can choose between two options: - **Cancel:** Stops the login and keeps the already open session active. - **Access anyway:** Completes access in the new session and automatically disconnects the previous one. It is not possible to be connected simultaneously from a **mobile device and computer**. If you log in from **mobile** while already connected from a **computer** (or vice versa) you will be **automatically disconnected** from the other device. --- ### Links - [Overview of users, roles and groups](https://wiki.eaglearca.com/books/access-and-overview/page/overview-of-users-roles-and-groups "Overview of users, roles and groups") ---  **Italian version** Accedere a EagleArca permette di utilizzare sia il *[Backoffice](https://wiki.eaglearca.com/books/backoffice "Backoffice") *(gestione utenti, ruoli, gruppi, progetti, oggetti e classi oggetto) sia l’**App Inventory** (raccolta dati e lavoro sul campo). Questa pagina descrive i passaggi per **entrare nel sistema**, **impostare la password** e **selezionare organizzazione e applicazione**.Per accedere è necessario che l’utenza sia **creata e abilitata** da un amministratore con permesso di **backoffice**.
--- ### Primo accesso **1.** Apri la **mail di benvenuto** ricevuta dopo la creazione dell’utenza e clicca il **link di attivazione**. [](https://wiki.eaglearca.com/uploads/images/gallery/2025-12/1-mail-first-access.png) **2.** Imposta la **nuova password** rispettando i requisiti minimi: - almeno 8 caratteri - una lettera maiuscola - un numero - un carattere speciale **3.** Conferma per **salvare la password**. **4.** Verrai reindirizzato alla **pagina di login**: inserisci email e password, quindi clicca su **Login**. [](https://wiki.eaglearca.com/uploads/images/gallery/2025-11/Y3Z2-login.png)Il link di attivazione ha validità limitata. Se risulta scaduto, richiedi nuovamente la creazione dell’utenza.
**💡 Suggerimento**: Se il **link di benvenuto è scaduto**, richiedi un nuovo invito o un reset al referente del progetto. --- ### Reimpostare la password **1.** Vai alla pagina di **login** di EagleArca. **2.** Clicca su **Hai dimenticato la password?** [](https://wiki.eaglearca.com/uploads/images/gallery/2025-11/8a13-link-password-dimenticata.png) **3.** Inserisci l’**email** associata all’utenza e clicca su **Invia**. **4.** Controlla la tua casella email e apri il **link di reset** ricevuto. [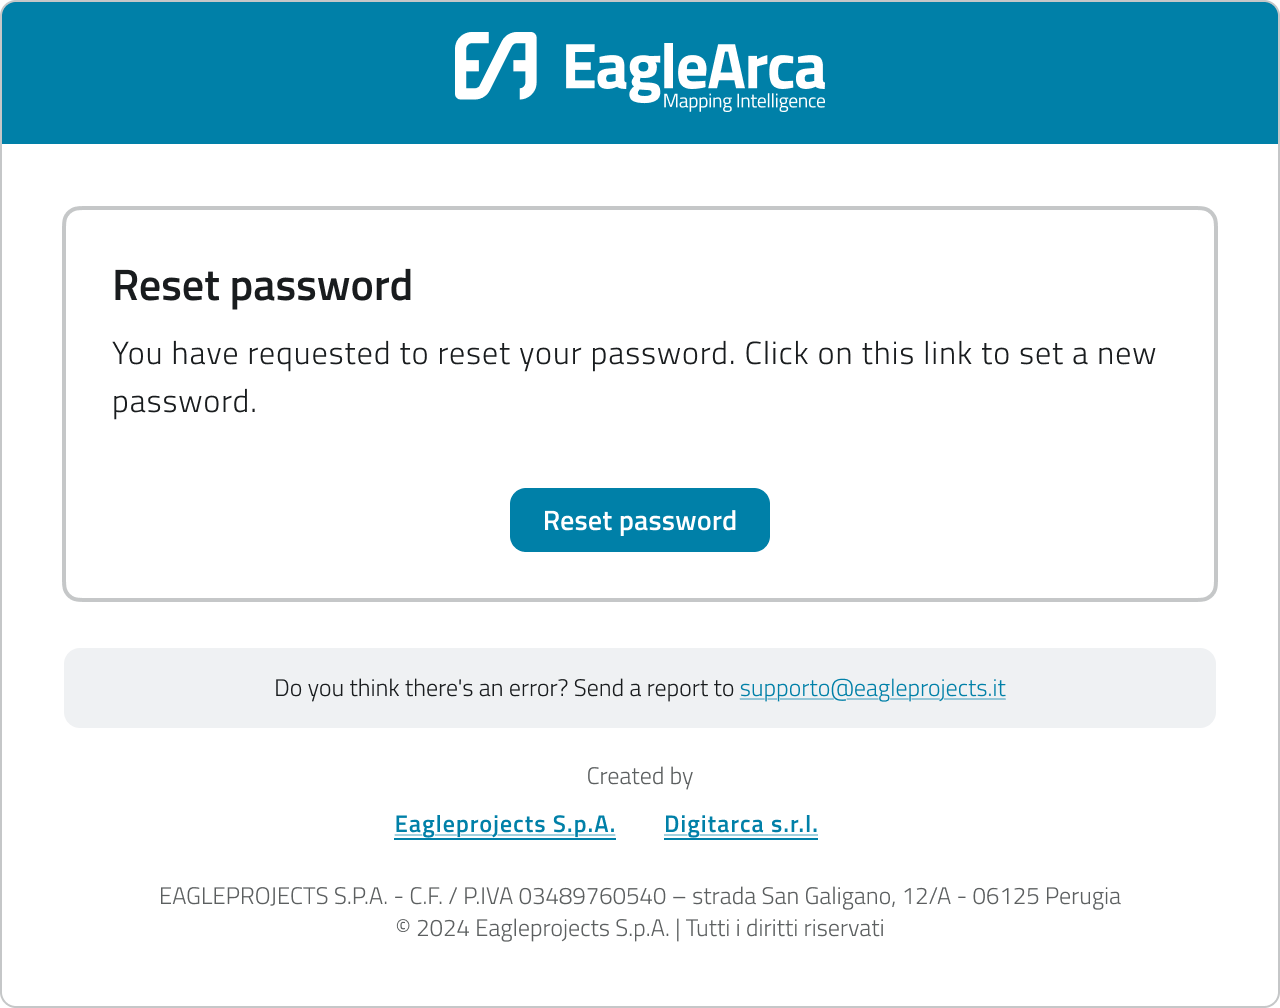](https://wiki.eaglearca.com/uploads/images/gallery/2025-12/4-mail-reset-password.png) **5.** Imposta e conferma la **nuova password** rispettando i requisiti minimi: - almeno 8 caratteri - una lettera maiuscola - un numero - un carattere speciale quindi clicca su **Cambia password**. [](https://wiki.eaglearca.com/uploads/images/gallery/2025-11/Lkg5-password-requirements.png) **6.** Torna alla pagina di login e accedi con la nuova password.Se la mail non arriva, controlla la cartella **Spam** o **Posta indesiderata**.
--- ### Selezionare organizzazione e app **1.** Dopo il login, si apre la **pagina di selezione app**. - Scegli l’**organizzazione** dal menu in alto. - Seleziona l’**app** desiderata (Backoffice o App Inventory). - Clicca su **Apri** nella card dell’app. [](https://wiki.eaglearca.com/uploads/images/gallery/2026-03/6-app-selection.png) **2.** Se si è associati a **una sola organizzazione e a una sola applicazione**, l’accesso avviene automaticamente. - Con permessi per l’**App Inventory**, si accede direttamente all’applicazione. - Con permessi **Backoffice**, si entra nella console di configurazione. **3.** Se accedi a un’organizzazione ma **non sei associato a nessuna app**, viene mostrata una **pagina vuota**. - La pagina indica che non sono disponibili app per l’organizzazione selezionata. - Viene richiesto di **contattare l’amministratore** per ottenere le autorizzazioni necessarie. **4.** Per cambiare organizzazione o app una volta entrato, clicca in alto a sinistra sul **nome dell'organizzazione e dell'app** correnti e seleziona una nuova voce.  --- ### Accedere al progetto Una volta aperta l’App Inventory, viene mostrata la **pagina iniziale di selezione progetto**. La visualizzazione può essere cambiata (a card, a lista o a tabella) con un selettore in alto a destra. I progetti possono essere filtrati tramite searchbar. [](https://wiki.eaglearca.com/uploads/images/gallery/2026-03/TyJ8-layout-searchbar.png) Ogni progetto rappresenta un ambiente di lavoro indipendente, che contiene i propri gruppi, classi oggetto e dati. - Per visualizzare i dettagli di un progetto, clicca su di esso per aprire un pannello laterale con le informazioni. - Per aprire un progetto, clicca sul bottone **Apri**, visibile al passaggio del mouse sopra l'elemento o in alto sul pannello dei dettagli. - Attendere il caricamento della vista principale. [](https://wiki.eaglearca.com/uploads/images/gallery/2025-12/9-project-detail.png)La disponibilità dei progetti dipende dai **gruppi** e dai **ruoli** assegnati: se non vedi un progetto nella lista, verifica con un amministratore che l’utenza sia associata correttamente.
--- ### Gestione degli accessi contemporanei Per ogni account può essere attiva **una sola sessione alla volta**. Se provi ad accedere mentre la tua utenza è già collegata da un altro browser o dispositivo, la piattaforma mostra un messaggio che segnala la presenza di una sessione già attiva. [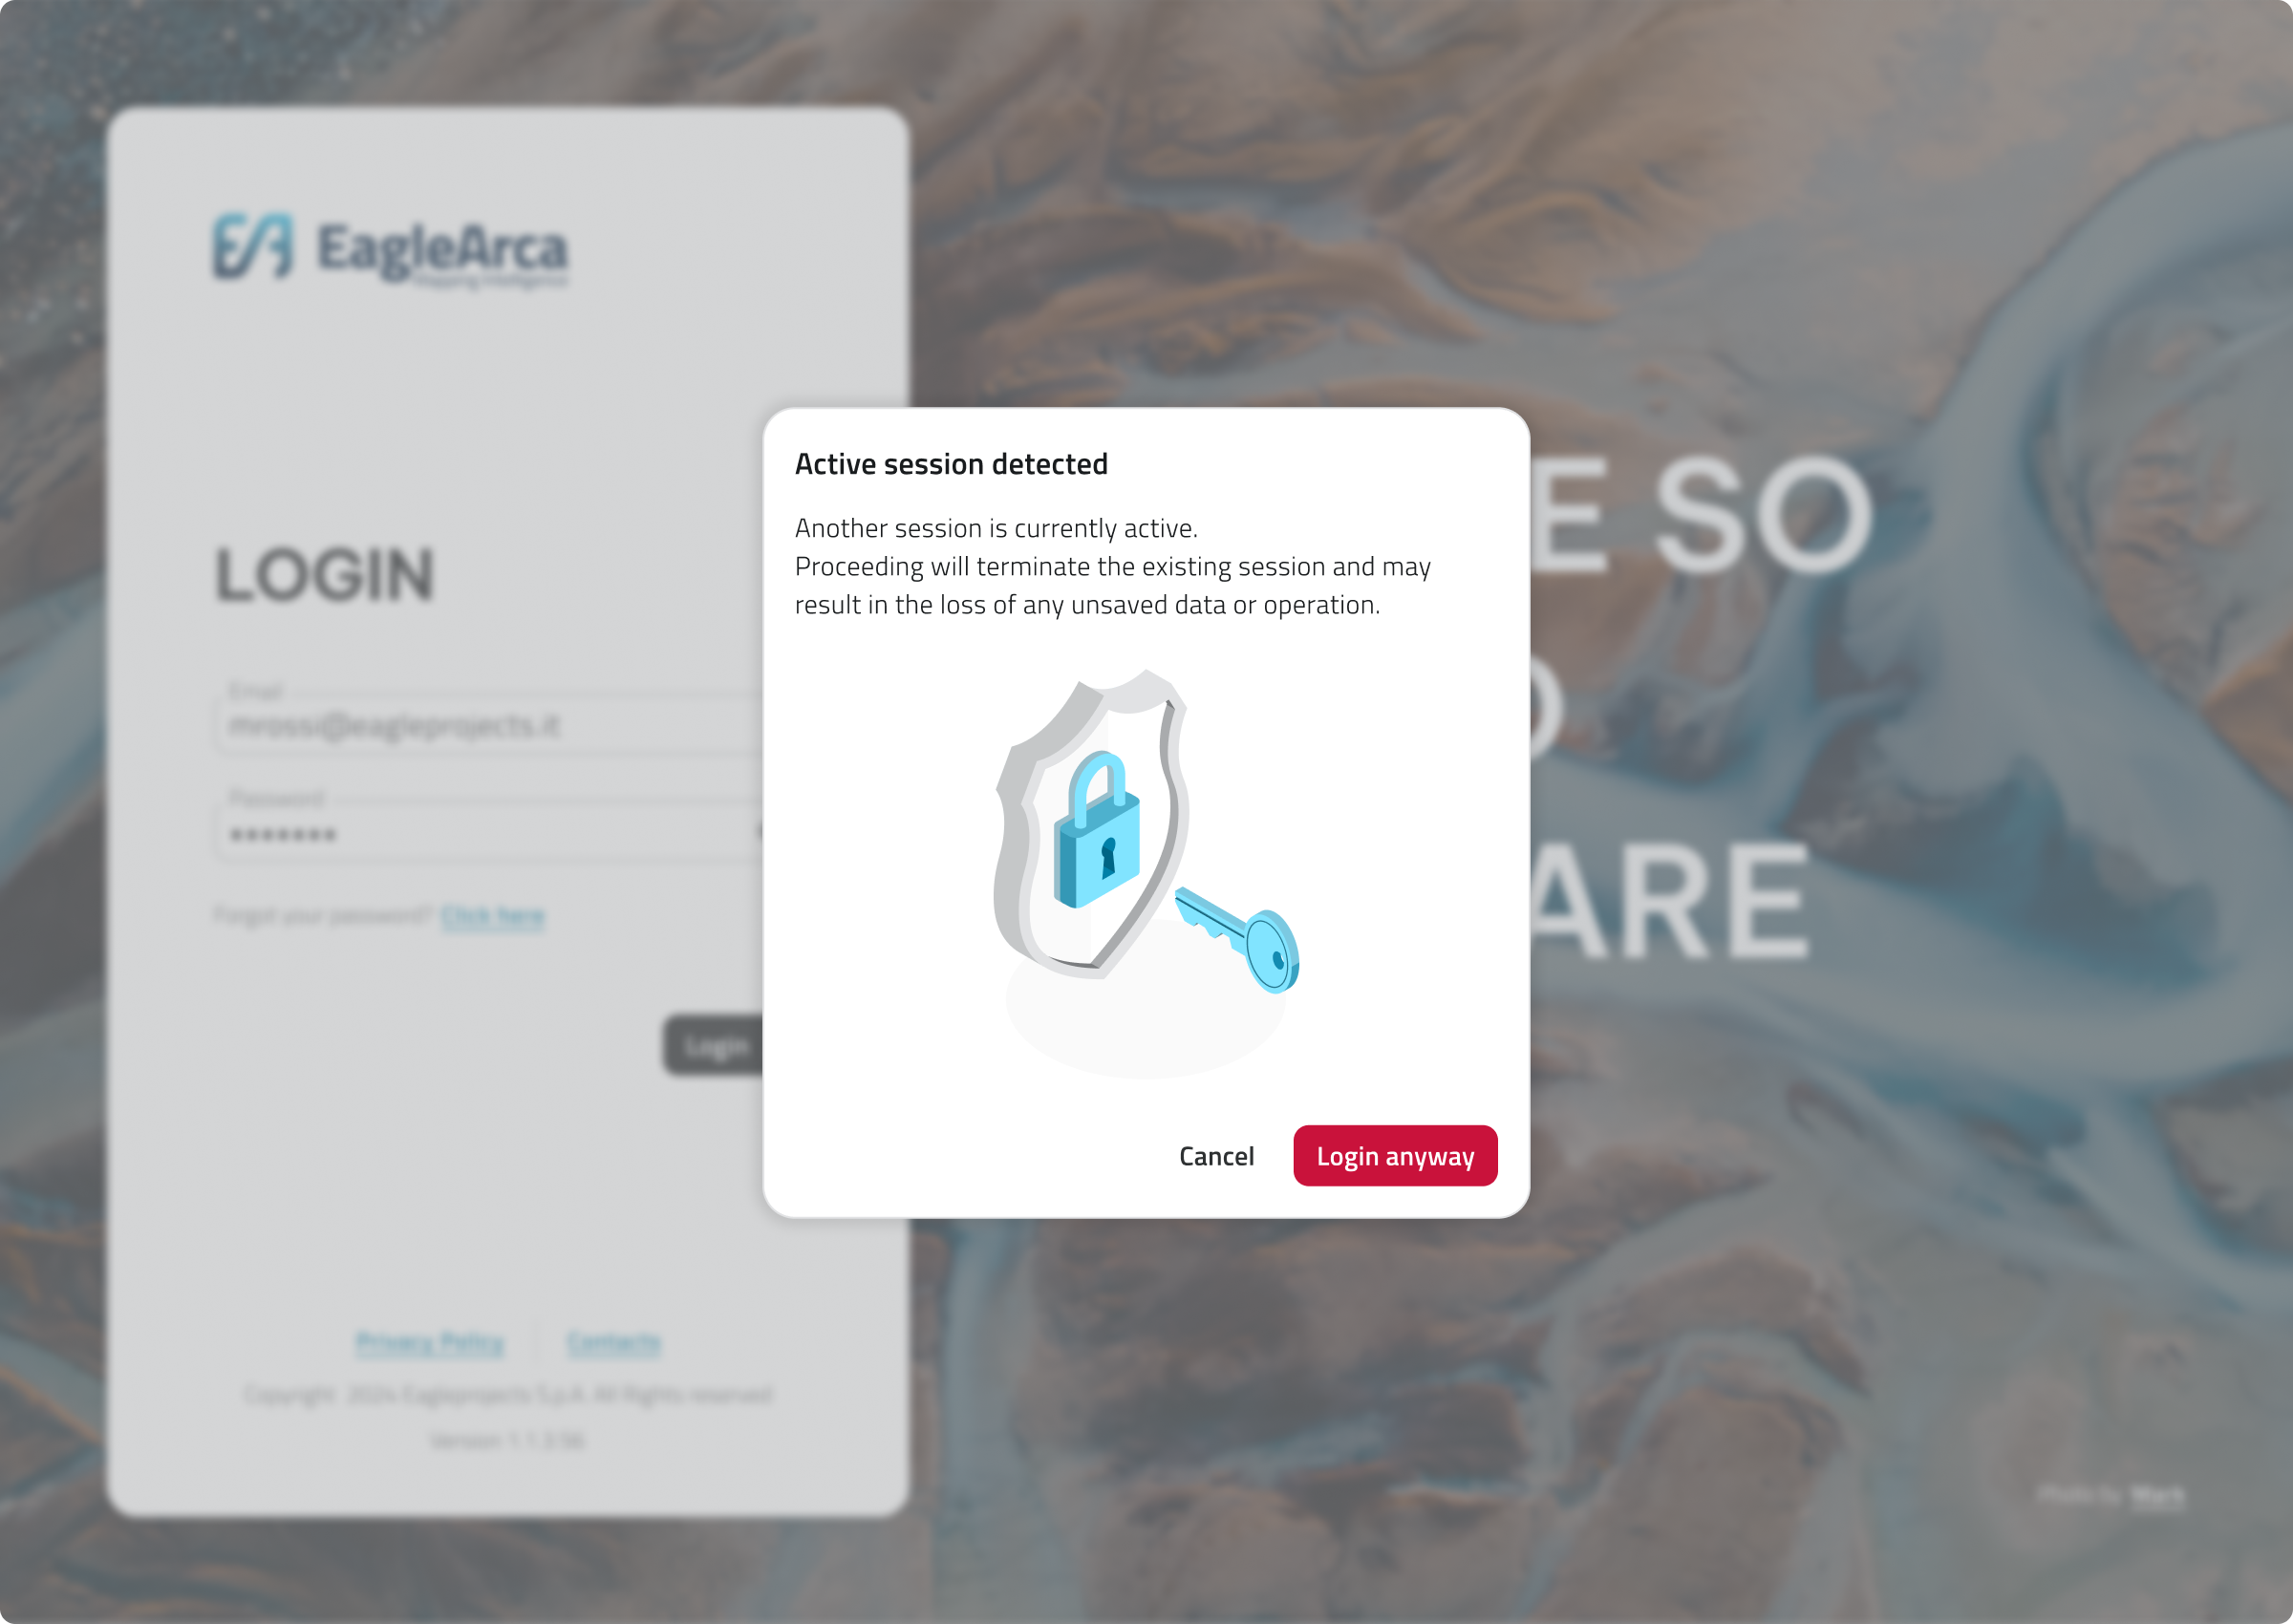](https://wiki.eaglearca.com/uploads/images/gallery/2026-03/10-active-session-detected.png) In questo caso puoi scegliere tra due opzioni: - **Annulla:** Interrompe il login e mantiene attiva la sessione già aperta. - **Accedi comunque:** Completa l’accesso nella nuova sessione e disconnette automaticamente quella precedente. Non è possibile essere collegati contemporaneamente da **dispositivo mobile** e **computer**. Se accedi da **mobile** mentre sei già collegato da **computer** (o viceversa), verrai **automaticamente disconnesso** dall’altro dispositivo. --- ### Collegamenti - [Panoramica utenti, ruoli e gruppi](https://wiki.eaglearca.com/books/access-and-overview/page/overview-of-users-roles-and-groups "Overview of users, roles and groups") --- ***Last update:** *28 May 2026** # Overview of users, roles and groups In EagleArca, each user’s access and permissions are managed through users, roles and groups. These three elements work together to control who can access which projects and what editing privileges they have.Each user can belong to one or more organizations, but access to projects depends on the roles and groups to which they are assigned.
Within EagleArca, users are classified as: - **Internal**, if created directly within the organization. - **External**, if already registered in another organization and added as collaborators. [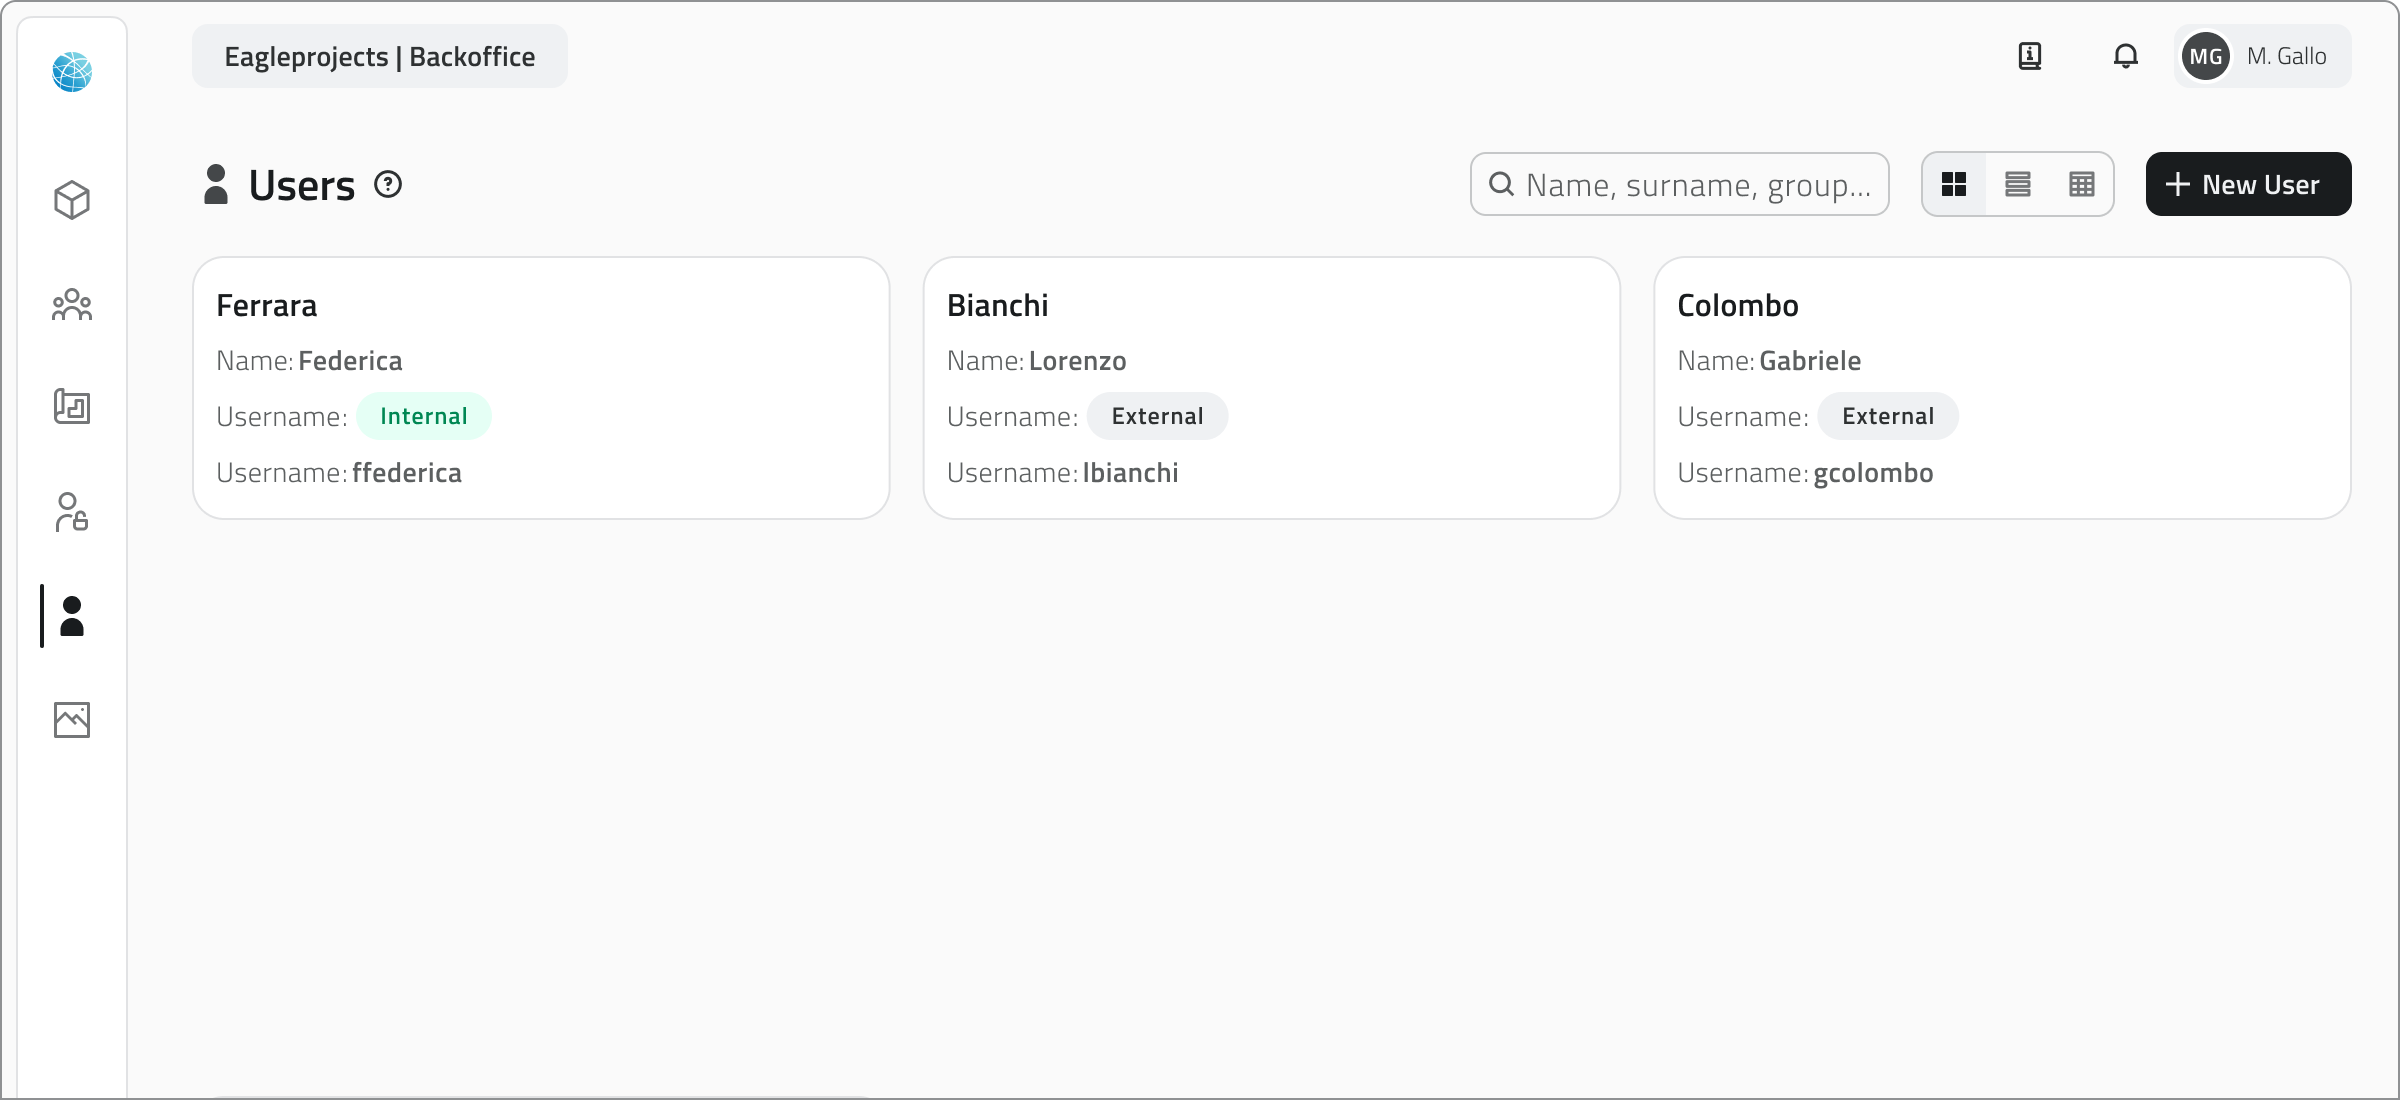](https://wiki.eaglearca.com/uploads/images/gallery/2026-03/cQm1-users.png) When a new user is created, they receive a **welcome email** containing a link to set their password and complete their first login. Each user account can have different permissions for the **App Inventory** and the **Backoffice**, and consume separate licenses based on the access granted. --- ### Roles A **role** defines which actions a user can perform on the platform's data. It is a set of **permissions** that determine what is visible or editable. - **Object classes** can be set to be invisible, visible, or editable. - **Resources** can be either visible or invisible. [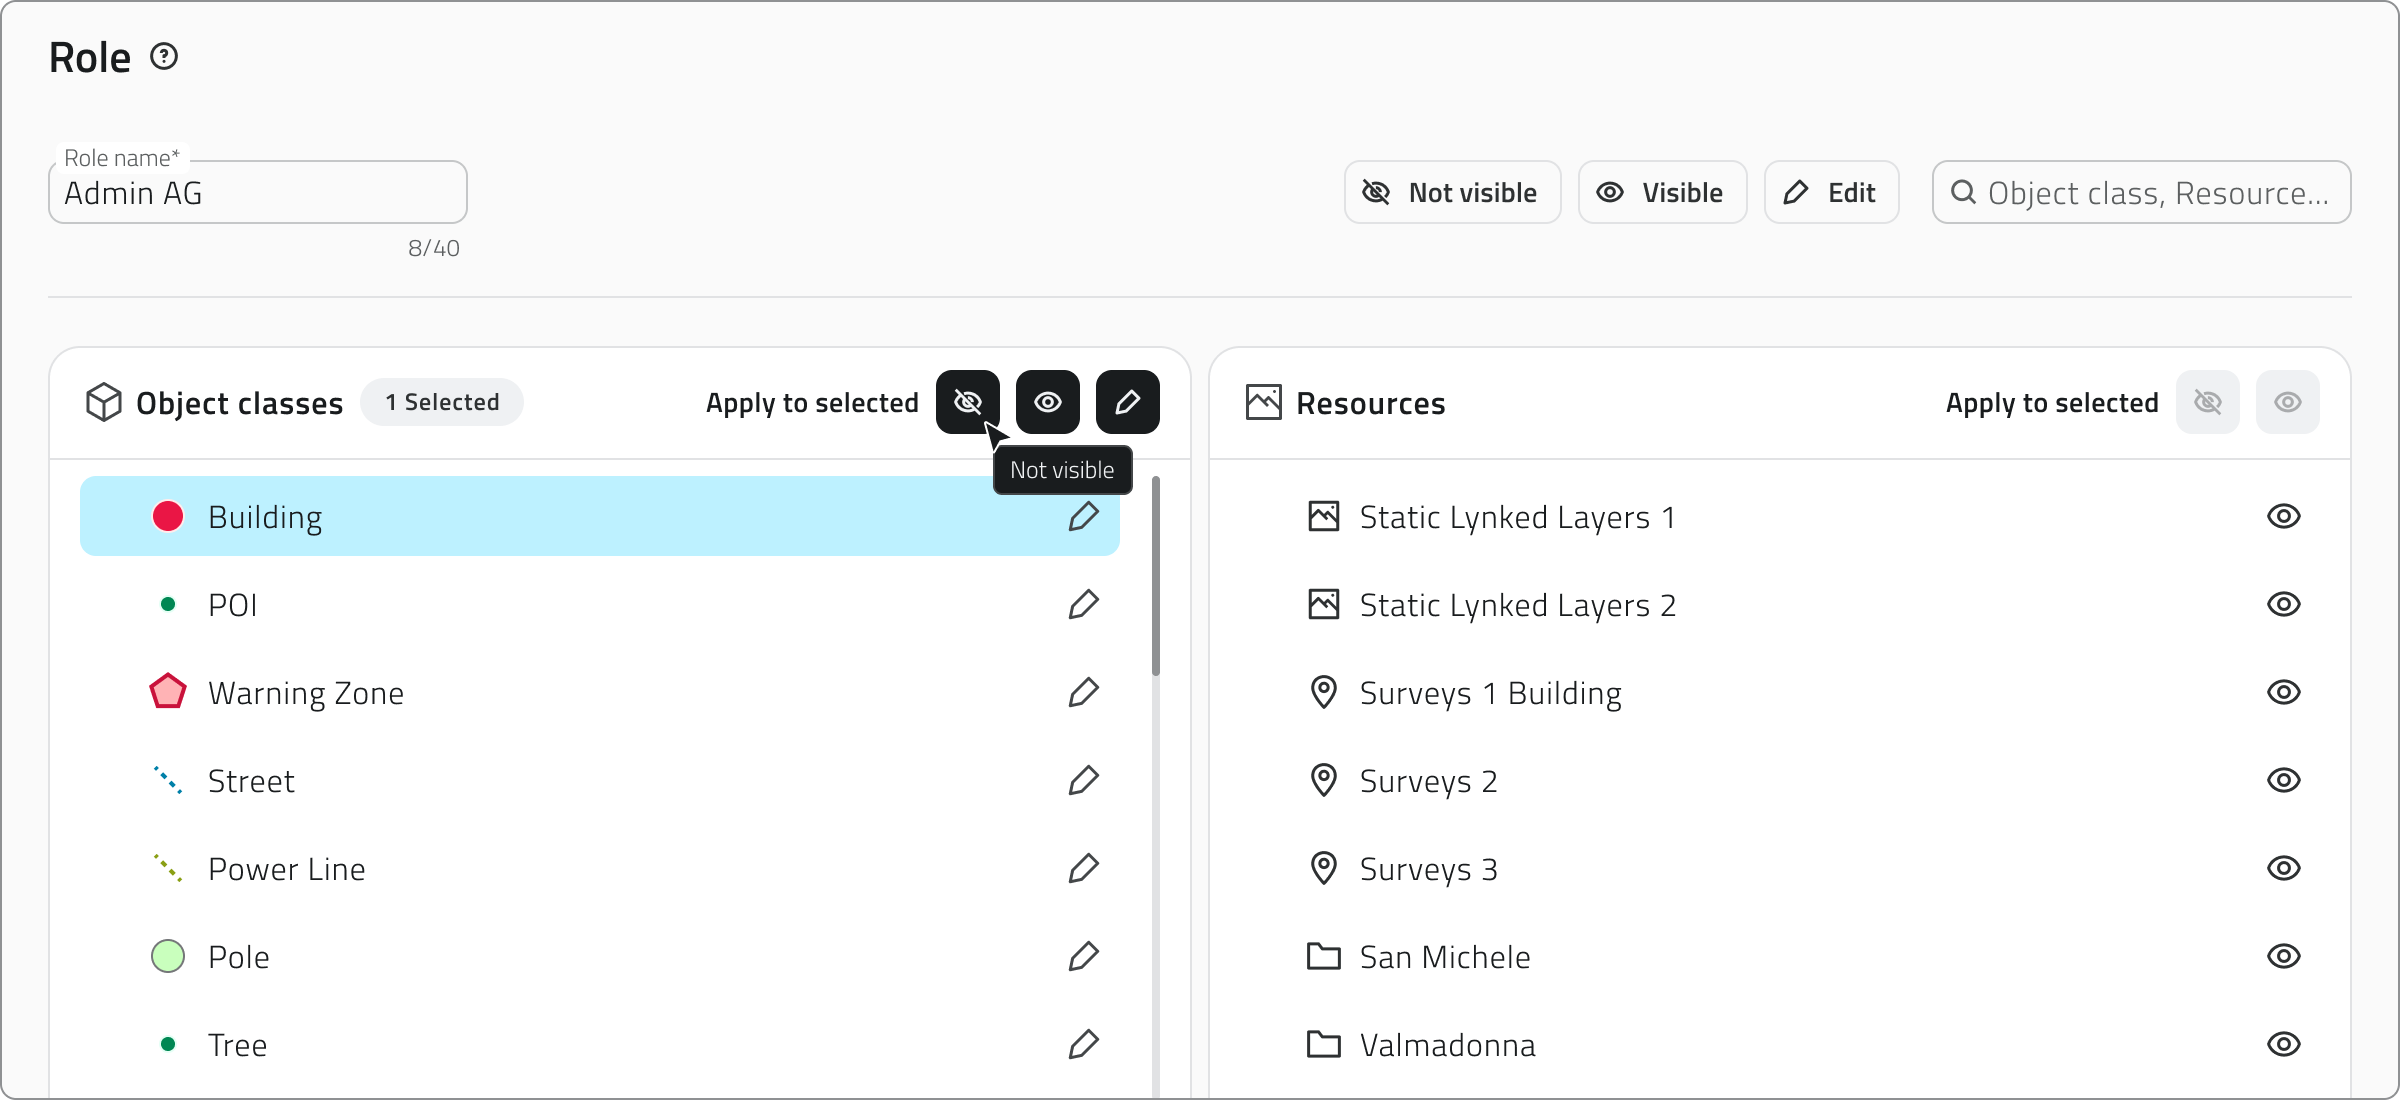](https://wiki.eaglearca.com/uploads/images/gallery/2025-12/lk63-roles.png) Each role can be linked to one or more groups. This allows you to automatically apply the same permissions to multiple users without having to configure them one by one. **💡 TIP**: Create **clear, reusable roles** to avoid redundant configurations. --- ### Groups A **group** is a collection of users who share the same role and have access to the same projects. Each group is associated with: - a **role**, which determines permissions; - one or more **projects**, which define where users can work. [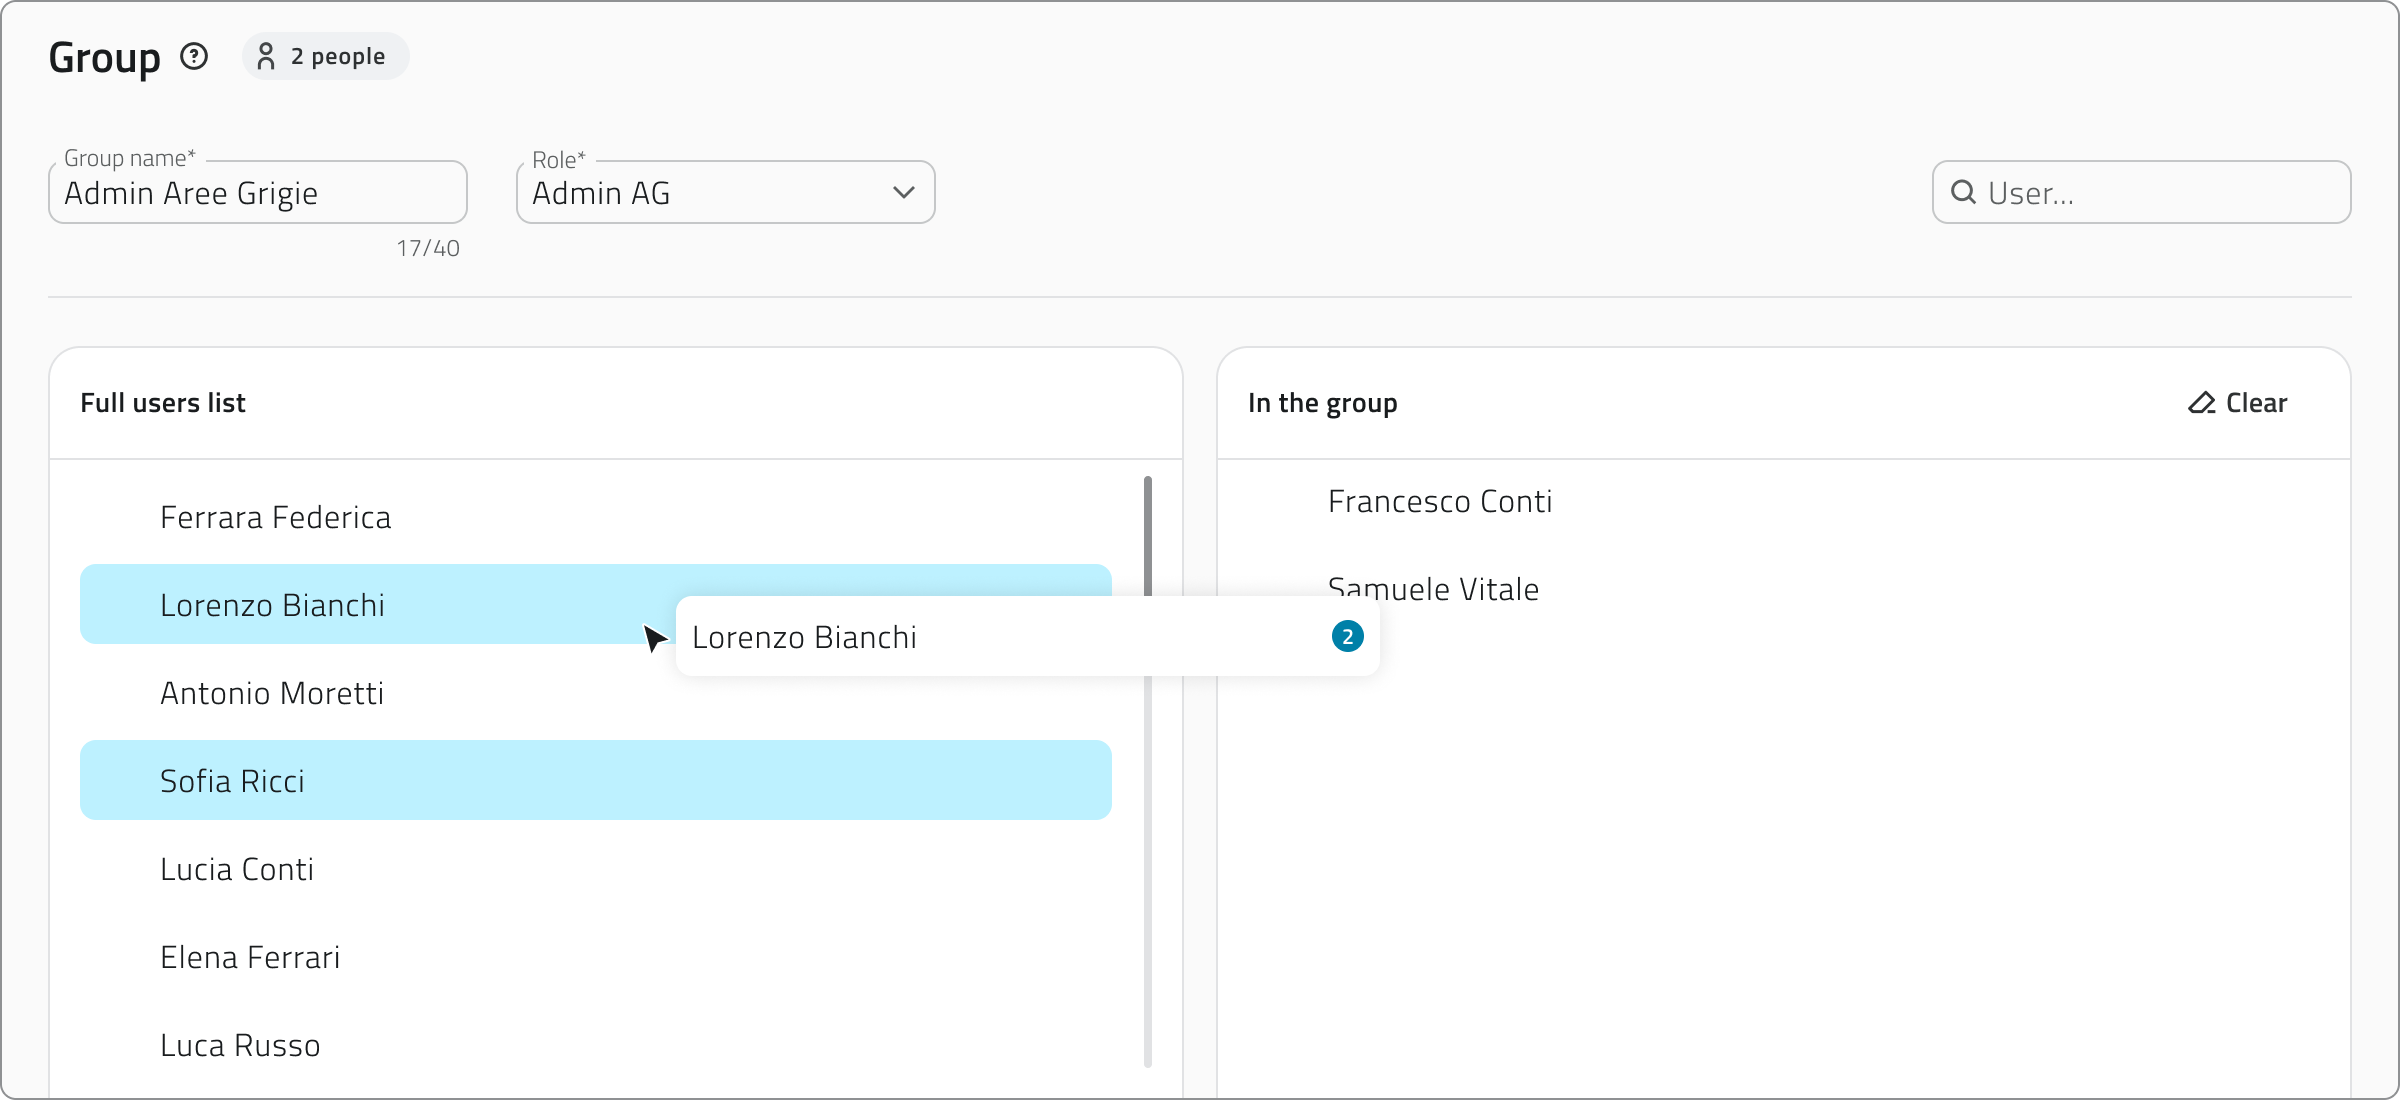](https://wiki.eaglearca.com/uploads/images/gallery/2026-03/2-groups.png) Groups simplify access management, especially in complex organizations. Assigning users to a group allows you to: - Quickly assign consistent permissions to multiple people. - Centrally manage role changes. - Reduce configuration errors in projects. If a user belongs to multiple groups, after logging in, they can select which group to work with to access the corresponding projects. **💡 TIP**: Keep the names consistent (e.g., “Northern Operators” / “Southern Operators”) to make searching easier. --- ### Relationship between users, roles and groups| **Element** | **Main function** | **Assigned to / by** |
|---|---|---|
| **User** | Identifies a person | Is included in one or more groups |
| **Role** | Defines operational permissions | Is assigned to a group |
| **Group** | Collects multiple users with the same purpose | Is associated with a role and one or more projects |
Ogni utente può appartenere a una o più organizzazioni, ma l’accesso ai progetti dipende dai ruoli e dai gruppi a cui è assegnato.
All’interno di EagleArca, gli utenti sono classificati come: - **Interni**, se creati direttamente all’interno dell’organizzazione. - **Esterni**, se già registrati in un’altra organizzazione e aggiunti come collaboratori. [](https://wiki.eaglearca.com/uploads/images/gallery/2026-03/cQm1-users.png) Quando si crea un nuovo utente, questo riceve una **mail di benvenuto** con il link per impostare la password e completare il primo accesso. Ogni utenza può avere permessi diversi per l'**App Inventory** e per il **Backoffice**, e consumare licenze separate in base all’accesso concesso. --- ### Ruoli Un **ruolo** definisce quali azioni può svolgere un utente sui dati della piattaforma. È un insieme di **permessi** che determinano cosa è visibile o modificabile. - Le **classi oggetto** possono essere impostate come *non visibili*, *visibili* o *modificabili*. - Le **risorse** possono essere solo *visibili* o *non visibili*. [](https://wiki.eaglearca.com/uploads/images/gallery/2025-12/lk63-roles.png) Ogni ruolo può essere collegato a uno o più gruppi. Questo consente di applicare automaticamente gli stessi permessi a più utenti senza doverli configurare uno per uno. **💡 Suggerimento**: Crea **ruoli chiari e riutilizzabili** per evitare configurazioni ridondanti. --- ### Gruppi Un **gruppo** è un insieme di utenti che condividono lo stesso ruolo e accedono agli stessi progetti. Ogni gruppo è associato a: - un **ruolo**, che stabilisce i permessi; - uno o più **progetti**, che definiscono dove gli utenti possono operare. [](https://wiki.eaglearca.com/uploads/images/gallery/2026-03/2-groups.png) I gruppi semplificano la gestione degli accessi, specialmente in organizzazioni complesse. Associare utenti a un gruppo consente di: - Assegnare rapidamente permessi coerenti a più persone. - Gestire in modo centralizzato le modifiche dei ruoli. - Ridurre gli errori di configurazione nei progetti. Se un utente appartiene a più gruppi, dopo l’accesso può selezionare con quale gruppo lavorare per accedere ai progetti corrispondenti. **💡 Suggerimento**: Mantieni i nomi coerenti (es. “Operatori Nord” / “Operatori Sud”) per facilitare la ricerca. --- ### Relazione tra utenti, ruoli e gruppi| **Elemento** | **Funzione principale** | **Assegnato a / da** |
|---|---|---|
| **Utente** | Identifica una persona | È inserito in uno o più gruppi |
| **Ruolo** | Definisce i permessi operativi | È assegnato a un gruppo |
| **Gruppo** | Raccoglie più utenti con lo stesso scopo | È associato a un ruolo e uno o più progetti |
You can make an **oriented point**, that is, a point oriented in a specific direction on the map, which is useful for representing elements such as cameras or headlights.
##### Non-vector Object Classes Known as **Form** classes. They define the attributes of objects that **do not have a geographic representation**. They are used to manage non-mapped information, such as inspection reports, technical checks or reference lists that can be used within projects. [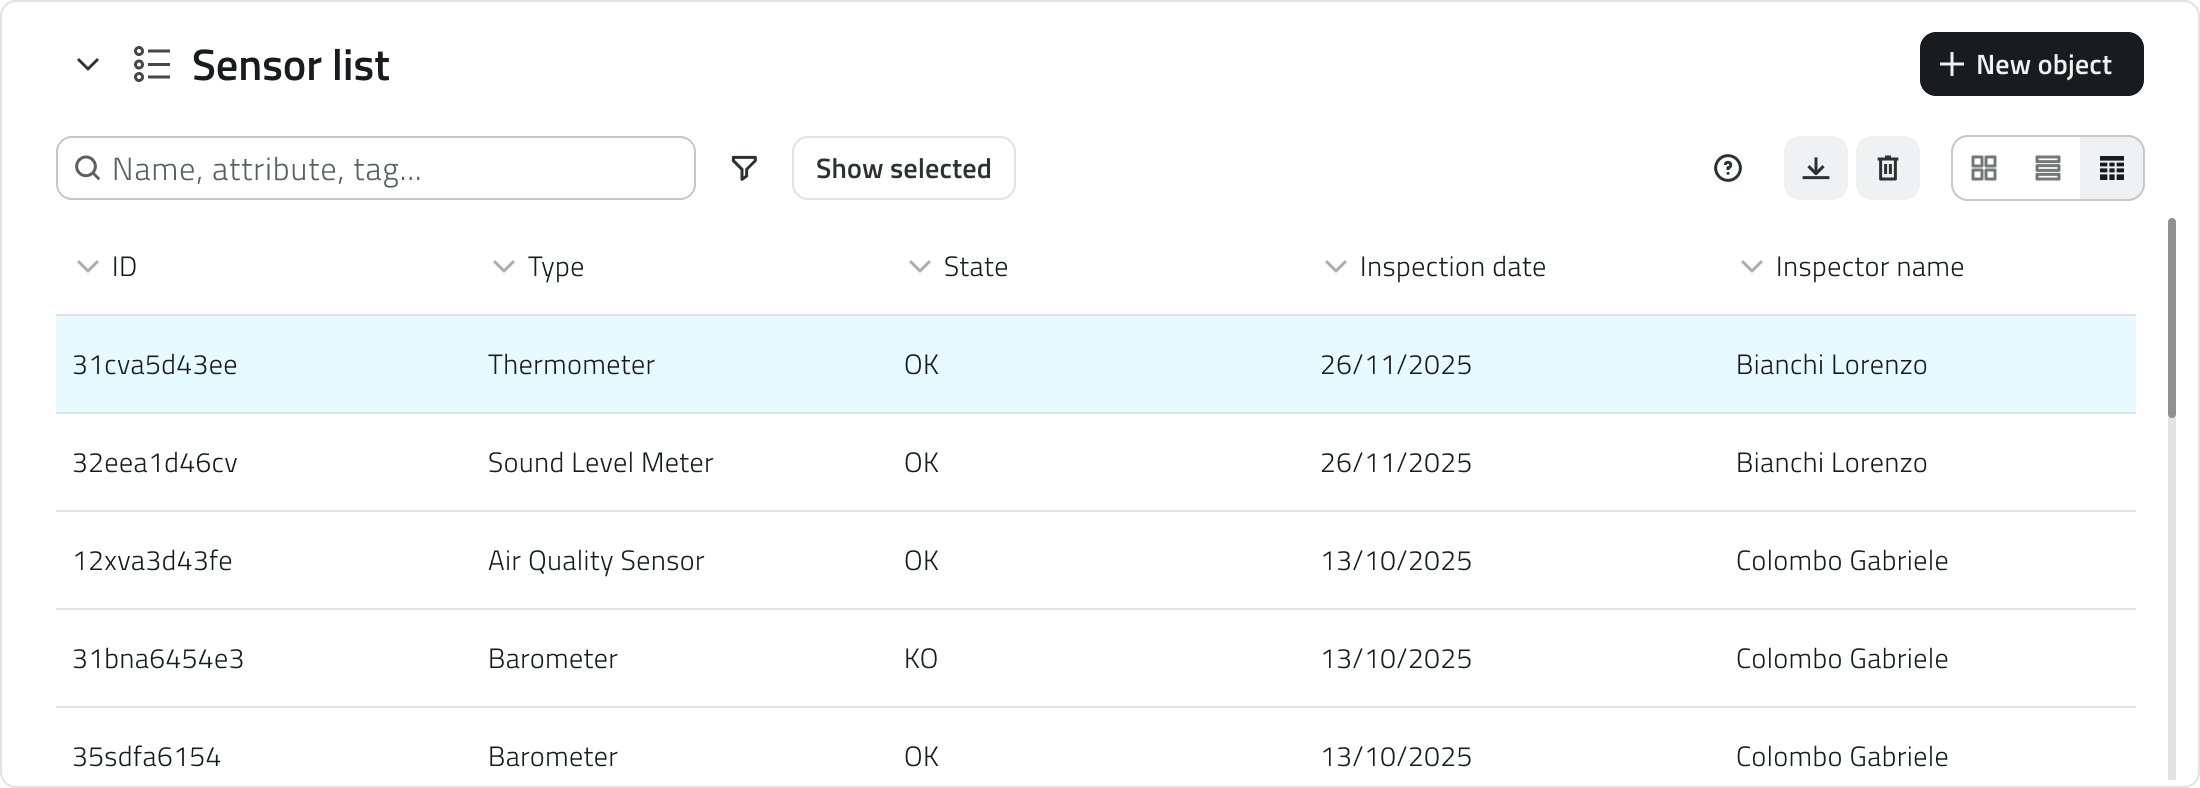](https://wiki.eaglearca.com/uploads/images/gallery/2025-12/5ho3-form.png) --- ### Global List **Global Lists** are Form-type object classes that exist at the organizational level and **are not tied to a single project**. They serve as shared, centralized repositories of reusable data. For example: - lists of suppliers or sensor models - material types or risk categories - code tables or references used by multiple projectsGlobal List objects are added from the **Home** screen and not within the project.
--- ### Object Class Attributes Each Object Class consists of **attributes**, which are the data fields that describe the information to be entered for each object in the class. An attribute can be of the following types: - **Text field** For names or descriptions - **Numeric field** For quantitative values or measurements - **List of values** For selecting an option from a predefined list - **Date** For entering dates or deadlines - **Attachments** For uploading files, images, or videos - **Dimensions** For automatically recording measurable quantities (e.g., length, area, coordinates) - **True/False** For Boolean fields - **Object list** For fields composed of multiple sub-attributes, such as a set of repeated measurements or parameters [](https://wiki.eaglearca.com/uploads/images/gallery/2025-12/aFR4-attributes.png) Each attribute also has configurable properties: - **Name** The field label - **Required** Indicates whether the field must be filled in - **Default value** The preset value, which can be changed if necessary - **Locked** The field is visible but cannot be edited - **Main attribute** The primary attribute displayed when querying the object, useful for quickly identifying it [](https://wiki.eaglearca.com/uploads/images/gallery/2025-12/Zsc5-attribute-configuration.png) --- ### Creation and Management Object classes are created and modified in the *[Backoffice](https://wiki.eaglearca.com/books/backoffice/page/create-and-manage-object-classes "Create and manage Object Classes")*, which is accessible only to users with the appropriate permissions. Once published, the class becomes available in projects and can be used to create new objects. --- ### In summary - **Object Classes** define the structure and representation of data. - They can be **geometric** (displayed on the map) or **form-based** (data sheets only). - **Global Lists** are forms shared across projects, useful for standardized lists. - **Attributes** define the information that each object must contain. - **Oriented points** allow for the representation of directed points. - Only users with *backoffice permissions* can create or modify classes. ---  **Italian version** Le **Classi Oggetto** definiscono la struttura dei dati nei progetti EagleArca. Ogni classe rappresenta un **tipo di elemento censibile,** per esempio una pianta, un palo, una condotta o un sensore, e stabilisce **quali informazioni devono essere raccolte** e **come l’oggetto deve apparire sulla mappa**. Una volta creata e pubblicata, una classe diventa disponibile per tutti i progetti dell’organizzazione e può essere utilizzata per *[creare nuovi oggetti](https://wiki.eaglearca.com/books/app-features/page/managing-objects-in-the-project "Managing objects in the project")*. --- ### Tipologie di Classe Oggetto In EagleArca esistono due categorie di Classi Oggetto: ##### Classi Oggetto vettoriali Permettono di creare oggetti **visualizzati sulla mappa**. Ogni classe definisce una **geometria** di base, che può essere: - **Punto** Per elementi singoli come alberi o sensori - **Linea** Per elementi estesi come tubazioni o percorsi - **Poligono** Per aree come aiuole, edifici o zone operative [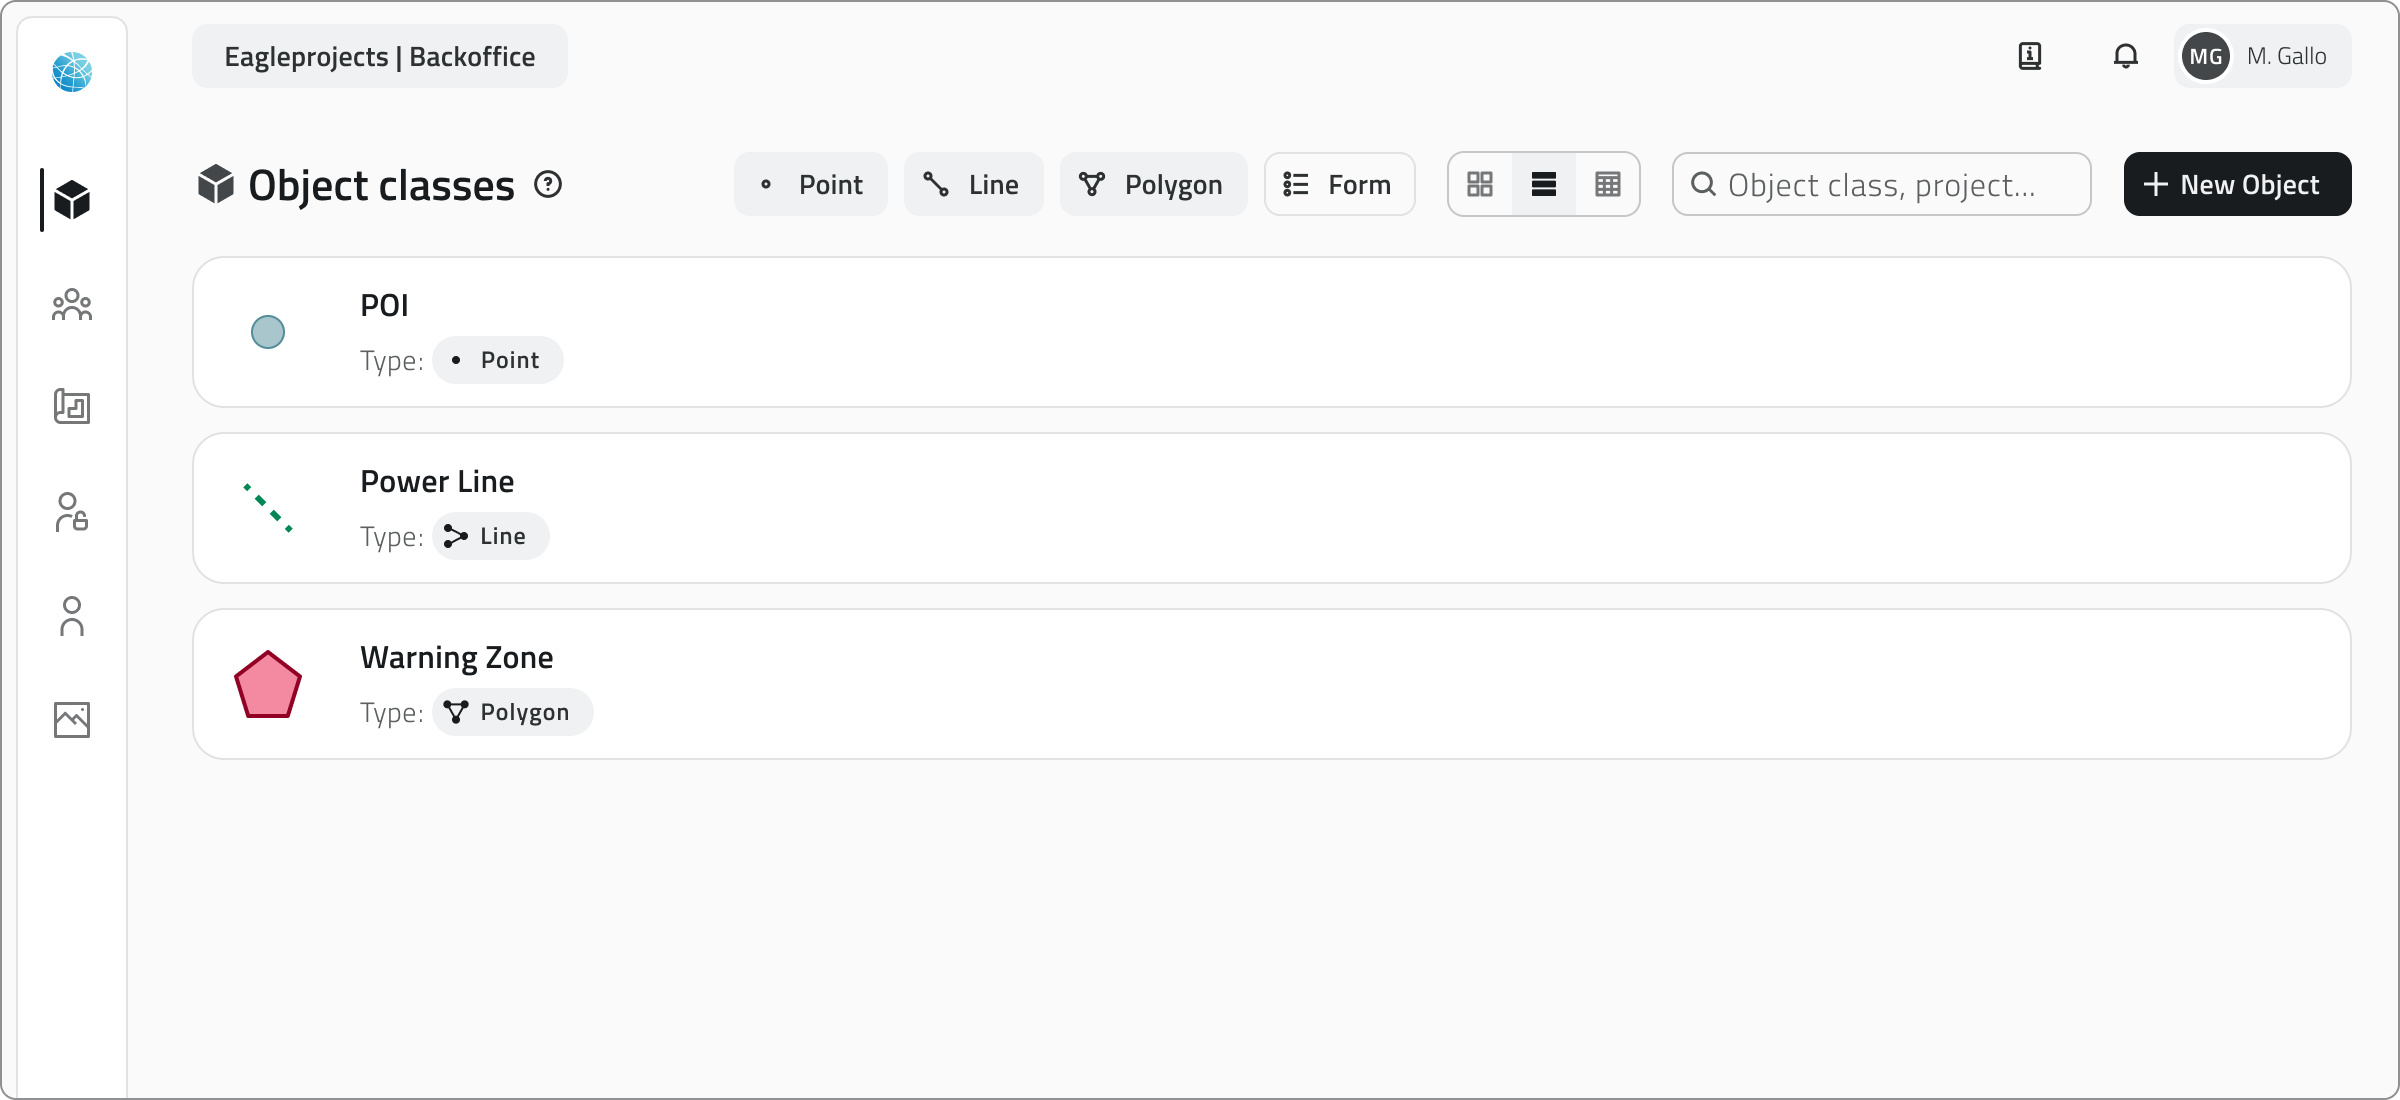](https://wiki.eaglearca.com/uploads/images/gallery/2026-03/5M41-objects-type.png) Le classi geometriche possono essere **stilizzate** con forme di base, colori e **stili condizionali**. Gli stili condizionali permettono di cambiare automaticamente l’aspetto degli oggetti in mappa in base al valore di uno o più attributi, ad esempio per distinguere stati operativi, livelli di criticità o soglie numeriche. (es: *stato = attivo → colore verde*). [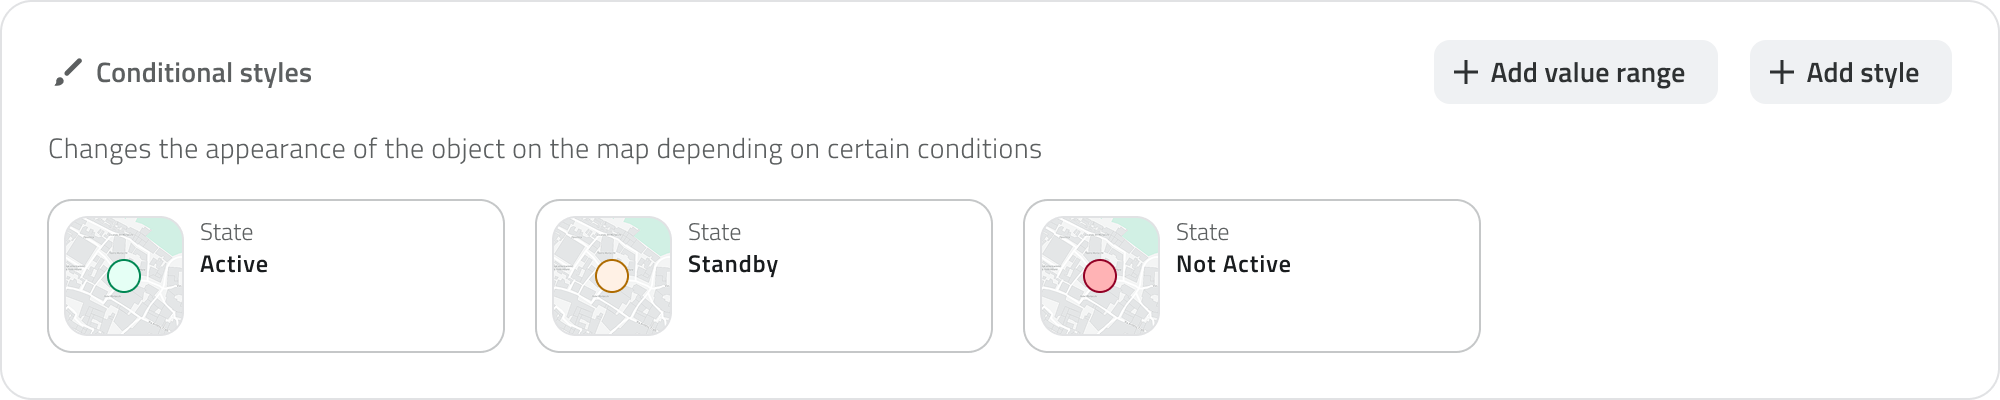](https://wiki.eaglearca.com/uploads/images/gallery/2025-12/lB42-conditional-style.png)È possibile rendere un **punto orientato**, cioè un punto orientato in una direzione specifica della mappa, utile per rappresentare elementi come telecamere o fari.
##### Classi Oggetto non vettoriali Chiamate **Form**. Definiscono gli attributi di oggetti che **non hanno rappresentazione geografica**. Servono per gestire informazioni non mappate, come schede di ispezione, controlli tecnici o elenchi di riferimento utilizzabili all’interno dei progetti. [](https://wiki.eaglearca.com/uploads/images/gallery/2025-12/5ho3-form.png) --- ### Liste Globali Le **Liste globali** sono classi oggetto di tipo Form che esistono a livello di organizzazione e **non dipendono da un singolo progetto**. Servono come archivi condivisi e centralizzati di dati riutilizzabili. Ad esempio: - elenco dei fornitori o dei modelli di sensori; - tipologie di materiali o categorie di rischio; - tabelle di codici o riferimenti usati da più progetti.Gli oggetti delle Global List vengono aggiunti dalla **Home** e non dentro al progetto.
--- ### Attributi delle Classi Oggetto Ogni Classe Oggetto è composta da **attributi**, ovvero i campi di dati che descrivono le informazioni da compilare per ogni oggetto della classe. Un attributo può essere di tipo: - **Campo di testo** Per nomi o descrizioni - **Campo numerico** Per valori quantitativi o misurazioni - **Lista di valori** Per scegliere un’opzione da un elenco predefinito - **Data** Per inserire date o scadenze - **Allegati** Per caricare file, immagini o video - **Dimensioni** Per registrare automaticamente grandezze misurabili (es. lunghezza, area, coordinate) - **Vero/Falso** Per campi booleani - **Lista oggetti** Per campi composti da più sotto-attributi, ad esempio un set di misure o parametri ripetuti [](https://wiki.eaglearca.com/uploads/images/gallery/2025-12/bfA4-attributes.png) Ogni attributo ha inoltre proprietà configurabili: - **Nome** Etichetta del campo - **Obbligatorietà** Indica se deve essere compilato - **Valore di default** Valore preimpostato ma modificabile se necessario - **Bloccato** Campo visibile ma non modificabile - **Attributo principale** L’attributo principale mostrato quando si interroga l’oggetto, utile per identificarlo rapidamente [](https://wiki.eaglearca.com/uploads/images/gallery/2025-12/Zsc5-attribute-configuration.png) --- ### Creazione e gestione La creazione e la modifica delle Classi Oggetto avvengono dal *[Backoffice](https://wiki.eaglearca.com/books/backoffice/page/create-and-manage-object-classes "Create and manage Object Classes")*, accessibile solo agli utenti con permessi adeguati. Dopo la pubblicazione, la classe diventa disponibile nei progetti e può essere usata per creare nuovi oggetti. --- ### In sintesi - Le **Classi Oggetto** definiscono la struttura e la rappresentazione dei dati. - Possono essere **geometriche** (visualizzate sulla mappa) o **form** (solo schede dati). - Le **Liste globali** sono Form condivisi tra progetti, utili per elenchi standardizzati. - Gli **attributi** definiscono le informazioni che ogni oggetto deve contenere. - I **punti orientati** permettono di rappresentare punti direzionati. - Solo utenti con *permesso backoffice* possono creare o modificare classi. --- ***Last update:** 28 May 2026*