Generating and deleting reports is only available if you have **edit permissions** for that template.
--- ### Generating a report **1.** From the left-side menu, click the **Report** icon (file-shaped icon) to open the dedicated section.  **2.** Select the desired template from the list to open the **Report view**. [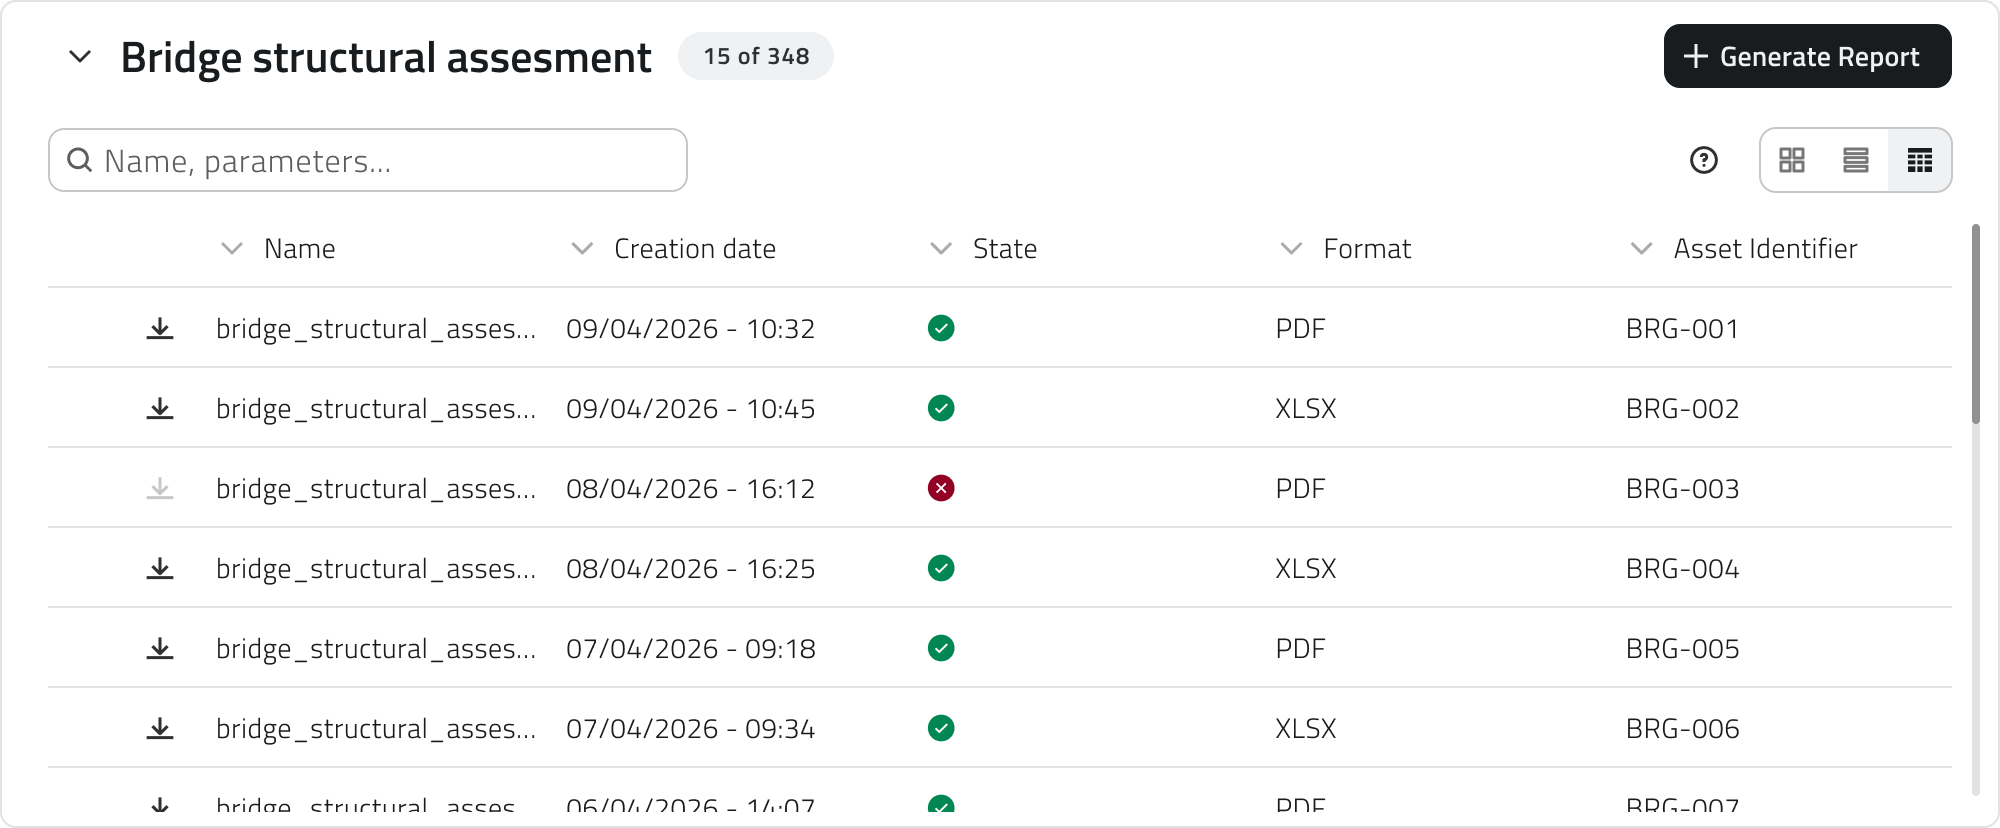](https://wiki.eaglearca.com/uploads/images/gallery/2026-05/report-view.png) **3.** Click the **Generate report** button in the top-right corner. [](https://wiki.eaglearca.com/uploads/images/gallery/2026-05/generate-report.png) **4.** A configuration window opens requiring: - the selection of **a format** from those available, configured in the Backoffice; - the completion of any **parameters**, which vary depending on the selected template and act as filters for the report content. Some parameters may be mandatory. [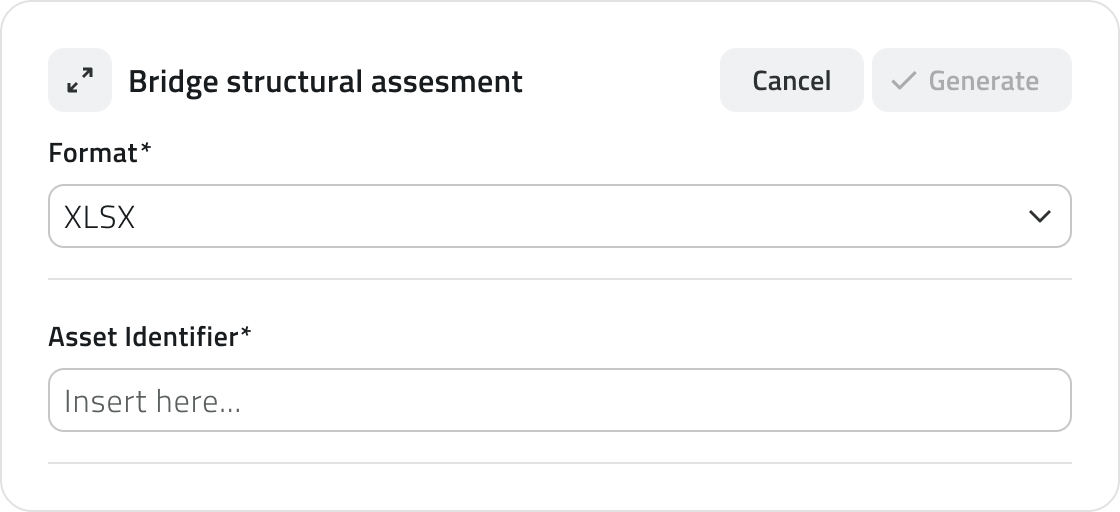](https://wiki.eaglearca.com/uploads/images/gallery/2026-05/4aBreport-configuration.png) **5.** Click **Confirm** to start the generation, or **Cancel** to close the window without proceeding.The **Confirm** button is disabled until all mandatory parameters have been filled in.
Report generation takes a few moments. **Do not leave the page during the process.** The progress status is visible directly in the report row, where the download button shows a spinner until completion.
--- ### Report information Once generation has started, the following information is shown for each element in the Report view: - **Name** of the report - **Creation date** (empty until generation is complete) - **Status** (success or error; empty if generation has not yet concluded) - **Selected** **format** - **Parameters** entered during configuration --- ### Downloading and viewing a report Once generation is complete, the report can be **downloaded** using the download button on the element row. Alternatively, clicking the **blue Open button** that appears when hovering over the element opens the **report details**, which shows all associated information. [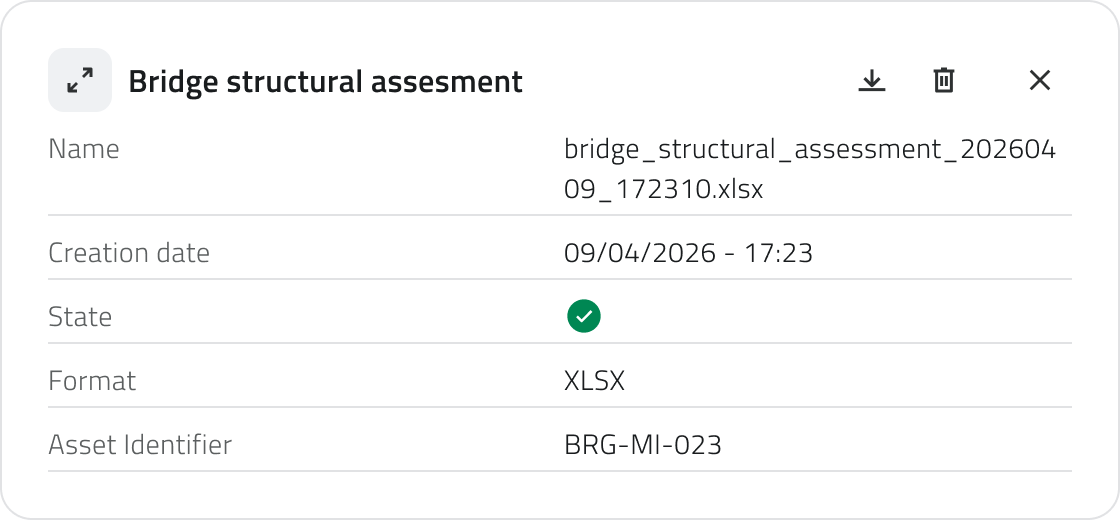](https://wiki.eaglearca.com/uploads/images/gallery/2026-05/sKxreport-details.png) If generation did not complete successfully, the error message is visible at the top of the report details. [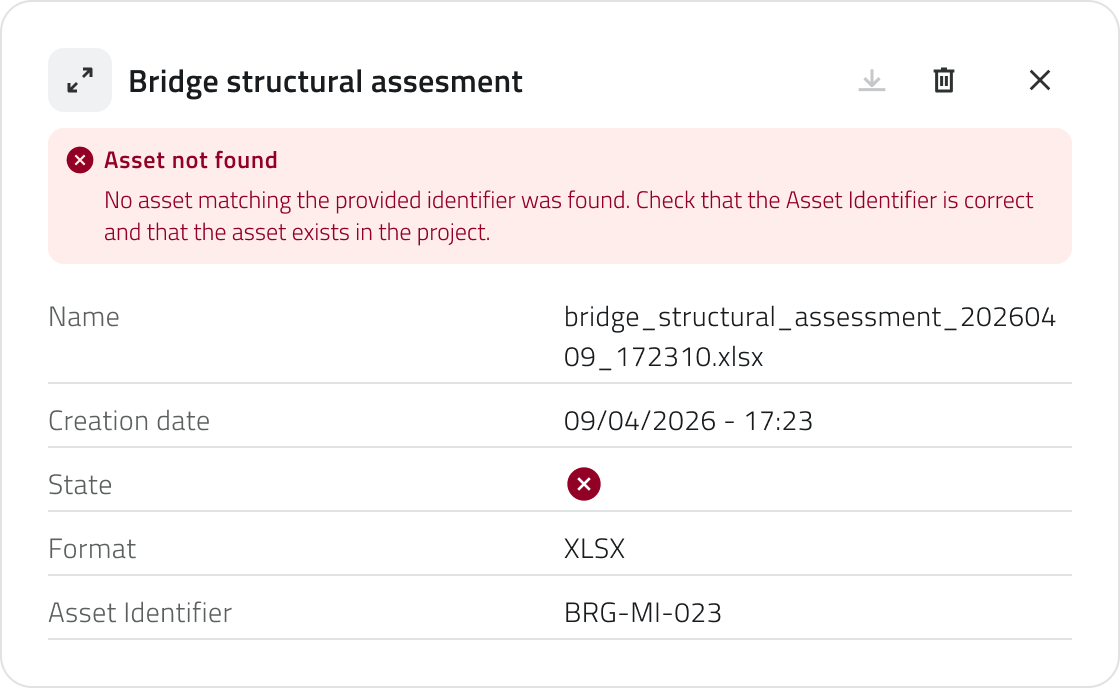](https://wiki.eaglearca.com/uploads/images/gallery/2026-05/report-error.png)Reports **cannot** be edited after generation.
--- ### Deleting a report To delete a report, open the **report details** and click the **Delete** button, then confirm the operation. Alternatively, select one or more reports from the list: the **Delete** button will appear in the top-right corner of the view. --- ##### Links - *[Navigating between views](https://wiki.eaglearca.com/books/app-features/page/navigating-between-views "Navigating between views")* - *[Managing objects in the project](https://wiki.eaglearca.com/books/app-features/page/managing-objects-in-the-project "Managing objects in the project")* ---  **Italian version** Questa sezione spiega come generare, consultare e gestire i report all'interno del progetto. I report vengono prodotti a partire da **template predefiniti** e possono essere scaricati nei formati disponibili.La generazione e l'eliminazione dei report sono disponibili solo se si dispone dei **permessi di modifica** per quel template.
--- ### Generare un report **1.** Dal menu laterale sinistro, clicca sull'icona **Report** (icona a forma di file) per aprire la sezione dedicata.  **2.** Seleziona il template desiderato dalla lista per aprire la **vista Report**. [](https://wiki.eaglearca.com/uploads/images/gallery/2026-05/report-view.png) **3.** Clicca sul pulsante **Genera report** in alto a destra. [](https://wiki.eaglearca.com/uploads/images/gallery/2026-05/generate-report.png) **4.** Si apre una finestra di configurazione che richiede: - la scelta di **un formato** tra quelli disponibili, configurati nel Backoffice; - la compilazione degli eventuali **parametri**, che variano in base al template selezionato e fungono da filtri per il contenuto del report. Alcuni parametri possono essere obbligatori. [](https://wiki.eaglearca.com/uploads/images/gallery/2026-05/4aBreport-configuration.png) **5.** Clicca **Conferma** per avviare la generazione, oppure **Annulla** per chiudere la finestra senza procedere.Il pulsante **Conferma** è disabilitato finché tutti i parametri obbligatori non sono stati compilati.
La generazione del report richiede alcuni istanti. **Non lasciare la pagina durante il processo.** Lo stato di avanzamento è visibile direttamente nella riga del report, dove il pulsante di download mostra uno spinner fino al completamento.
--- ### Informazioni del report Una volta avviata la generazione, nella vista Report vengono mostrate le seguenti informazioni per ogni elemento: - **Nome** del report - **Data di creazione** (vuota fino al completamento della generazione) - **Stato** (successo o errore; vuoto se la generazione non è ancora conclusa) - **Formato** **selezionato** - **Parametri** inseriti in fase di configurazione --- ### Scaricare e consultare un report Al termine della generazione il report può essere **scaricato** tramite il pulsante di download presente sulla riga dell'elemento. In alternativa, cliccando sul **pulsante blu Apri** che compare al passaggio del mouse sull'elemento si apre il **dettaglio report**, che mostra tutte le informazioni associate. [](https://wiki.eaglearca.com/uploads/images/gallery/2026-05/sKxreport-details.png) Se la generazione non è andata a buon fine, il messaggio di errore è visibile in cima al dettaglio del report. [](https://wiki.eaglearca.com/uploads/images/gallery/2026-05/report-error.png)I report **non** possono essere modificati dopo la generazione.
--- ### Eliminare un report Per eliminare un report apri il **dettaglio report** e clicca il pulsante **Elimina**, quindi conferma l'operazione. In alternativa, seleziona uno o più report dalla lista: comparirà il pulsante **Elimina** in alto a destra della vista. --- #### Collegamenti - *[Navigare tra le viste](https://wiki.eaglearca.com/books/app-features/page/navigating-between-views "Navigating between views")* - *[Gestire gli oggetti nel progetto](https://wiki.eaglearca.com/books/app-features/page/managing-objects-in-the-project "Managing objects in the project")* --- ***Last update:** 22 May 2026*