Available only to users with **backoffice-admin** permission.
--- ### Create a new automation **1.** Log in to the Backoffice and open the **Automations** section from the side menu. [](https://wiki.eaglearca.com/uploads/images/gallery/2026-05/automation-section-button.png) **2.** Click **New Automation** in the upper-right corner. [](https://wiki.eaglearca.com/uploads/images/gallery/2026-05/new-automation-button.png) **3.** Enter the **name** of the automation in the page header. This field is required. **4.** Select the **groups** to associate with the automation using the multi-search field.Groups define the visibility of the automation in the app. **5.** Set the **status** of the automation using the toggle at the top. It is active by default. If the status is inactive, the configuration sections are locked. [](https://wiki.eaglearca.com/uploads/images/gallery/2026-05/configuration-header.png) The page is divided into two areas: - **On the left** is the flow summary, with the trigger card and the cards for any added actions - **On the right** is the configuration panel for the selected section [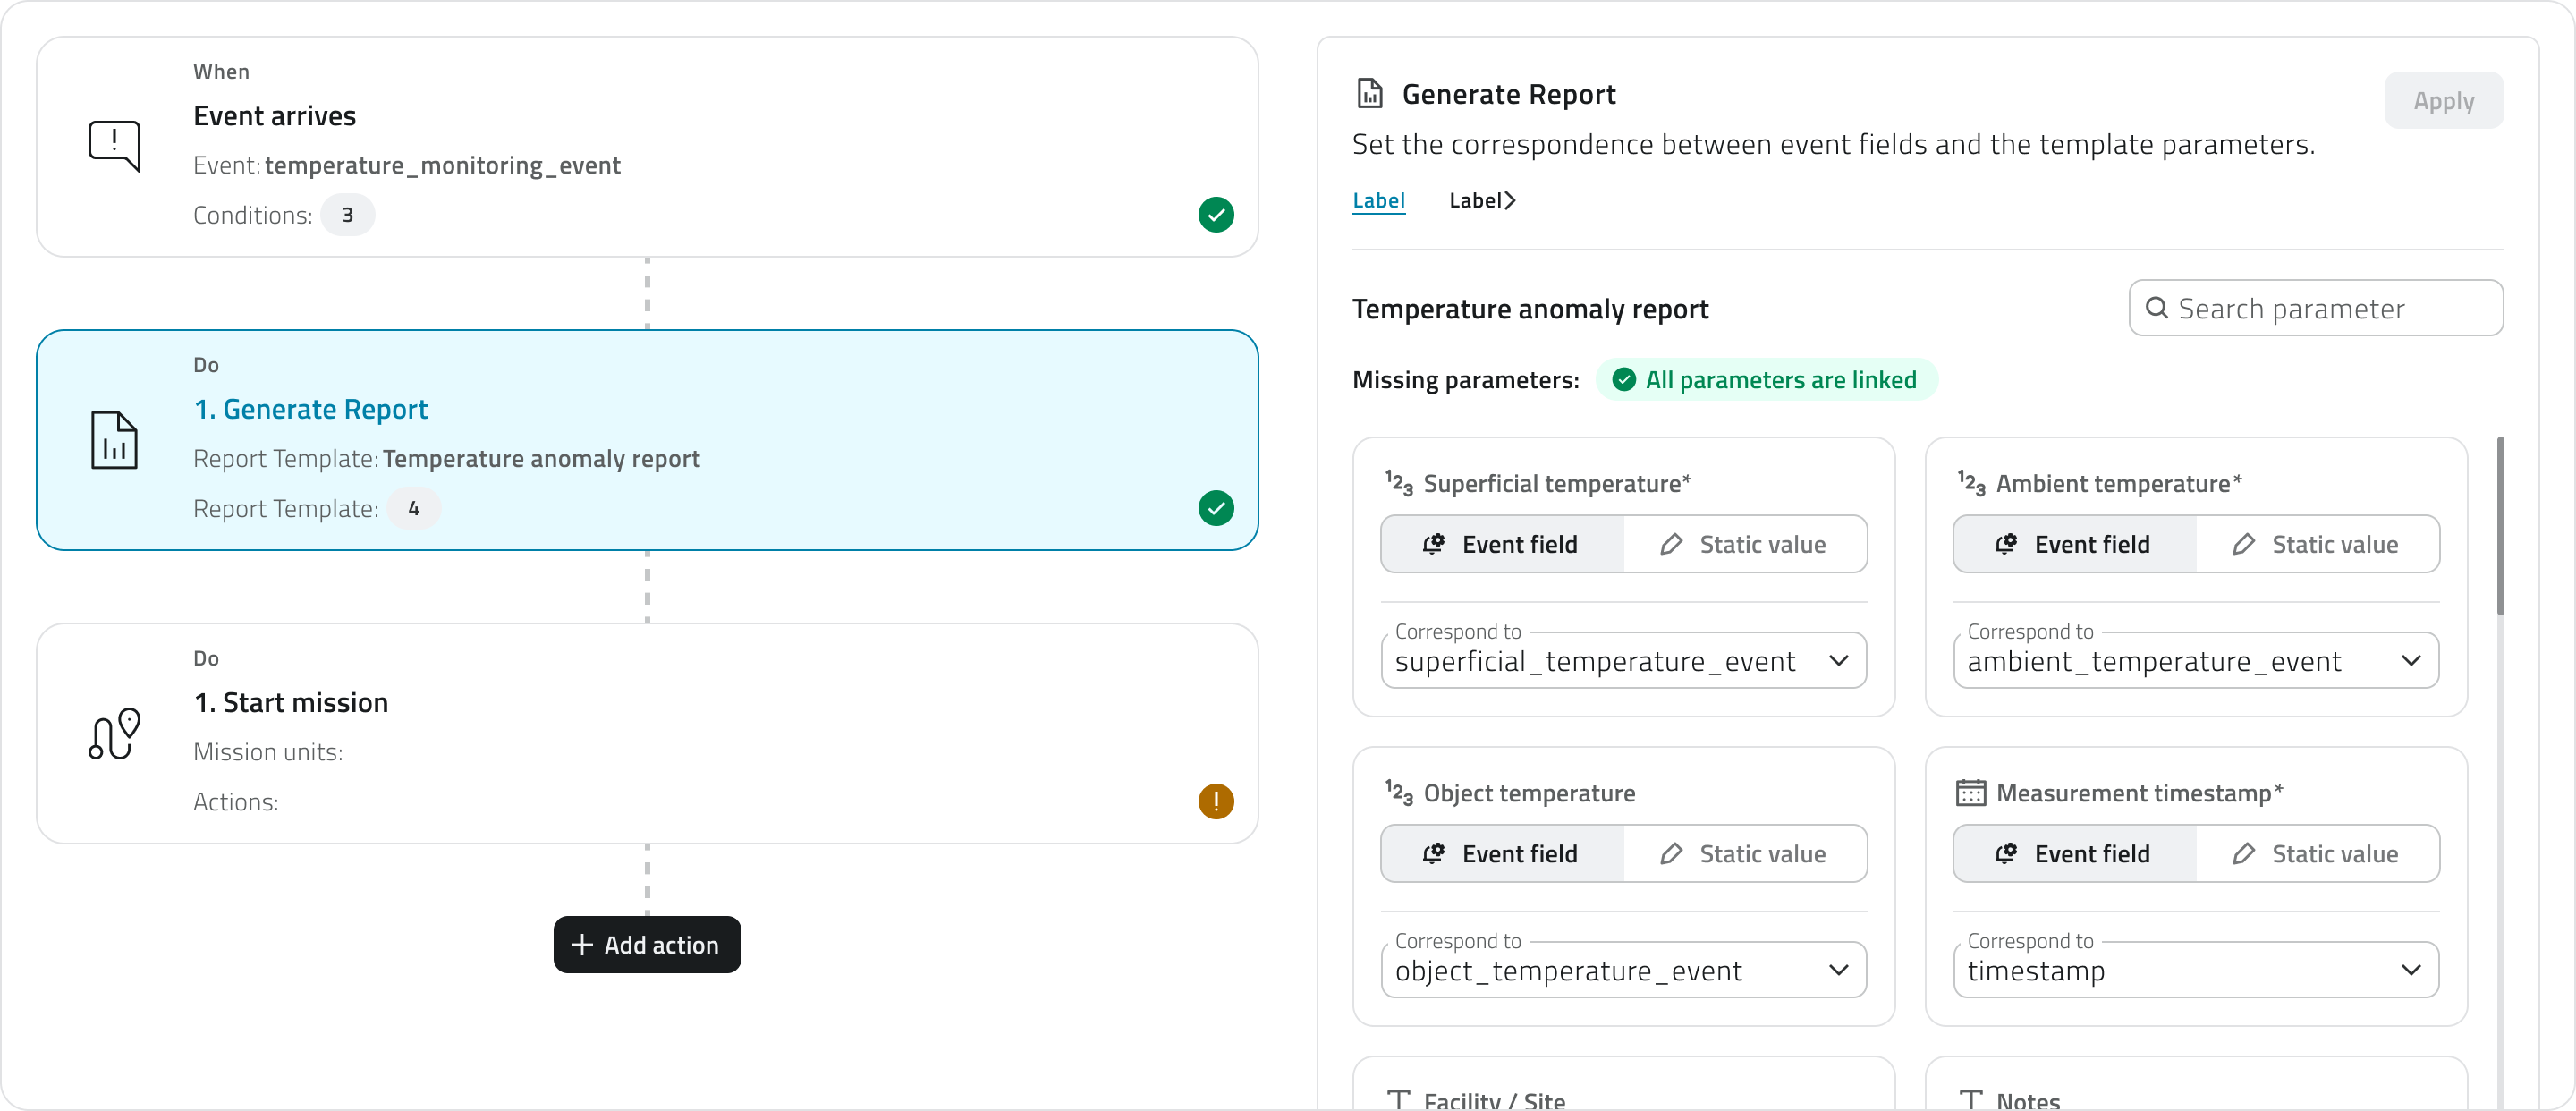](https://wiki.eaglearca.com/uploads/images/gallery/2026-05/automation-timeline-and-configuration.png) The trigger and action cards display their status via an icon: an **exclamation mark on a yellow background** (Pending) indicates a configuration that is **incomplete** or **not yet confirmed**, while a **checkmark on a green background** (Completed) indicates a complete and confirmed configuration.The page has **two distinct save levels**. The **Apply** button confirms the configuration of the **individual section** and updates the card status. The **Save** button in the upper-right corner saves the entire automation definitively.
**6.** *[Configure the trigger ↓](https://wiki.eaglearca.com/link/143#bkmrk-configurare-il-trigg)* to define when the automation should run. **7.** *[Add and configure actions ↓](https://wiki.eaglearca.com/link/143#bkmrk-aggiungere-e-configu)* to choose what the platform should do when the trigger fires. **8.** Save the automation by clicking **Save** in the upper-right corner of the page. The button is enabled only when the name, groups, trigger, and all configured actions are correctly set up and confirmed. 💡 **Tip**: Before saving, make sure all cards are in the Completed state. A card in the Pending state prevents the automation from being saved. --- ### Configure the trigger The trigger defines when the automation should run. It is the first section to complete: until the trigger is configured and confirmed, the button to add actions is not available. [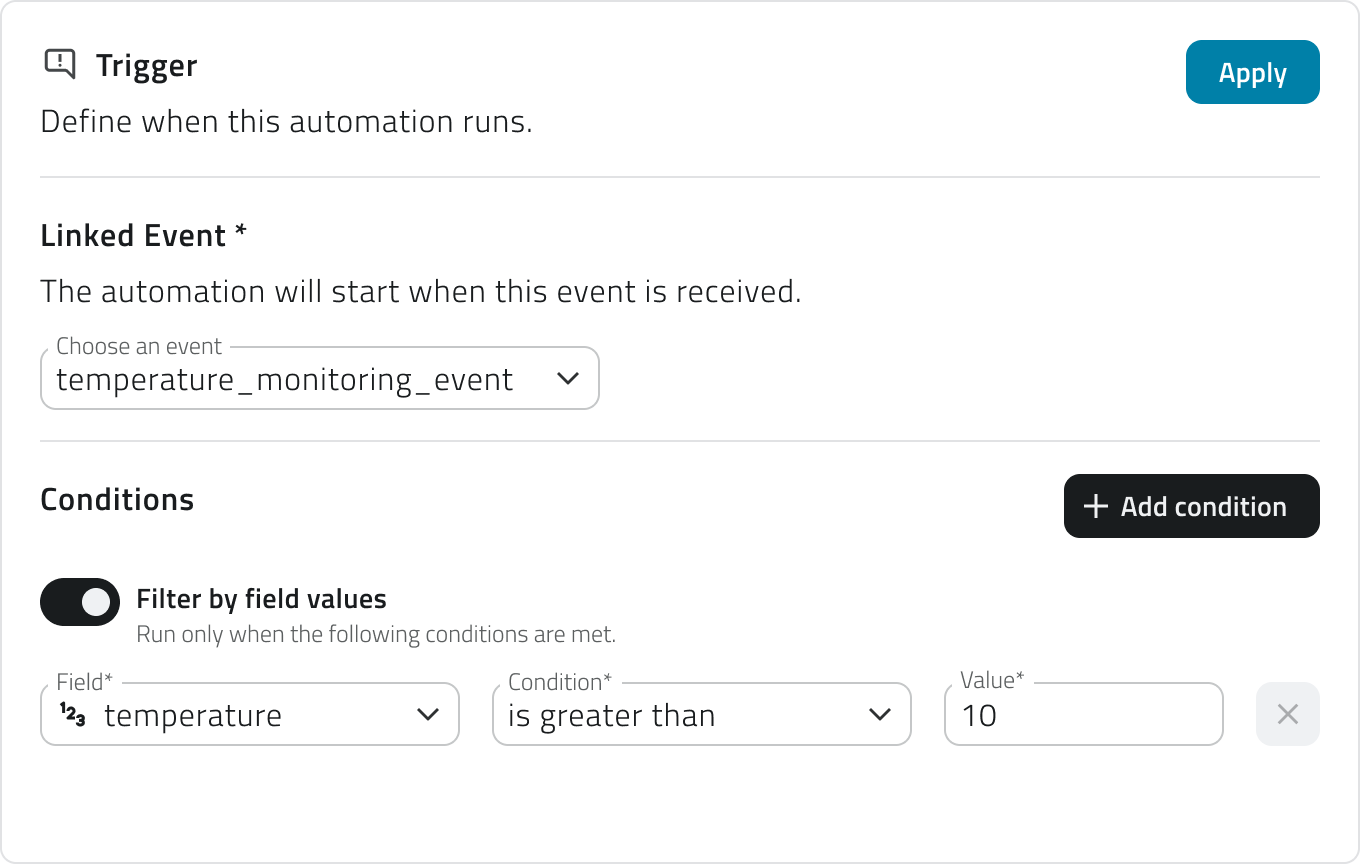](https://wiki.eaglearca.com/uploads/images/gallery/2026-05/trigger-configuration.png) **1.** Select the **linked event** from the dropdown menu. The list shows all events configured for the organization. Events already associated with another automation are not available. **2.** If you want the automation to activate only when specific conditions are met, enable the **Filter by field values** toggle. In this case, for each condition you will need to fill in three required fields: - **Field** Select one of the fields mapped in the event. Each field is accompanied by an icon indicating the data type (text, number, date, boolean). - **Condition** Select the condition, for example equal to, greater than, less than, etc. The list of conditions depends on the data type. - **Value** Enter the comparison value [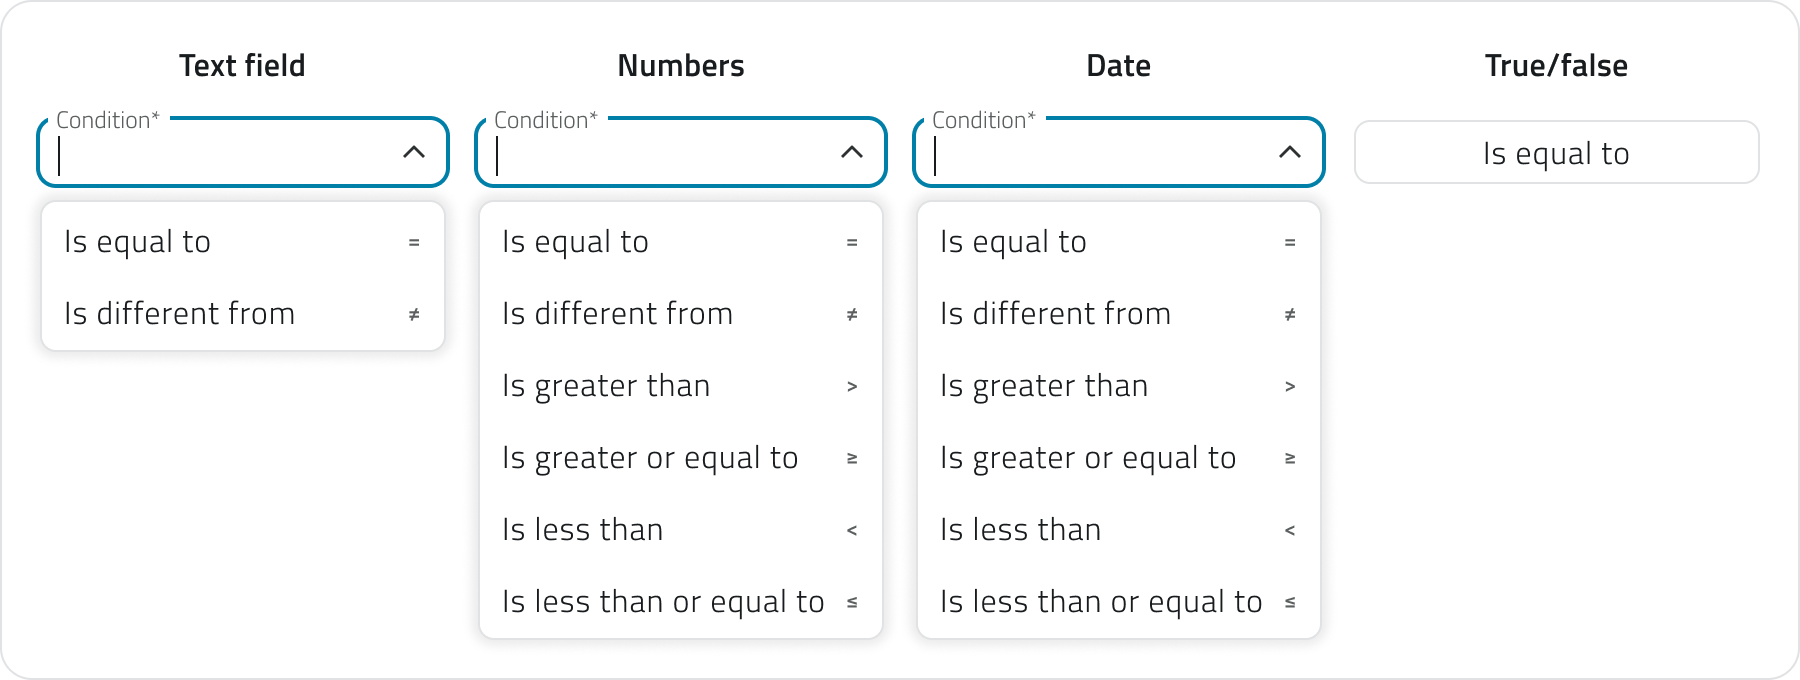](https://wiki.eaglearca.com/uploads/images/gallery/2026-05/conditions.png) You can add more conditions using the **Add condition** button. If multiple conditions are present, all of them must be satisfied simultaneously to activate the trigger. If you don't add any conditions, the automation fires **every time the event is received**. **3.** Click **Apply** to confirm the trigger. The card will move to the **Completed** state and the button to add actions will become available.If you later change the linked event, all already configured conditions will be reset. You can undo the change via **Discard changes** to restore the previous configuration.
--- ### Add and configure actions Once the trigger is confirmed, click **Add action** to choose the type of action to execute. The available actions depend on the entity the event selected in the trigger is linked to. [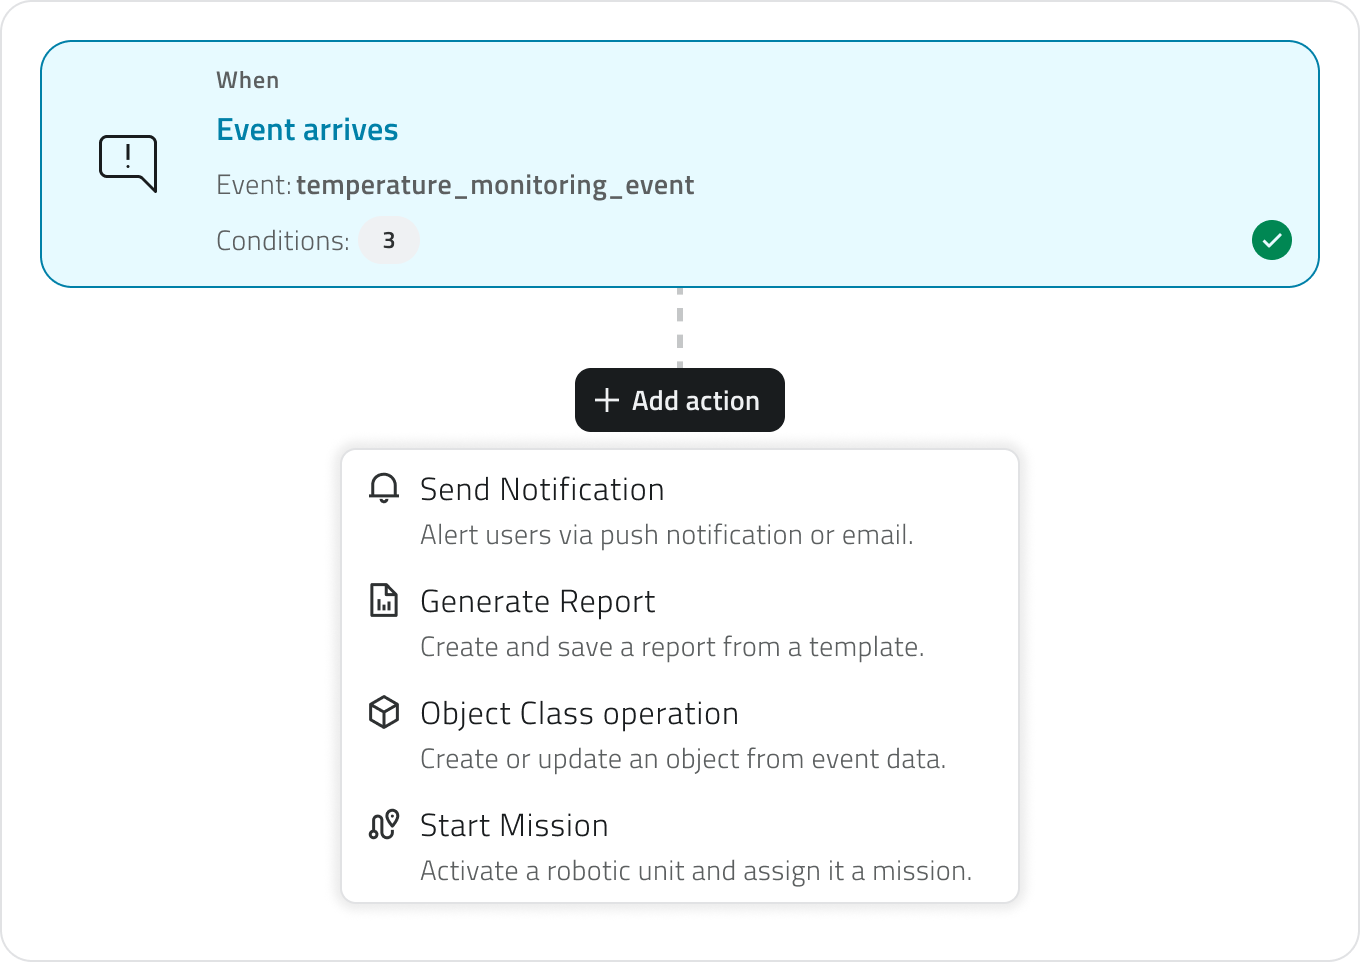](https://wiki.eaglearca.com/uploads/images/gallery/2026-05/select-action.png) If the event is linked to a **project**, an **object**, or a **sensor**, **all action types** are available. If the event is linked to an **organization** or a **device**, only **send notification** is available. The available action types are: - [*Send notification ↓*](https://wiki.eaglearca.com/link/143#bkmrk-invia-notifica) Sends an email or push notification to the selected recipients. - [*Generate report ↓*](https://wiki.eaglearca.com/link/143#bkmrk-genera-report) Automatically generates a report from a configured template. - [*Object class operation ↓*](https://wiki.eaglearca.com/link/143#bkmrk-operazione-su-classe) Creates or updates an instance of an existing object class. - [*Start mission ↓*](https://wiki.eaglearca.com/link/143#bkmrk-avvia-missione) Automatically starts a mission for a drone or a robot dog. Once the type is selected, the configuration panel opens on the right. The configuration is structured in progressive steps: each step unlocks only after the previous one has been completed and confirmed via the **Continue** button. When you have finished configuring the action, click **Apply** to add it to the flow. The action card will appear in the left column with a summary of the main settings. For each action you must also define the **error behavior**, choosing whether the system should **continue with the next action** or **stop the entire automation**. [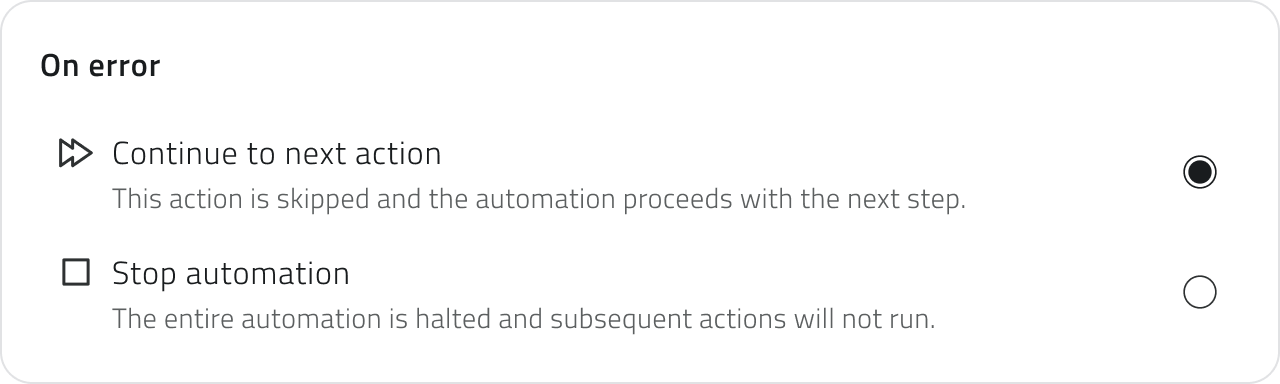](https://wiki.eaglearca.com/uploads/images/gallery/2026-05/error-behavior.png) You can add an unlimited number of actions. To change the execution order, drag the cards up or down in the left column. The order in which the cards appear corresponds to the actual execution order. 💡 **Tips**: - If the actions are independent of each other, choose to continue with the next action to prevent a single issue from blocking the entire flow - If the actions are chained and depend on one another, choose to stop the automation to avoid inconsistent partial executions #### Send notification Configure the automatic sending of an email or push notification. **1.** Select the **notification type**: Email or Push. Each action handles a single channel. To send both email and push, add two separate actions. [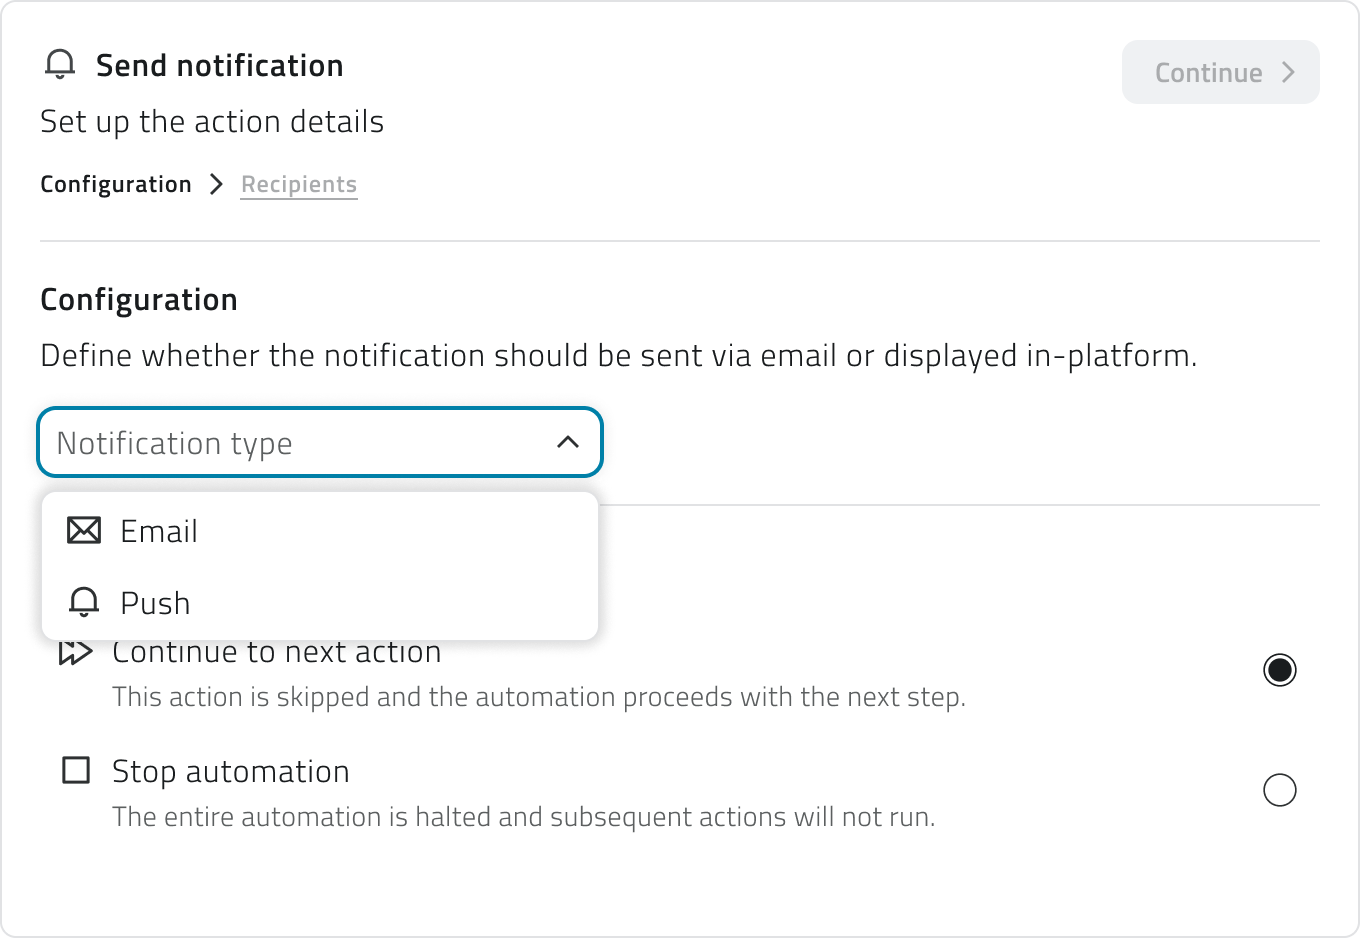](https://wiki.eaglearca.com/uploads/images/gallery/2026-05/notification-type-selection.png) **2.** Click **Continue** to access the **Recipients** section. **3.** You can add optional conditions to limit delivery to specific occurrences of the event, filtering by severity level (info, warning, success, error) or by specific event name. **4.** Add the **recipients** by selecting users or groups. For email notifications you can also add external email addresses. [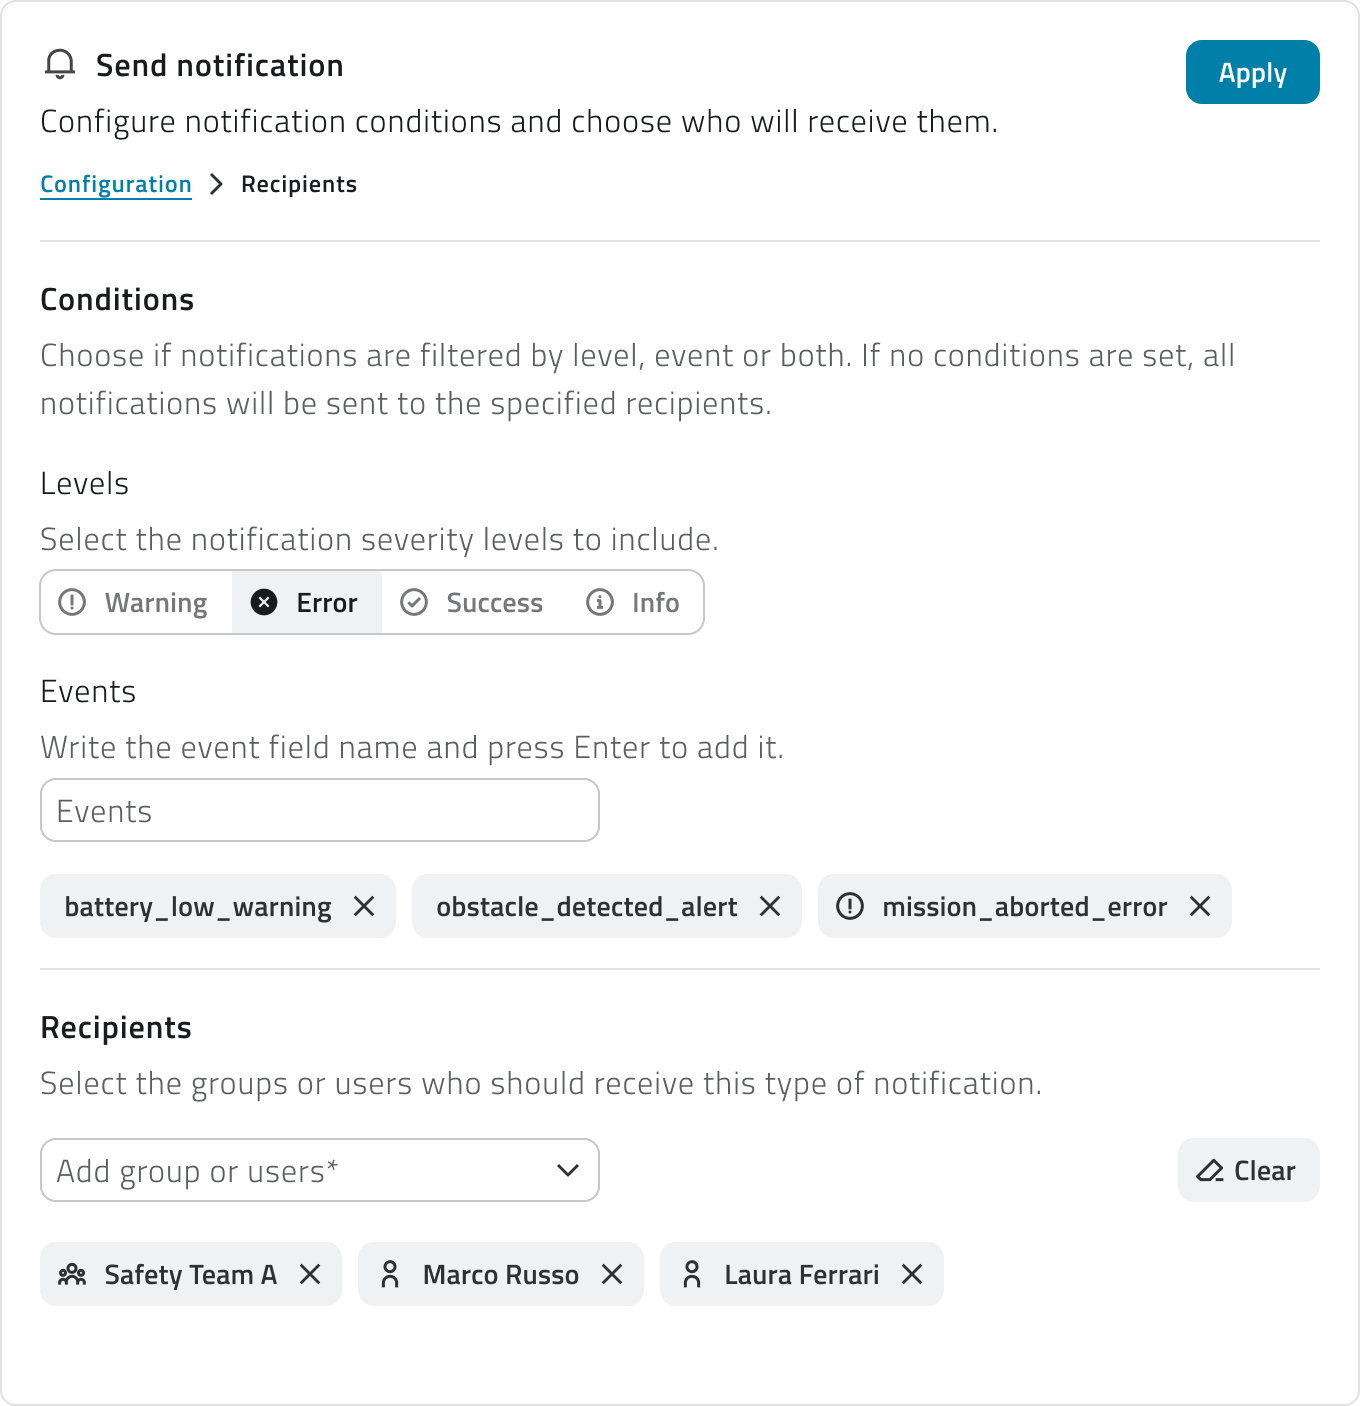](https://wiki.eaglearca.com/uploads/images/gallery/2026-05/recipients-panel.png) **5.** Click **Apply** to confirm. #### Generate report Configure the automatic generation of a report. **1.** Select the **report template** from the dropdown menu. The list shows the templates available in the Reports section of the Backoffice. [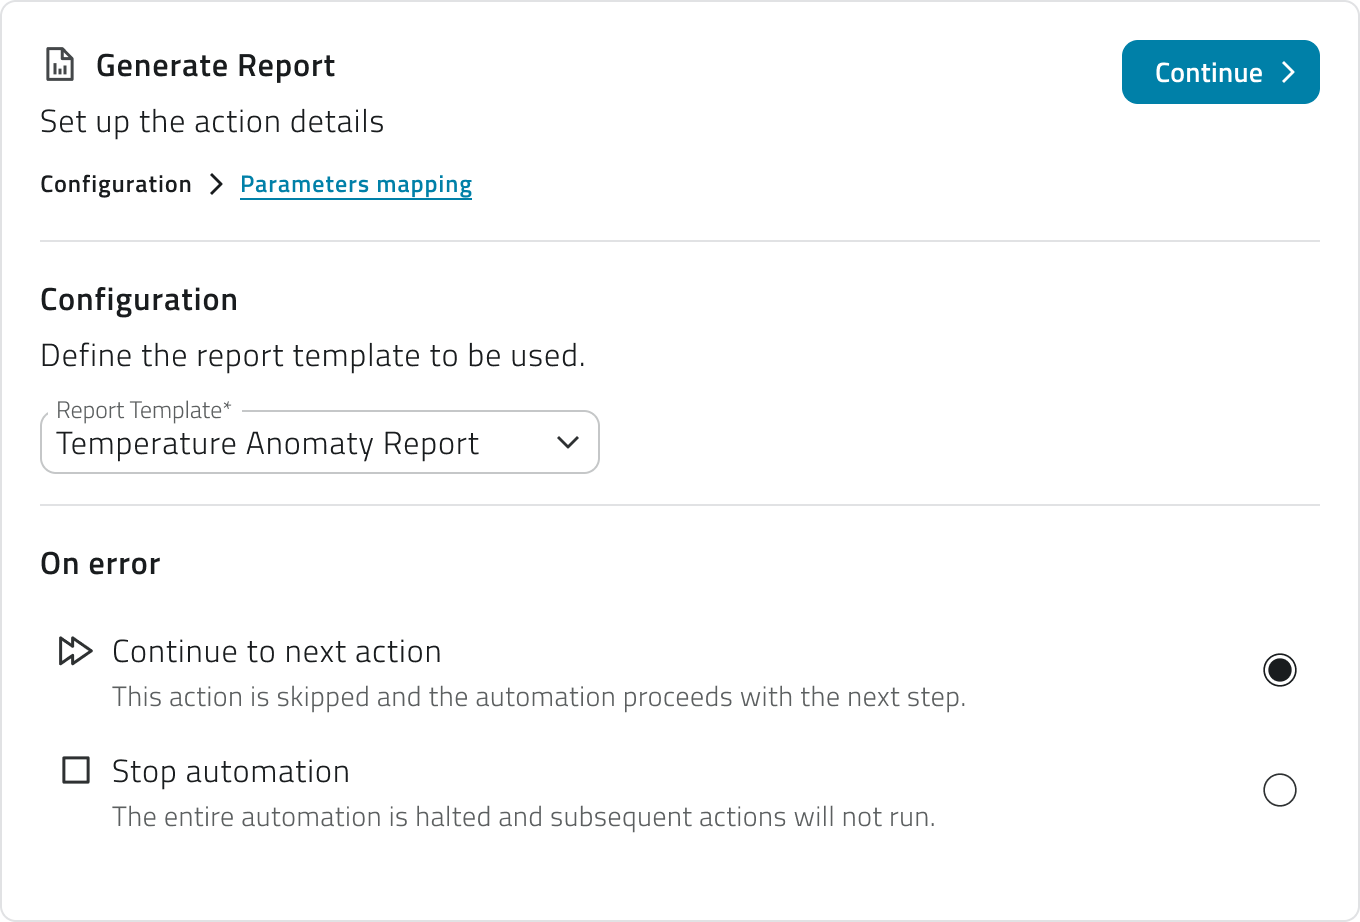](https://wiki.eaglearca.com/uploads/images/gallery/2026-05/report-template-selection.png) **2.** Click **Continue** to access the **Parameters mapping** section. **3.** Choose how to populate each template parameter: with the **event field**, where the value is read from a field of the received event that you will select from a dropdown menu, or with a **static value**, by entering a fixed value manually. [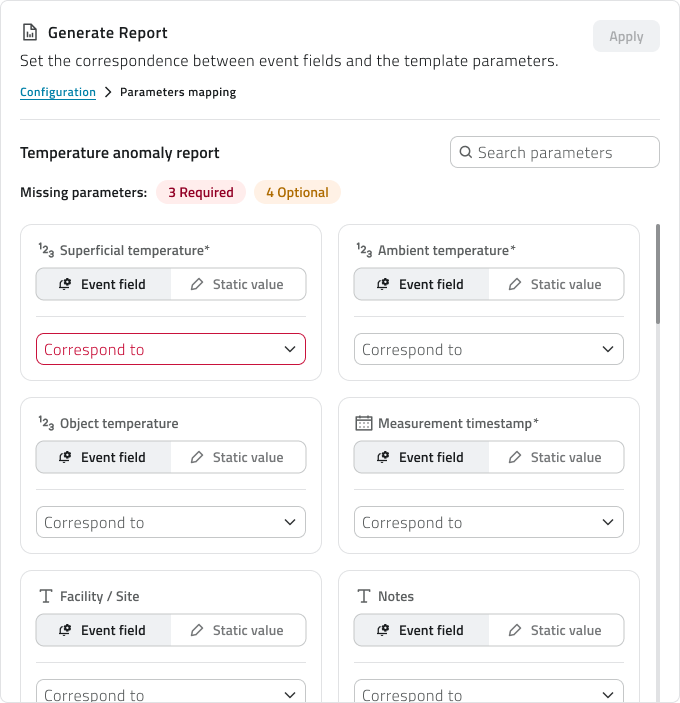](https://wiki.eaglearca.com/uploads/images/gallery/2026-05/parameters-mapping.png) **Required parameters** are marked with an asterisk and must all be populated. A counter updated in real time showing the missing parameters is displayed at the top. A search bar allows you to filter the parameter list. **4.** Click **Apply** to confirm.If you **change the report template**, the parameter configuration will be **reset** because the available parameters depend on the selected template.
#### Object class operation Configure the automatic creation or update of an object class instance. **1.** Select the **object class** from the dropdown menu. **2.** Select the **operation** to perform: - **Create object** Creates a new instance of the class. Available for classes of **type Point and Form**. - **Modify object** Updates an existing instance. Available for all class types. [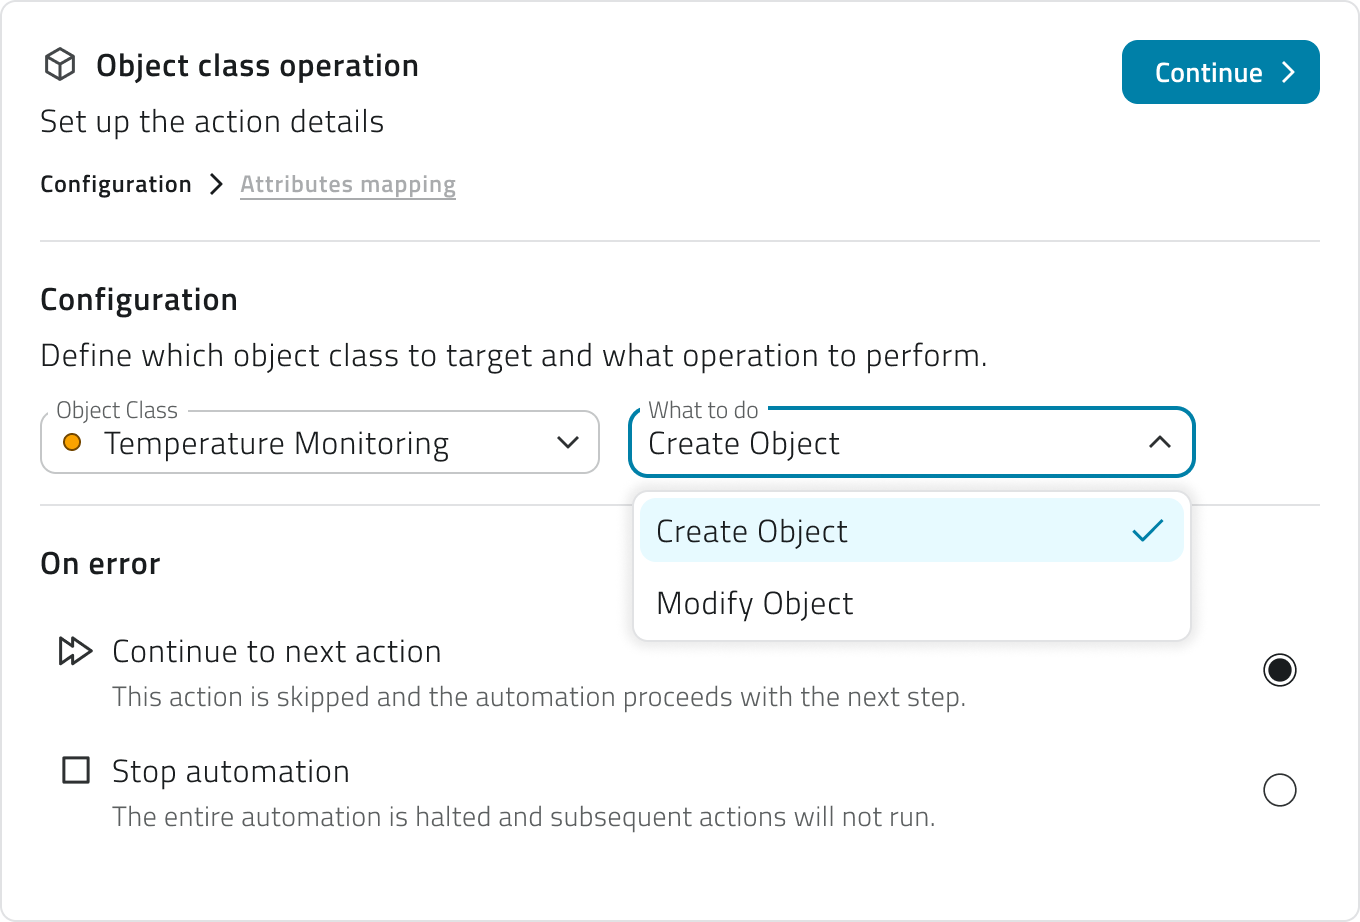](https://wiki.eaglearca.com/uploads/images/gallery/2026-05/ptxobject-class-selection.png)The **Point creation** action is only available if the linked event has a coordinates field correctly configured.
**3.** Click **Continue** to access the **Attributes mapping** section. **4.** Choose how to populate each class attribute: with the **event field**, where the value is read from a field of the received event that you will select from a dropdown menu, or with a **static value**, by entering a fixed value manually. [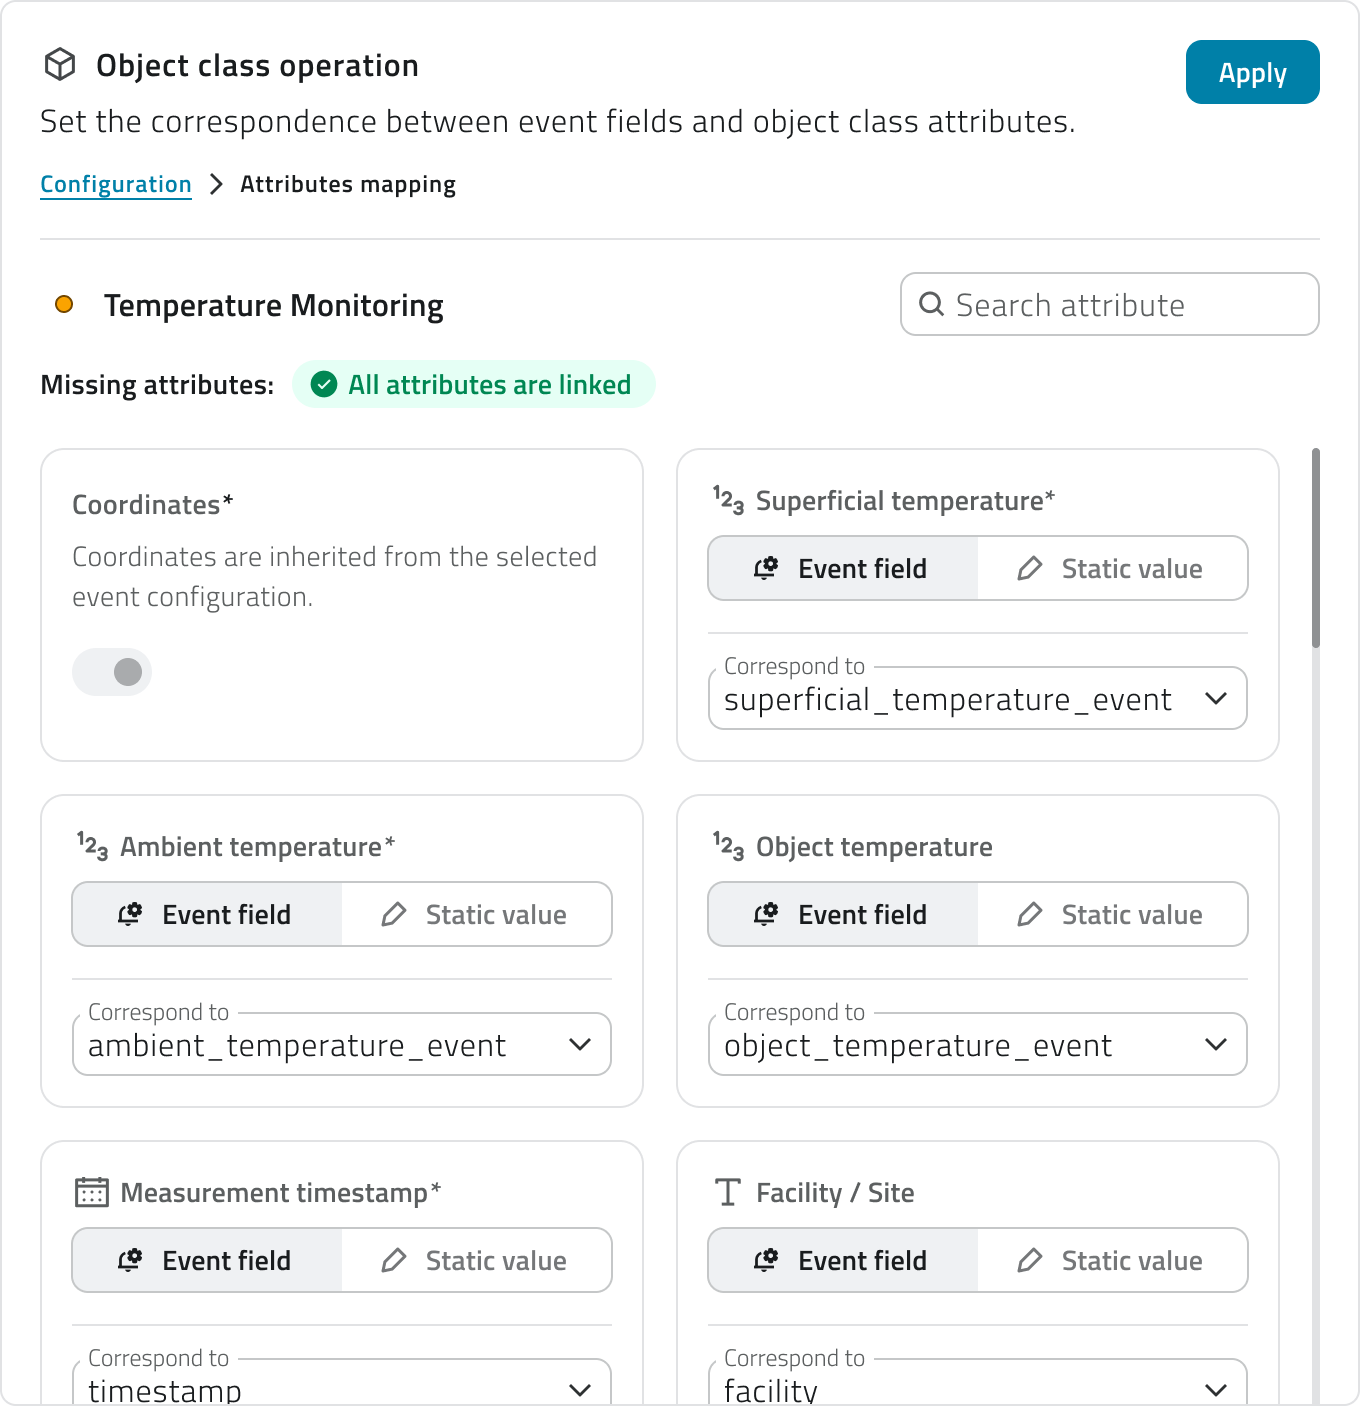](https://wiki.eaglearca.com/uploads/images/gallery/2026-05/attribute-mapping.png) **Required attributes** are marked with an asterisk and must all be populated. A counter updated in real time showing the missing attributes is displayed at the top. A search bar allows you to filter the attribute list. For classes of type **Point**, the **Coordinates** field is managed automatically: during creation it is populated from the coordinates field configured in the event and cannot be edited manually. During a modification it is optional. For the **Modify object** operation, the **Unique identifier** field is required to indicate which instance to update. It can be mapped from an event field or entered as a static value. **5.** Click **Apply** to confirm.If you **change the object class**, the attribute mapping will be **reset** and the selected operation will be invalidated.
#### Start mission Configure the automatic launch of a robotic mission.This action is only available if the linked event has a coordinates field correctly configured.
**1.** Select the **unit type**: **Robot Dog** or **Drone**. **2.** Select the specific **unit**. For a drone, you must also select the associated **hangar**: the drone + hangar pair is treated as the unique reference for the action. [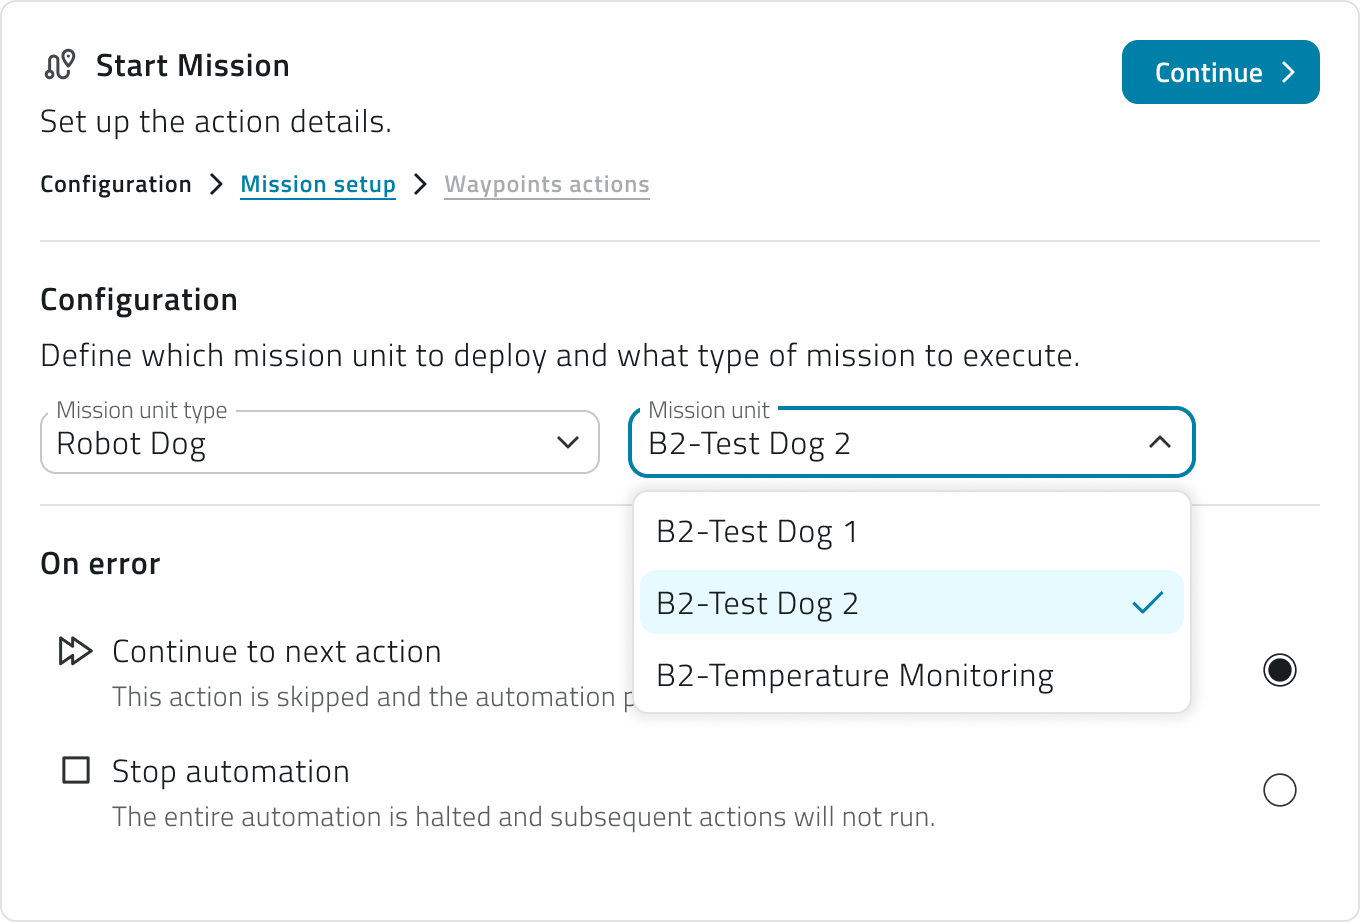](https://wiki.eaglearca.com/uploads/images/gallery/2026-05/mission-unit-selection.png) **3.** Click **Continue** to access the **Mission setup** section. The fields to fill in vary depending on the selected unit. For **Robot Dog**: - **Mission name** - **Mission type** - **Profile** - **Mission map**, selectable via the **Browse map** button, which opens a viewer where you can **search**, **select**, and **preview** the **maps available for the organization**. Only outdoor maps are shown - **Notes** (optional) For **Drone**: - **Mission name** - **Take-off safety height** - **Take-off speed** - **Global height** - **Global speed** - **Profile** - **Notes** (optional) [](https://wiki.eaglearca.com/uploads/images/gallery/2026-05/mission-setup.png) **4.** Click **Continue** to access the **Waypoint actions** section. The waypoint coordinates are populated automatically from the coordinates field configured in the event and cannot be edited manually. Using the **Add action** button you can configure one or more actions for the unit to perform at the target point. The available actions depend on the selected profile and the add-ons associated with the unit. [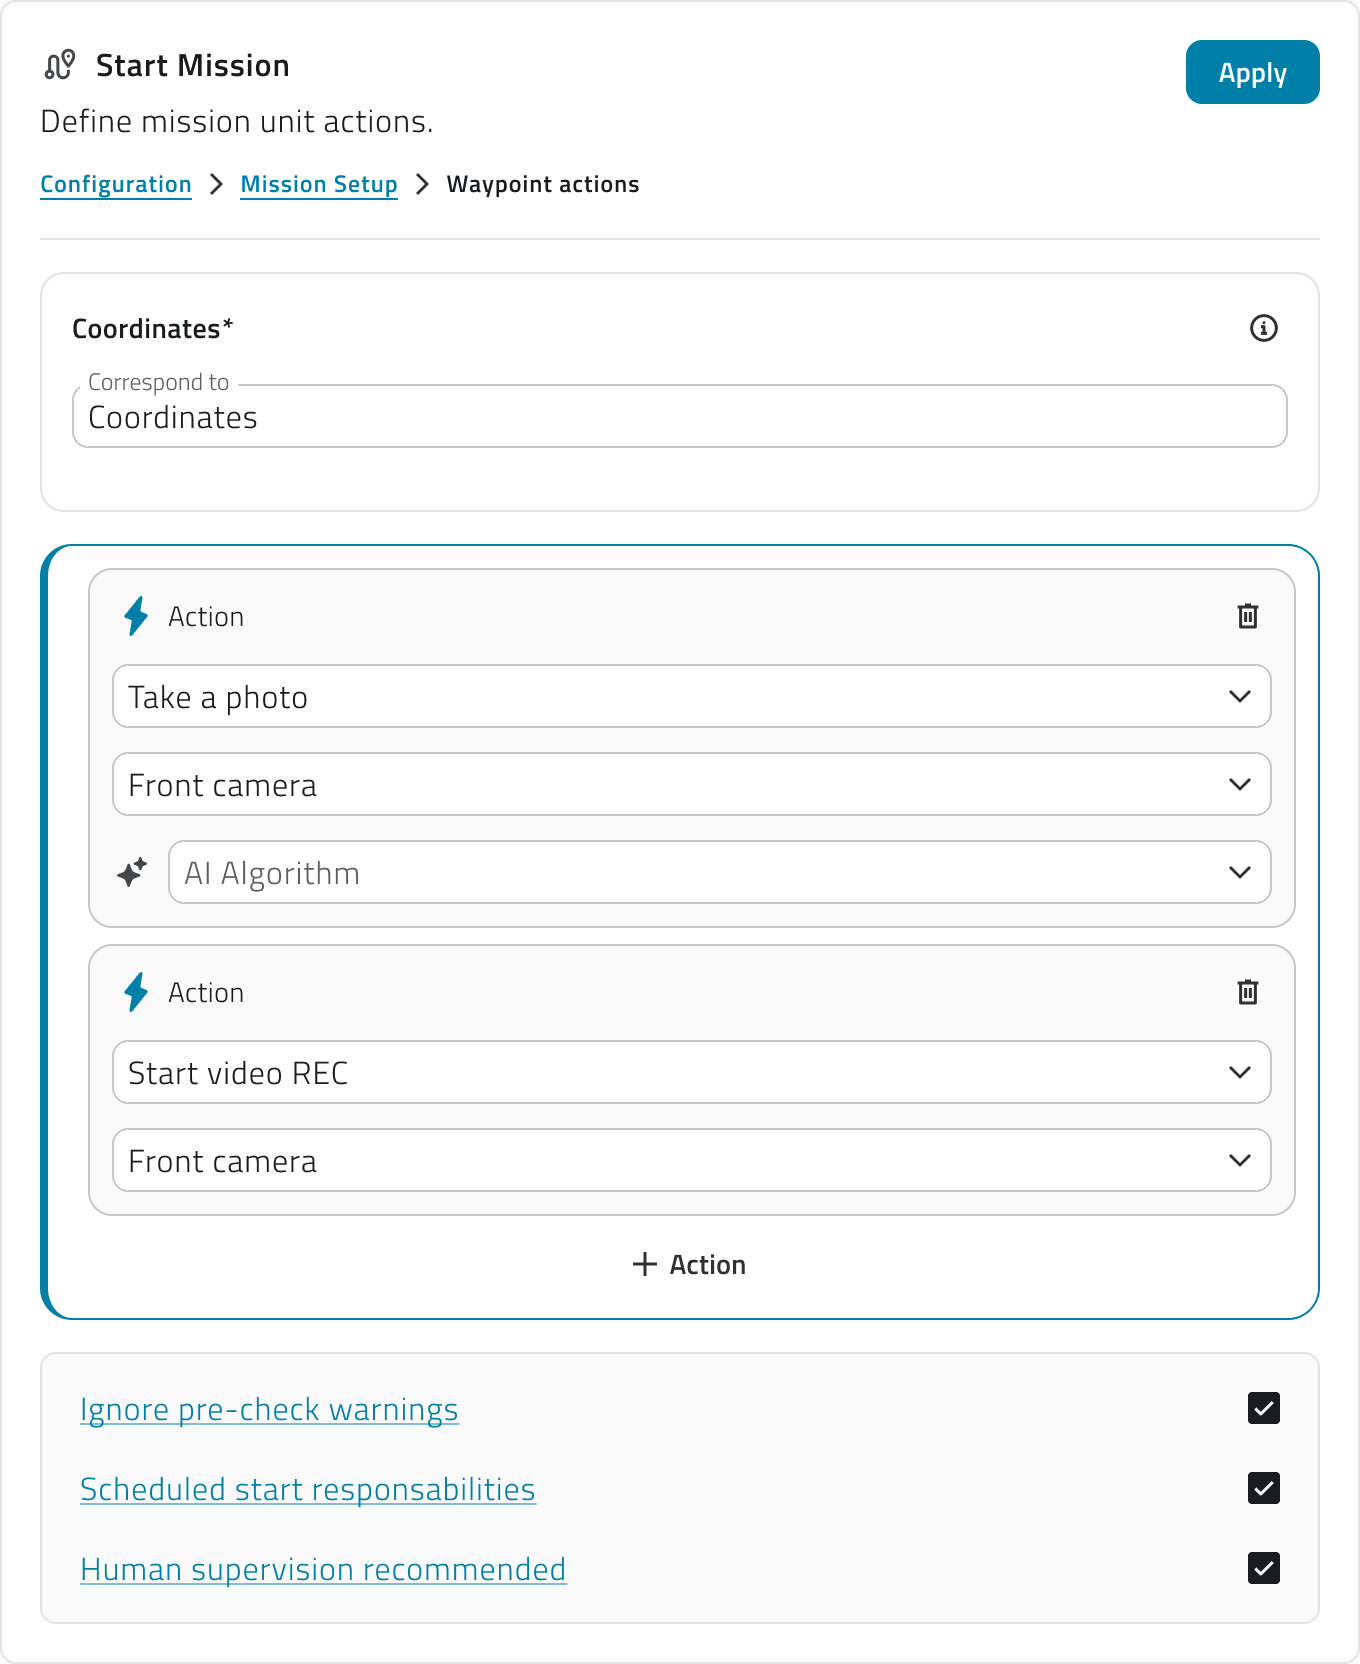](https://wiki.eaglearca.com/uploads/images/gallery/2026-05/waypoints-actions.png) **5.** Before you can confirm, you must read and explicitly select all the **operational disclaimers** shown at the bottom of the section. These notices concern the responsibilities related to the automatic execution of the mission and the option to force the launch even in the presence of warnings detected during the pre-check. **6.** Click **Apply** to confirm.You can add multiple start mission actions within the same automation, provided they do not reference the same unit. For drones, the same drone + hangar pair cannot be used more than once.
If the unit is busy with another mission at the time of execution, the action is interrupted. No override mechanism for the ongoing mission is available.
--- ### View and manage automations The list shows all configured automations with the following information: - **Name** of the automation - **Status** active or inactive, shown via icon - **Actions** total number of configured actions; hovering over the number shows the list in execution order - **Creation date** The list can be viewed in table, grid, or list mode. Two warning states may appear in the list: - **Warning icon next to the name** The automation is saved but has no actions configured yet. - **Alert icon next to the name** The event linked to the trigger has been deleted. The automation is automatically deactivated and cannot run until a new valid event is selected. [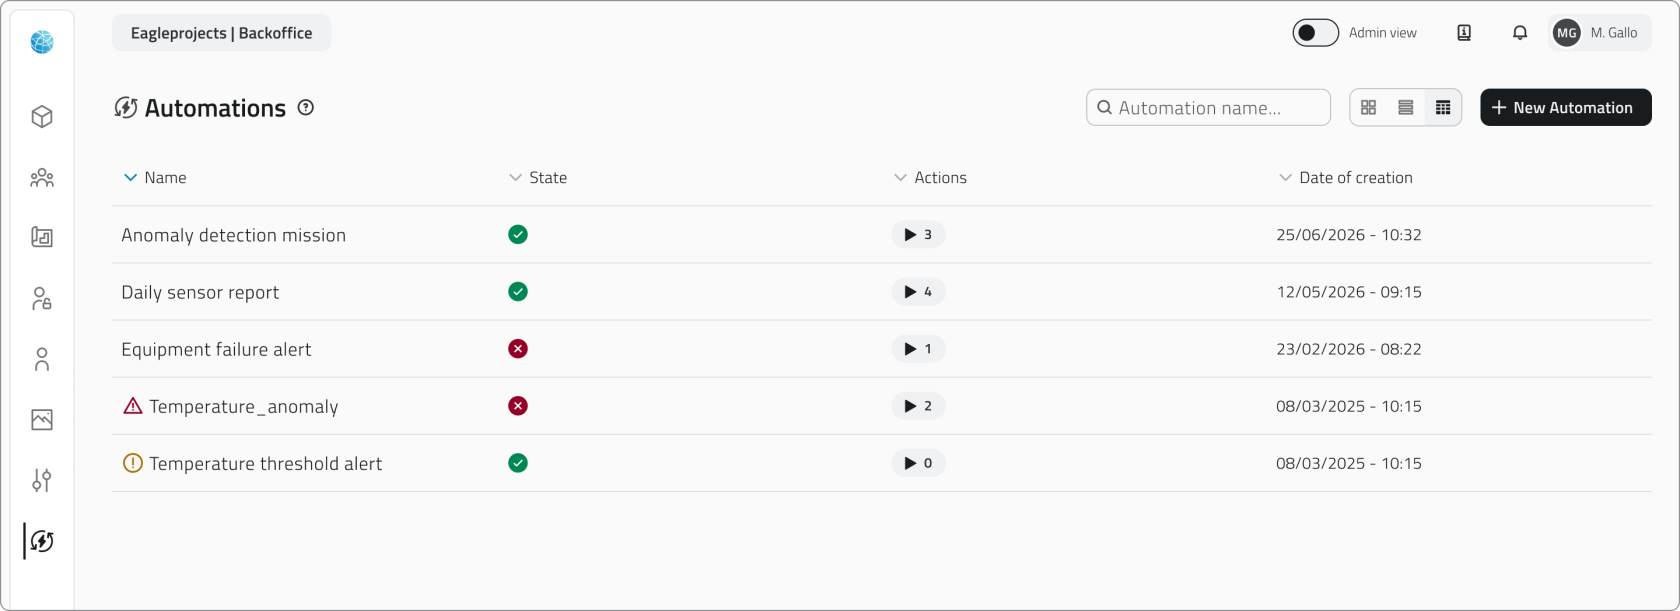](https://wiki.eaglearca.com/uploads/images/gallery/2026-05/automation-section.png) To edit an automation, click the blue button with the arrow icon that appears when hovering over the item. When you edit a section, the related card returns to the **Pending** state. You can confirm the changes via **Apply** or discard them via **Discard changes**, which restores the last saved configuration. If you **edit** a field that **affects subsequent configurations**, such as the unit type in a mission or the object class in an operation, the dependent steps are **automatically reset** and must be **reconfigured**. You can also change the **action order** by dragging the cards, and **add** or **remove** individual actions.Changes are **not final** until the automation is saved.
--- ### Delete an automation From the main list, **select one or more automations** and click the **Delete** button. The system shows a **confirmation dialog** with the names of the selected automations and a warning that all actions configured within them will stop running.Deleting an automation permanently removes the trigger, all conditions, and all actions configured within it. **This action cannot be undone.**
--- ### What happens when the linked event is deleted If an event used by an automation is deleted, the system flags this before proceeding with the deletion, indicating that the affected automation will be deactivated. [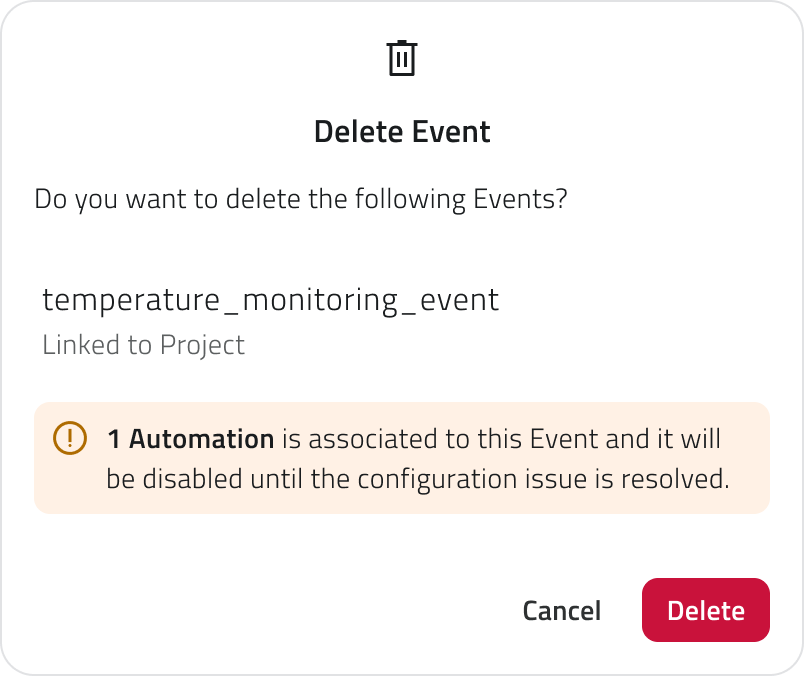](https://wiki.eaglearca.com/uploads/images/gallery/2026-05/delete-event-modal.png) If the deletion is confirmed, the automation is automatically set to inactive and the trigger is considered unconfigured. The alert icon appears next to the name in the list. To restore the automation, open it, activate it using the status toggle, and select a new valid event in the trigger. Events that are not compatible with the already configured actions are disabled in the dropdown menu. [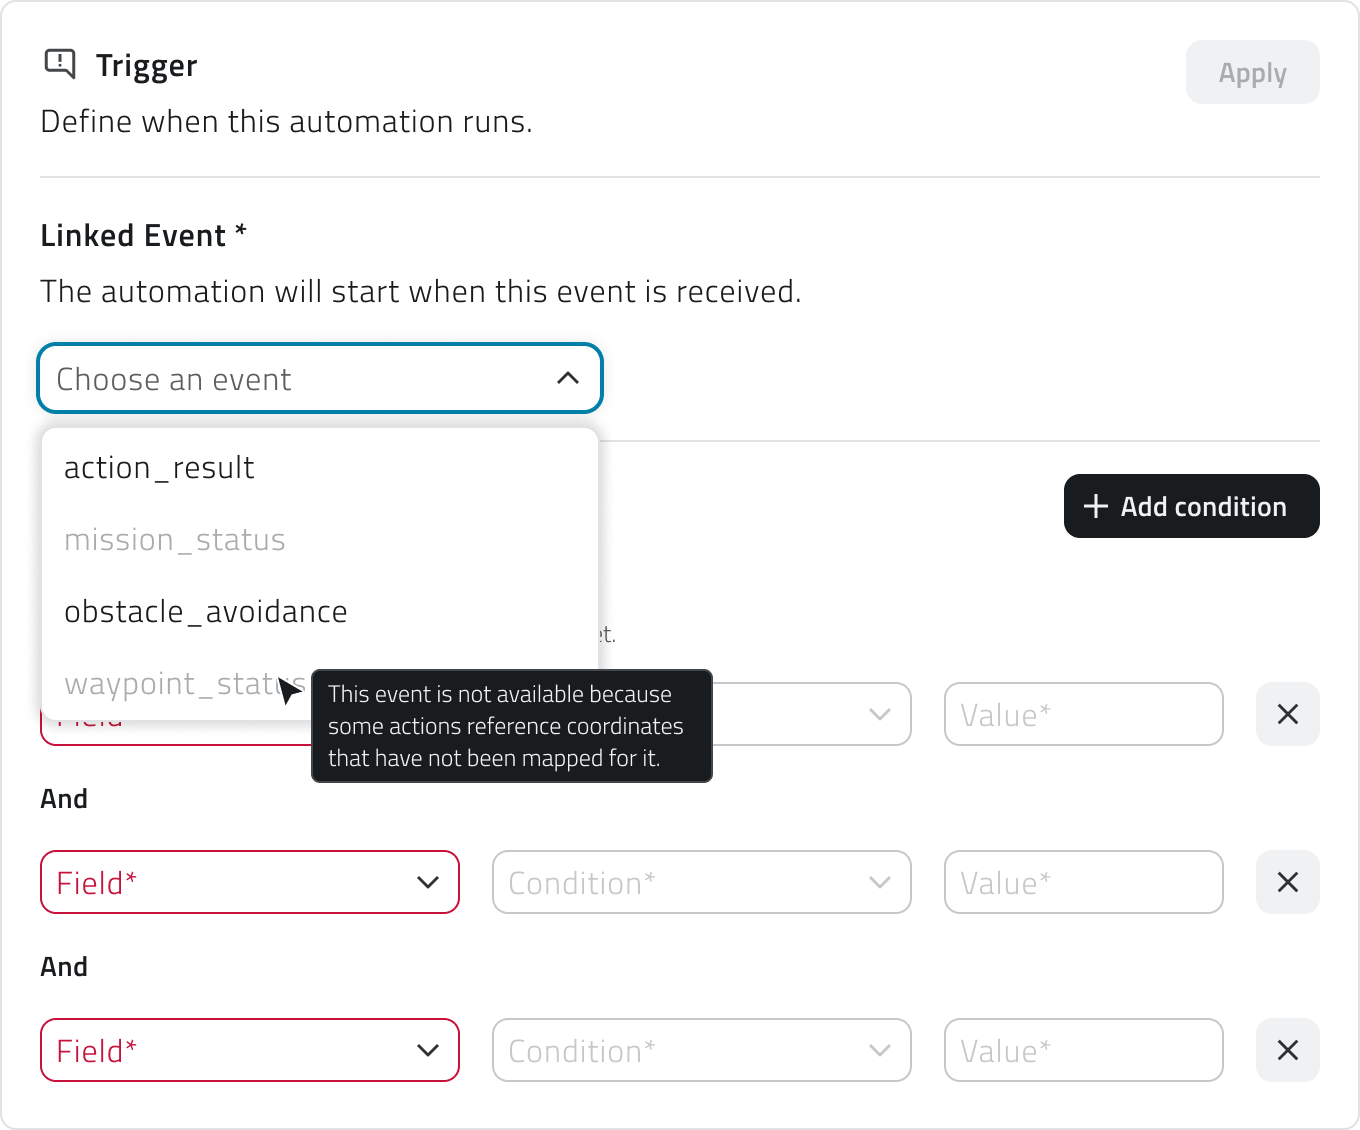](https://wiki.eaglearca.com/uploads/images/gallery/2026-05/event-selection-pt-2.png) --- ### Links - *[Create and manage Events](https://wiki.eaglearca.com/books/backoffice/page/create-and-manage-events "Create and manage Events")* - *[Create and manage Reports](https://wiki.eaglearca.com/books/backoffice/page/create-and-manage-reports "Create and manage Reports")* - *[Create and manage Object Classes](https://wiki.eaglearca.com/books/backoffice/page/create-and-manage-object-classes "Create and manage Object Classes")* - [Mission Planner - Initial Setup](https://wiki.eaglearca.com/books/mission-planner-wR9/page/initial-setup "Mission Planner - Initial Setup") ---  **Italian version** Le automazioni consentono alla piattaforma di rispondere automaticamente alla ricezione di un evento, eseguendo una o più azioni in sequenza, dalla generazione di report all'avvio di missioni robotiche.Disponibile solo per utenti con permesso **backoffice-admin**.
--- ### Creare una nuova automazione **1.** Accedi al Backoffice e apri la sezione **Automazioni** dal menu laterale. [](https://wiki.eaglearca.com/uploads/images/gallery/2026-05/automation-section-button.png) **2.** Clicca su **Nuova automazione** in alto a destra. [](https://wiki.eaglearca.com/uploads/images/gallery/2026-05/new-automation-button.png) **3.** Inserisci il **nome** dell'automazione nell'intestazione della pagina. Il campo è obbligatorio. **4.** Seleziona i **gruppi** a cui associare l'automazione tramite il campo di ricerca multipla. I gruppi definiscono la visibilità dell'automazione nell'app. **5.** Imposta lo **stato** dell'automazione tramite l'interruttore in alto. Di default è attivo. Se lo stato è disattivo, le sezioni di configurazione risultano bloccate. [](https://wiki.eaglearca.com/uploads/images/gallery/2026-05/configuration-header.png) La pagina è divisa in due aree: - **A sinistra** si trova il riepilogo del flusso, con la scheda del trigger e le schede delle azioni aggiunte - **A destra** si trova il pannello di configurazione della sezione selezionata [](https://wiki.eaglearca.com/uploads/images/gallery/2026-05/automation-timeline-and-configuration.png) Le schede del trigger e delle azioni mostrano il loro stato tramite un'icona, il **punto esclamativo su sfondo giallo** (In attesa) rappresenta una configurazione **incompleta** o **non ancora confermata**, la **spunta su sfondo verde** (Completato) rappresenta una configurazione completa e confermata.All'interno della pagina sono presenti **due livelli di salvataggio distinti**. Il pulsante **Applica** conferma la configurazione della **singola sezione** e aggiorna lo stato della scheda. Il pulsante **Salva** in alto a destra salva l'intera automazione in modo definitivo.
**6.** *[Configura il trigger ↓](https://wiki.eaglearca.com/link/143#bkmrk-configurare-il-trigg-1)* per stabilire quando l'automazione dovrà essere eseguita. **7.** [*Aggiungi e configura le azioni* ↓](https://wiki.eaglearca.com/link/143#bkmrk-aggiungere-e-configu-1) per scegliere cosa la piattaforma dovrà fare a seguito del trigger. **8.** Salva l'automazione cliccando **Salva** in alto a destra della pagina. Il pulsante è abilitato solo quando nome, gruppi, trigger e tutte le azioni presenti sono correttamente configurati e confermati. 💡 **Suggerimento**: Prima di salvare, verifica che tutte le schede siano nello stato Completato. Una scheda in stato In attesa impedisce il salvataggio dell'automazione. --- ### Configurare il trigger Il trigger definisce quando l'automazione deve essere eseguita. È la prima sezione da completare: finché il trigger non è configurato e confermato, il pulsante per aggiungere azioni non è disponibile. [](https://wiki.eaglearca.com/uploads/images/gallery/2026-05/trigger-configuration.png) **1.** Seleziona l'**evento collegato** dal menu a tendina. La lista mostra tutti gli eventi configurati per l'organizzazione. Gli eventi già associati a un'altra automazione non sono disponibili. **2.** Se vuoi che l'automazione si attivi solo al verificarsi di condizioni specifiche, abilita l'interruttore **Filtra per valori del campo**. In questo caso, per ogni condizione, dovrai compilare tre campi obbligatori: - **Campo** Seleziona uno dei campi mappati nell'evento. Ogni campo è accompagnato da un'icona che indica il tipo di dato (testo, numero, data, booleano). - **Condizione** Seleziona la condizione, per esempio uguale, maggiore, minore, ecc. La lista delle condizioni dipende dal tipo di dato. - **Valore** Inserisci il valore di confronto [](https://wiki.eaglearca.com/uploads/images/gallery/2026-05/conditions.png) Puoi aggiungere più condizioni tramite il pulsante **Aggiungi condizione**. Se sono presenti più condizioni, per attivare il trigger devono essere tutte soddisfatte contemporaneamente. Se non aggiungi condizioni, l'automazione si avvia **ogni volta che l'evento viene ricevuto**. **3.** Clicca **Applica** per confermare il trigger. La scheda passerà allo stato **Completato** e si abiliterà il pulsante per aggiungere azioni.Se in seguito modifichi l'evento collegato, tutte le condizioni già configurate vengono azzerate. Puoi annullare la modifica tramite **Scarta modifiche** per ripristinare la configurazione precedente.
--- ### Aggiungere e configurare le azioni Dopo aver confermato il trigger, clicca su **Aggiungi azione** per scegliere il tipo di azione da eseguire. Le azioni disponibili dipendono dall'entità a cui è collegato l'evento selezionato nel trigger. [](https://wiki.eaglearca.com/uploads/images/gallery/2026-05/select-action.png) Se l'evento è collegato a un **progetto**, un **oggetto** o un **sensore**, sono disponibili **tutti i tipi di azione**. Se l'evento è collegato a un'**organizzazione** o a un **dispositivo**, è disponibile solo l'**invio di notifiche**. I tipi di azione disponibili sono: - [*Invia notifica ↓*](https://wiki.eaglearca.com/link/143#bkmrk-invia-notifica-1) Invia una notifica email o push ai destinatari selezionati. - [*Genera report ↓*](https://wiki.eaglearca.com/link/143#bkmrk-genera-report-1) Genera automaticamente un report a partire da un template configurato. - [*Operazione su classe oggetto ↓*](https://wiki.eaglearca.com/link/143#bkmrk-operazione-su-classe-1) Crea o modifica un'istanza di una classe oggetto esistente. - [*Avvia missione ↓*](https://wiki.eaglearca.com/link/143#bkmrk-avvia-missione-1) Avvia automaticamente una missione per un drone o un robot dog Una volta selezionato il tipo, il pannello di configurazione si apre a destra. La configurazione è strutturata in step progressivi: ogni step successivo si sblocca solo dopo aver completato e confermato il precedente tramite il pulsante **Continua**. Quando hai terminato la configurazione dell'azione, clicca **Applica** per aggiungerla al flusso. La scheda dell'azione apparirà nella colonna di sinistra con un riepilogo delle impostazioni principali. Per ogni azione devi anche definire il **comportamento in caso di errore**, scegliendo se il sistema deve **continuare con l'azione successiva** oppure **interrompere l'intera automazione**. [](https://wiki.eaglearca.com/uploads/images/gallery/2026-05/error-behavior.png) Puoi aggiungere un numero illimitato di azioni. Per cambiare l'ordine di esecuzione, trascina le schede verso l'alto o verso il basso nella colonna di sinistra. L'ordine in cui le schede compaiono corrisponde all'ordine effettivo di esecuzione. 💡 **Suggerimenti**: - Se le azioni sono indipendenti tra loro, scegli di continuare con l'azione successiva per evitare che un singolo problema blocchi l'intero flusso - Se le azioni sono concatenate e dipendono l'una dall'altra, scegli di interrompere l'automazione per evitare esecuzioni parziali incoerenti #### Invia notifica Configura l'invio automatico di una notifica email o push. **1.** Seleziona il **tipo di notifica**: Email o Push. Ogni azione gestisce un solo canale. Per inviare sia email che push, aggiungi due azioni separate. [](https://wiki.eaglearca.com/uploads/images/gallery/2026-05/notification-type-selection.png) **2.** Clicca **Continua** per accedere alla sezione **Destinatari**. **3.** Puoi aggiungere condizioni opzionali per limitare l'invio solo ad alcune occorrenze dell'evento, filtrandole per livello di severità (info, avviso, successo, errore) o per nome evento specifico. **4.** Aggiungi i **destinatari** selezionando utenti o gruppi. Per le notifiche email puoi aggiungere anche indirizzi email esterni. [](https://wiki.eaglearca.com/uploads/images/gallery/2026-05/recipients-panel.png) **5.** Clicca **Applica** per confermare. #### Genera report Configura la generazione automatica di un report. **1.** Seleziona il **template di report** dal menu a tendina. La lista mostra i template disponibili nella sezione Report del Backoffice. [](https://wiki.eaglearca.com/uploads/images/gallery/2026-05/report-template-selection.png) **2.** Clicca **Continua** per accedere alla sezione **Mappatura parametri**. **3.** Scegli come popolare ogni parametro del template, se con il **campo dell'evento**, il valore viene letto da un campo dell'evento ricevuto che dovrai selezionare da un menu a tendina, oppure con un **valore statico**, inserendo manualmente un valore fisso. [](https://wiki.eaglearca.com/uploads/images/gallery/2026-05/parameters-mapping.png) I **parametri obbligatori** sono contrassegnati da un asterisco e devono essere tutti popolati. In alto viene mostrato un contatore aggiornato in tempo reale con i parametri mancanti. Una barra di ricerca consente di filtrare la lista dei parametri. **4.** Clicca **Applica** per confermare.Se **modifichi il template di report**, la configurazione dei parametri viene **azzerata** perché i parametri disponibili dipendono dal template selezionato.
#### Operazione su classe oggetto Configura la creazione o la modifica automatica di un'istanza di una classe oggetto. **1.** Seleziona la **classe oggetto** interessata dal menu a tendina. **2.** Seleziona l'**operazione** da eseguire tra: - **Crea oggetto** Crea una nuova istanza della classe. Disponibile per classi di **tipo Punto e Form**. - **Modifica oggetto** Aggiorna un'istanza esistente. Disponibile per tutti i tipi di classe. [](https://wiki.eaglearca.com/uploads/images/gallery/2026-05/ptxobject-class-selection.png)L'azione di **creazione di un Punto** è disponibile solo se l'evento collegato ha un campo coordinate correttamente configurato.
**3.** Clicca **Continua** per accedere alla sezione **Mappatura attributi**. **4.** Scegli come popolare ogni attributo della classe, se con il **campo dell'evento**, il valore viene letto da un campo dell'evento ricevuto che dovrai selezionare da un menu a tendina, oppure con un **valore statico**, inserendo manualmente un valore fisso. [](https://wiki.eaglearca.com/uploads/images/gallery/2026-05/attribute-mapping.png) Gli **attributi obbligatori** sono contrassegnati da un asterisco e devono essere tutti popolati. In alto viene mostrato un contatore aggiornato in tempo reale con gli attributi mancanti. Una barra di ricerca consente di filtrare la lista degli attributi. Per le classi di tipo **Punto**, il campo **Coordinate** è gestito automaticamente: in fase di creazione viene popolato a partire dal campo coordinate configurato nell'evento e non è modificabile manualmente. In fase di modifica è opzionale. Per l'operazione **Modifica oggetto** è obbligatorio configurare il campo **Identificatore univoco**, che indica quale istanza aggiornare. Può essere mappato da un campo evento o inserito come valore statico. **5.** Clicca **Applica** per confermare.Se **modifichi la classe oggetto**, la mappatura degli attributi viene **azzerata** e l'operazione selezionata viene invalidata.
#### Avvia missione Configura l'avvio automatico di una missione robotica.Questa azione è disponibile solo se l'evento collegato ha un campo coordinate correttamente configurato.
**1.** Seleziona il **tipo di unità** tra **Robot Dog** e **Drone.** **2.** Seleziona l'**unità** specifica. Nel caso di un drone, devi selezionare anche l'**hangar** associato: la coppia drone + hangar viene trattata come riferimento unico dell'azione. [](https://wiki.eaglearca.com/uploads/images/gallery/2026-05/mission-unit-selection.png) **3.** Clicca **Continua** per accedere alla sezione **Configurazione missione**. I campi da compilare variano in base all'unità selezionata. Per **Robot Dog**: - **Nome** della missione - **Tipologia missione** - **Profilo** - **Mappa missione**, selezionabile tramite il pulsante **Sfoglia mappa**, che apre un visualizzatore dove puoi **cercare**, **selezionare** e **visualizzare** in anteprima le **mappe disponibili per l'organizzazione**. Sono mostrate solo le mappe di tipo outdoor - **Note** (opzionale) Per **Drone**: - **Nome** della missione - **Altezza di sicurezza al decollo** - **Velocità di decollo** - **Altezza globale** - **Velocità globale** - **Profilo** - **Note** (opzionale) [](https://wiki.eaglearca.com/uploads/images/gallery/2026-05/mission-setup.png) **4.** Clicca **Continua** per accedere alla sezione **Azioni sul waypoint**. Le coordinate del waypoint vengono popolate automaticamente a partire dal campo coordinate configurato nell'evento e non sono modificabili manualmente. Tramite il pulsante **Aggiungi azione** puoi configurare una o più azioni che l'unità deve eseguire sul punto target. Le azioni disponibili dipendono dal profilo selezionato e dagli add-on associati all'unità. [](https://wiki.eaglearca.com/uploads/images/gallery/2026-05/waypoints-actions.png) **5.** Prima di poter confermare, devi leggere e selezionare esplicitamente tutti i **disclaimer operativi** mostrati in fondo alla sezione. Questi avvisi riguardano le responsabilità legate all'esecuzione automatica della missione e la possibilità di forzare l'avvio anche in presenza di avvisi rilevati durante il pre-controllo. **6.** Clicca **Applica** per confermare.Puoi aggiungere più azioni di avvio missione nella stessa automazione, a condizione che non facciano riferimento alla stessa unità. Per i droni, la stessa coppia drone + hangar non può essere usata più di una volta.
Se al momento dell'esecuzione l'unità è occupata in un'altra missione, l'azione viene interrotta. Non è previsto alcun meccanismo di override della missione in corso.
--- ### Visualizzare e modificare le automazioni La lista mostra tutte le automazioni configurate con le seguenti informazioni: - **Nome** dell'automazione - **Stato** attivo o disattivo, mostrato tramite icona - **Azioni** numero totale di azioni configurate; passando il mouse sul numero, viene mostrato l'elenco in ordine di esecuzione - **Data di creazione** La lista può essere visualizzata in modalità tabella, griglia o elenco. Nella lista possono comparire due stati di attenzione: - **Icona di avviso accanto al nome** L'automazione è salvata ma non ha ancora azioni configurate. - **Icona di allerta accanto al nome** L'evento collegato al trigger è stato eliminato. L'automazione viene automaticamente disattivata e non può essere eseguita finché non viene selezionato un nuovo evento valido. [](https://wiki.eaglearca.com/uploads/images/gallery/2026-05/automation-section.png) Per modificare un'automazione, clicca sul pulsante blu con l'icona freccia che appare al passaggio del mouse sull'elemento. Quando modifichi una sezione, la relativa scheda torna allo stato **In attesa**. Puoi confermare le modifiche tramite **Applica** oppure annullarle tramite **Scarta modifiche**, che ripristina l'ultima configurazione salvata. Se **modifichi** un campo che ha **impatto su configurazioni successive**, ad esempio il tipo di unità in una missione o la classe oggetto in un'operazione, gli step dipendenti vengono **automaticamente azzerati** e devono essere **riconfigurati**. Puoi anche modificare l'**ordine delle azioni** trascinando le schede, e **aggiungere** o **rimuovere** azioni singole.Le modifiche **non sono definitive** fino al salvataggio dell'automazione.
--- ### Eliminare un'automazione Dalla lista principale, **seleziona una o più automazioni** e clicca sul pulsante **Elimina**. Il sistema mostra una **finestra di conferma** con il nome delle automazioni selezionate e un avviso che tutte le azioni configurate al loro interno cesseranno di essere eseguite.Eliminando un'automazione vengono rimossi definitivamente anche il trigger, tutte le condizioni e tutte le azioni configurate al suo interno. **L'operazione è irreversibile.**
--- ### Cosa succede quando l'evento collegato viene eliminato Se un evento utilizzato da un'automazione viene eliminato, il sistema lo segnala prima di procedere con la cancellazione, indicando che l'automazione coinvolta verrà disattivata. [](https://wiki.eaglearca.com/uploads/images/gallery/2026-05/delete-event-modal.png) Se si conferma l'eliminazione, l'automazione passa automaticamente allo stato disattivo e il trigger risulta non configurato. Nella lista compare l'icona di allerta accanto al nome. Per ripristinare l'automazione, aprila, attivala tramite l'interruttore di stato e seleziona un nuovo evento valido nel trigger. Gli eventi non compatibili con le azioni già configurate risultano disabilitati nel menu a tendina. [](https://wiki.eaglearca.com/uploads/images/gallery/2026-05/event-selection-pt-2.png) --- ### Collegamenti - *[Creare e gestire gli Eventi](https://wiki.eaglearca.com/books/backoffice/page/create-and-manage-events "Create and manage Events")* - *[Creare e gestire i Report](https://wiki.eaglearca.com/books/backoffice/page/create-and-manage-reports "Create and manage Reports")* - *[Creare e gestire le Classi Oggetto](https://wiki.eaglearca.com/books/backoffice/page/create-and-manage-object-classes "Create and manage Object Classes")* - [Mission Planner - Setup iniziale](https://wiki.eaglearca.com/books/mission-planner-wR9/page/initial-setup "Mission Planner - Initial Setup") --- ***Last update:** 27 May 2026*