Available only to users with **backoffice** permission. To create an event, the entities it must be linked to must already exist in the system: project, object, sensor, or device.
--- ### Create a new Event **1.** Log in to the **Backoffice** and open the **Events** section from the left-side menu. The list shows the name, the linked entity, the linked automation, the creation date,and a button to copy the event URL.  **2.** Click **New event** in the top-right corner.  **3.** Enter the **Event name** and select the **Linked to** entity, both fields are required. [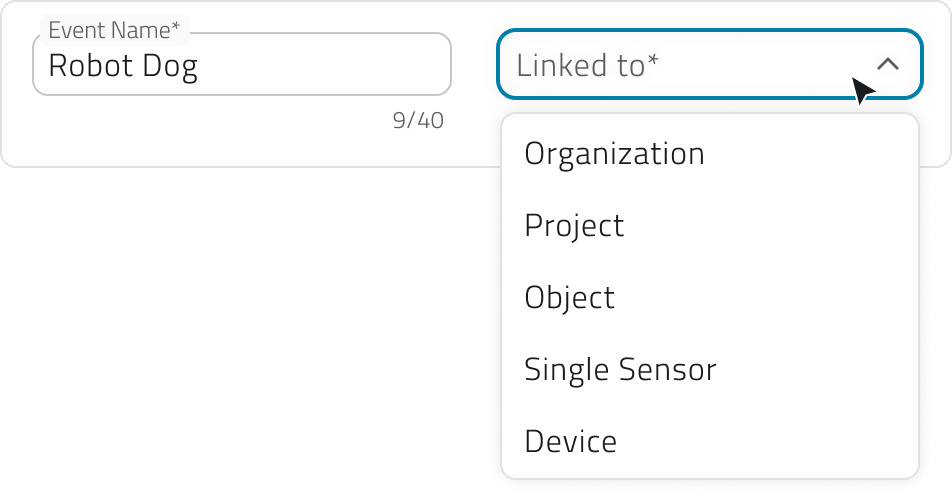](https://wiki.eaglearca.com/uploads/images/gallery/2025-12/X0h3-linked-to.png) The available options are: - **Organization** For general events. - **Project** For events specific to a single project. - **Object** For events linked to a class and a single instance. - **Single sensor** For events coming from a single sensor. - **Device** For events generated by a set of sensors. **4.** In the **Mapping** section, define how the incoming data should be interpreted. If needed, **load the sample payload**: paste or upload a JSON file in the text box and click **Confirm** to generate the mapping keys. Loading the JSON is **not required**, you can also fill in the fields **manually**. [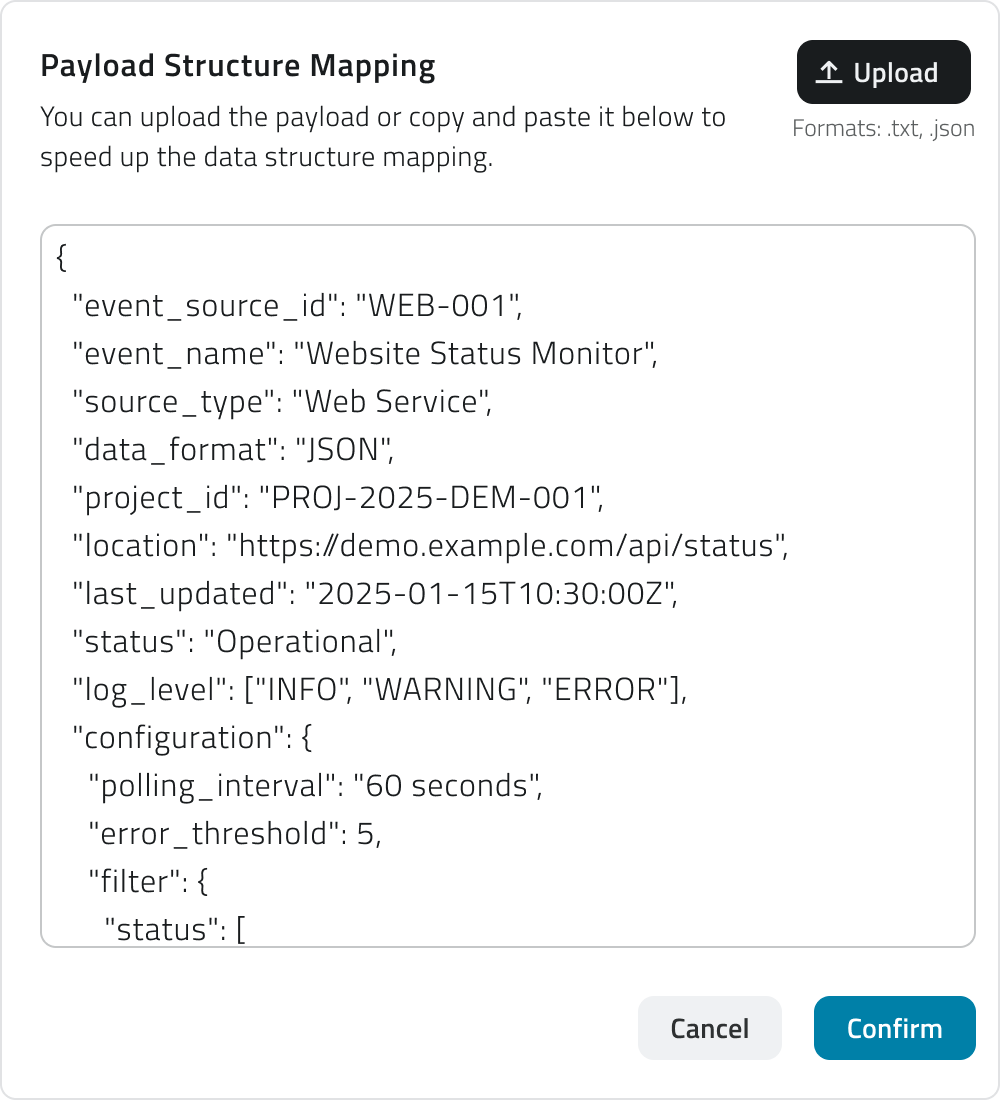](https://wiki.eaglearca.com/uploads/images/gallery/2025-12/tGl4-payload-structure.png) Then **map the keys**, associating the provider's keys with the fields required by the platform: - **Name** *(required)* The name of the event. Example: `event_name` or `notification_name`. - **Event ID** *(required)* Uniquely identifies the type of event. Example: `event_id` or `type_code`. - **Time** *(required)* Indicates when the event occurs. Example: `timestamp` or `event_time`. - **Levels** *(required)* Defines the type or severity of the event (`info`, `warning`, `success`, `error`). Each level can have a **Displayed name**, shown when hovering over the level icon. Example: a key like `severity` or `status` mapped to "warning". - **Description** *(required)* Briefly explains the content or purpose of the event. Example: `message` or `details`. - **Additional info** *(optional)* Adds supplementary data, each with an optional **Displayed name**. Example: `temperature`, `battery_status`, `signal_strength`. [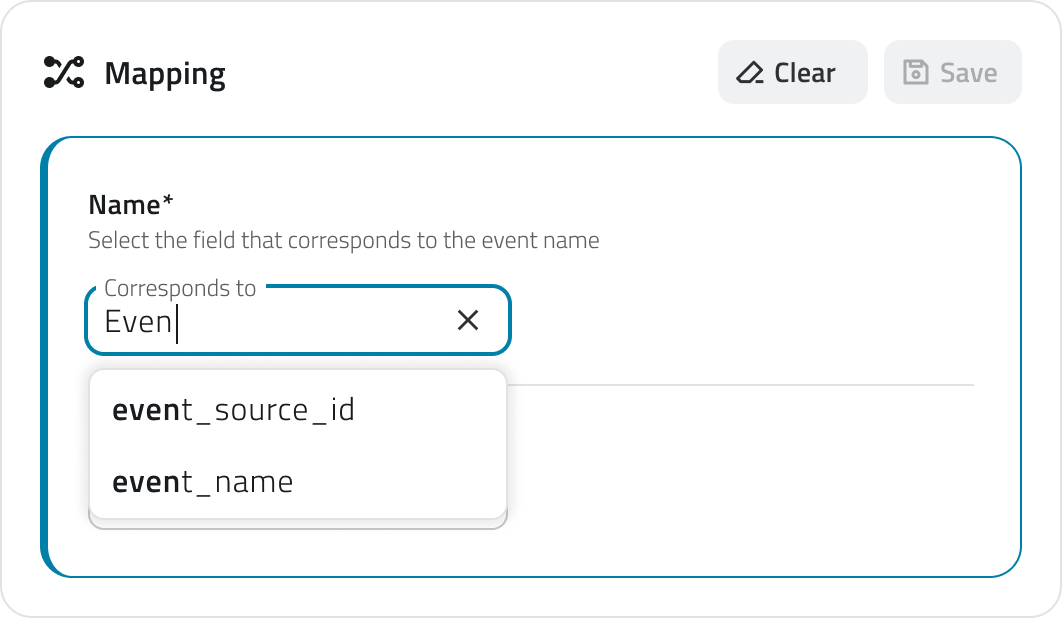](https://wiki.eaglearca.com/uploads/images/gallery/2026-05/5-mapping.png) Depending on the **linked entity** selected earlier, **additional required fields** may appear: - **Project ID** Links the event to a project. Example: `project_id`. - **Object ID** Links the event to an object; the **object class** must be selected first. Example: `object_id` or `entity_ref`. - **Single Sensor ID** Identifies the sensor the event comes from. Example: `sensor_id` or `sensor_name`. - **Device ID** Identifies the device grouping one or more sensors. Example: `device_id` or `controller_name`. For each mapped key it is also possible to assign a **type**, which defines how the platform should interpret that value. The available types are: - **Text field**: for text values. - **Date**: selectable as date only or date and time. - **Number**: selectable as integer or decimal number. - **True/false**: for boolean values. The type assigned to each field influences the conditions available in the Automations section**.** [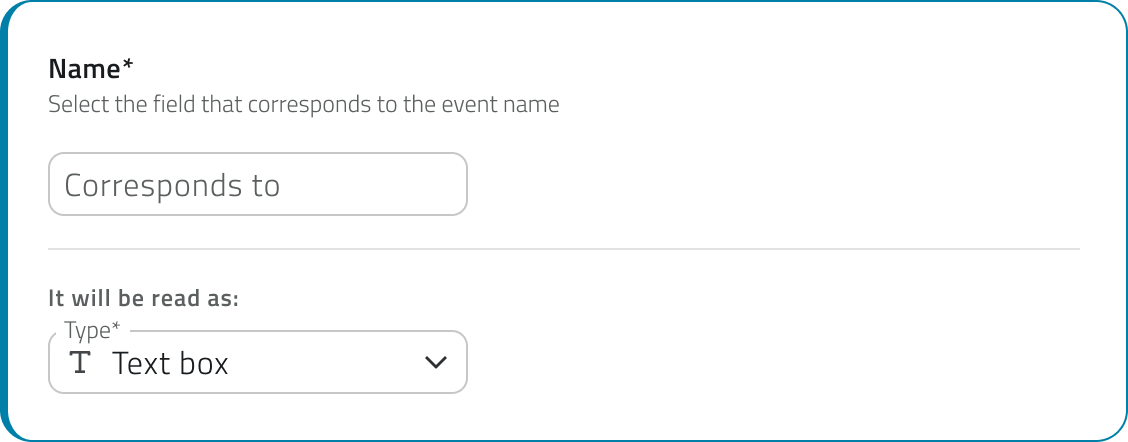](https://wiki.eaglearca.com/uploads/images/gallery/2026-05/gg4read-as.png) **5.** If the payload includes **geographic data**, it is possible to **map the coordinates as well**. Enable the switch to configure how the platform should **read the incoming coordinates**. Once enabled, you can choose the format in which the coordinates are transmitted by the provider: - **Single field** The coordinates are contained in a single field of the payload. Enter the field name in **Corresponds to**. - **Double field** Latitude and longitude are transmitted in separate fields. Enter the respective names in the **Latitude corresponds to** and **Longitude corresponds to** fields. [](https://wiki.eaglearca.com/uploads/images/gallery/2026-05/coordinates-section.png)The Coordinates field is required to enable certain actions in **Automations**, such as the **creation of an object** of type **Point** or the **launch of a robotic mission**.
**6.** Click **Save** in the top-right corner. The button remains disabled until the name, the linked entity, and all required keys have been filled in.Once saved, a **URL link** appears in the list. This link must be **provided to the external provider** to **enable data transmission**.
--- ### Edit and manage events To **edit an event**, click the blue button with the arrow icon that appears when hovering over the item. To **duplicate an event**, select **a single item** from the list, then click the **Duplicate** button in the top-right corner. To **delete an event**, select one or more items from the list, the **Delete** button will appear in the top-right corner. To **copy the URL** of an event, use the dedicated button directly from the list. 💡 **Tips:** - When duplicating an event, update the mapping keys if the target provider uses a different JSON structure. - Use descriptive names for events to make them easier to identify in the list. --- ### Links - *[Create and manage Projects](https://wiki.eaglearca.com/books/backoffice/page/create-and-manage-projects "Create and manage Projects")* - *[Managing objects in the project](https://wiki.eaglearca.com/books/app-features/page/managing-objects-in-the-project "Managing objects in the project")* - [Configure Data Sources and Charts](https://wiki.eaglearca.com/books/backoffice/page/configure-data-sources-and-charts "Configure Data Sources and Charts") ---  **Italian version** Un Evento consente alla piattaforma di **ricevere e interpretare informazioni** (tipicamente JSON) da provider esterni, collegandole a un'entità della piattaforma, come organizzazioni, progetti, oggetti, sensori e dispositivi. Per usare gli eventi per **l'invio di notifiche**, puoi configurare gli output dalla *[sezione Automazioni](https://wiki.eaglearca.com/books/backoffice/page/create-and-manage-automations "Create and manage Automations")*.Disponibile solo per utenti con permesso **backoffice**. Per creare un evento è necessario che nel sistema siano **già presenti** le entità a cui l’evento deve essere collegato: progetto, oggetto, sensore o dispositivo.
--- ### Creare un nuovo evento **1.** Accedi al **Backoffice** e apri la sezione **Eventi** dal menu laterale sinistro. La lista mostra il nome, l'entità collegata, l'automazione collegata, la data di creazione e un bottone per copiare l'URL dell'evento.  **2.** Clicca su **Nuovo evento** in alto a destra.  **3.** Inserisci il **Nome evento** e seleziona l'**Entità collegata**, entrambi i campi sono obbligatori. [](https://wiki.eaglearca.com/uploads/images/gallery/2025-12/X0h3-linked-to.png) Le opzioni disponibili sono: - **Organizzazione** Per eventi generali. - **Progetto** Per eventi specifici di un singolo progetto. - **Oggetto** Per eventi legati a una classe e a una singola istanza. - **Sensore singolo** Per eventi provenienti da un singolo sensore. - **Dispositivo** Per eventi generati da un insieme di sensori. **4.** Nella sezione **Mapping** definisci come i dati in arrivo devono essere interpretati. Se lo ritieni necessario, **carica il payload di esempio**: incolla o carica un file JSON nella casella di testo e clicca **Conferma** per generare le chiavi di mappatura. Inserire il JSON **non è obbligatorio**, puoi inserire i campi anche **manualmente**. [](https://wiki.eaglearca.com/uploads/images/gallery/2025-12/tGl4-payload-structure.png) Poi **mappa le chiavi**, associando le chiavi del provider ai campi richiesti dalla piattaforma: - **Nome** *(obbligatorio)* Il nome dell'evento. Esempio: `event_name` o `notification_name`. - **Event ID** *(obbligatorio)* Identifica in modo univoco il tipo di evento. Esempio: `event_id` o `type_code`. - **Tempo** *(obbligatorio)* Indica il momento in cui l'evento si verifica. Esempio: `timestamp` o `event_time`. - **Livelli** *(obbligatorio)* Definisce la tipologia o gravità dell'evento (`info`, `warning`, `success`, `error`). Ogni livello può avere un **Nome visualizzato**, visibile passando il cursore sull'icona del livello. Esempio: una chiave come `severity` o `status` mappata su "warning". - **Descrizione** *(obbligatoria)* Spiega brevemente il contenuto o lo scopo dell'evento. Esempio: `message` o `details`. - **Informazioni aggiuntive** *(facoltativo)* Aggiunge dati supplementari, ciascuno con un **Nome visualizzato** opzionale. Esempio: `temperature`, `battery_status`, `signal_strength`. [](https://wiki.eaglearca.com/uploads/images/gallery/2026-05/5-mapping.png) **In base all'entità colegata** selezionata precedentemente, potrebbero aggiungersi **ulteriori campi obbligatori**: - **Project ID** Collega l'evento a un progetto. Esempio: `project_id`. - **Object ID** Collega l'evento a un oggetto; è necessario selezionare prima la **classe oggetto**. Esempio: `object_id` o `entity_ref`. - **Single Sensor ID** Identifica il sensore da cui proviene l'evento. Esempio: `sensor_id` o `sensor_name`. - **Device ID** Identifica il dispositivo che raggruppa uno o più sensori. Esempio: `device_id` o `controller_name`. Per ogni chiave mappata è inoltre possibile assegnare una **tipologia**, che definisce come la piattaforma deve interpretare quel valore. Le tipologie disponibili sono: - **Campo di testo**: per valori testuali. - **Data**: selezionabile come solo data o come data e ora. - **Numero**: selezionabile come numero intero o numero reale. - **Vero/falso**: per valori booleani. La tipologia assegnata a ciascun campo influenza le condizioni disponibili nella sezione Automazioni**.** **[](https://wiki.eaglearca.com/uploads/images/gallery/2026-05/gg4read-as.png)** **5.** Se il payload include **dati geografici**, è possibile **mappare anche le coordinate**. Attiva lo switch per configurare come la piattaforma deve **leggere le coordinate in arrivo**. Una volta attivato, puoi scegliere il formato con cui le coordinate vengono trasmesse dal provider: - **Campo singolo** Le coordinate sono contenute in un unico campo del payload. Inserisci il nome del campo in **Corrisponde a**. - **Doppio campo** Latitudine e longitudine sono trasmesse in campi separati. Inserisci i rispettivi nomi nei campi **Latitudine corrisponde a** e **Longitudine corrisponde a**. [](https://wiki.eaglearca.com/uploads/images/gallery/2026-05/coordinates-section.png)Il campo Coordinate è necessario per abilitare alcune azioni nelle **Automazioni**, come la **creazione di un oggetto** di tipo **Punto** o l'**avvio di una missione** robotica.
**6.** Per salvare, clicca **Salva** in alto a destra. Il bottone rimane disabilitato finché non sono compilati il nome, l'entità collegata e tutte le chiavi obbligatorie.Una volta salvato, nella lista compare un **link URL** che deve essere **fornito al provider** esterno per **abilitare l'invio dei dati**.
--- ### Modificare e gestire gli eventi Per **modificare un evento**, clicca sul bottone blu con l'icona freccia che compare passando il mouse sull'elemento. Se vuoi **duplicare un evento**, seleziona **un singolo elemento** dalla lista, poi clicca il bottone **Duplica** in alto a destra. Per **eliminare un evento**, seleziona uno o più elementi dalla lista: comparirà il bottone **Elimina** in alto a destra. Per **copiare l'URL** di un evento, usa il bottone apposito direttamente dalla lista. 💡 **Suggerimenti:** - Quando duplichi un evento, aggiorna le chiavi di mappatura se il provider di destinazione ha una struttura JSON diversa. - Usa nomi descrittivi per gli eventi per facilitarne il riconoscimento nella lista. --- ### Collegamenti - *[Creare e gestire i progetti](https://wiki.eaglearca.com/books/backoffice/page/create-and-manage-projects "Create and manage Projects")* - *[Gestire gli oggetti nel progetto](https://wiki.eaglearca.com/books/app-features/page/managing-objects-in-the-project "Managing objects in the project")* - [Configurare Sorgenti dati e Grafici](https://wiki.eaglearca.com/books/backoffice/page/configure-data-sources-and-charts "Configure Data Sources and Charts") --- ***Last update**: 26 May 2026*