Available only to users with **backoffice** permissions. To create a group, **the role** to which the group will be linked must **already exist** in the system.
--- ### Steps **1. Access the Backoffice** and click **Groups** in the left-side menu**.** The list shows the name, creation date, associated projects, added users and linked role.  **2.** Click the **New Group** button in the top-right corner.  **3. Fill in the required fields** (name and role): - Enter a unique name in the **Group Name** field. - Select the **Role** to associate from the drop-down menu. [](https://wiki.eaglearca.com/uploads/images/gallery/2025-12/3-name-and-role.png)Name and Role are **required** to save.
**4. Add or remove users.** The group configuration shows two lists: on the **left** are all **users in the organization**, while on the **right** are the **users already added to the group**. **To add users to the group**, select one or more names from the list on the left using `Control` or `Shift` for multiple selection, then drag them to the area on the right. **To remove users from the group**, select the names from the list on the right and drag them to the list on the left. To remove all added users, click **Clear**. [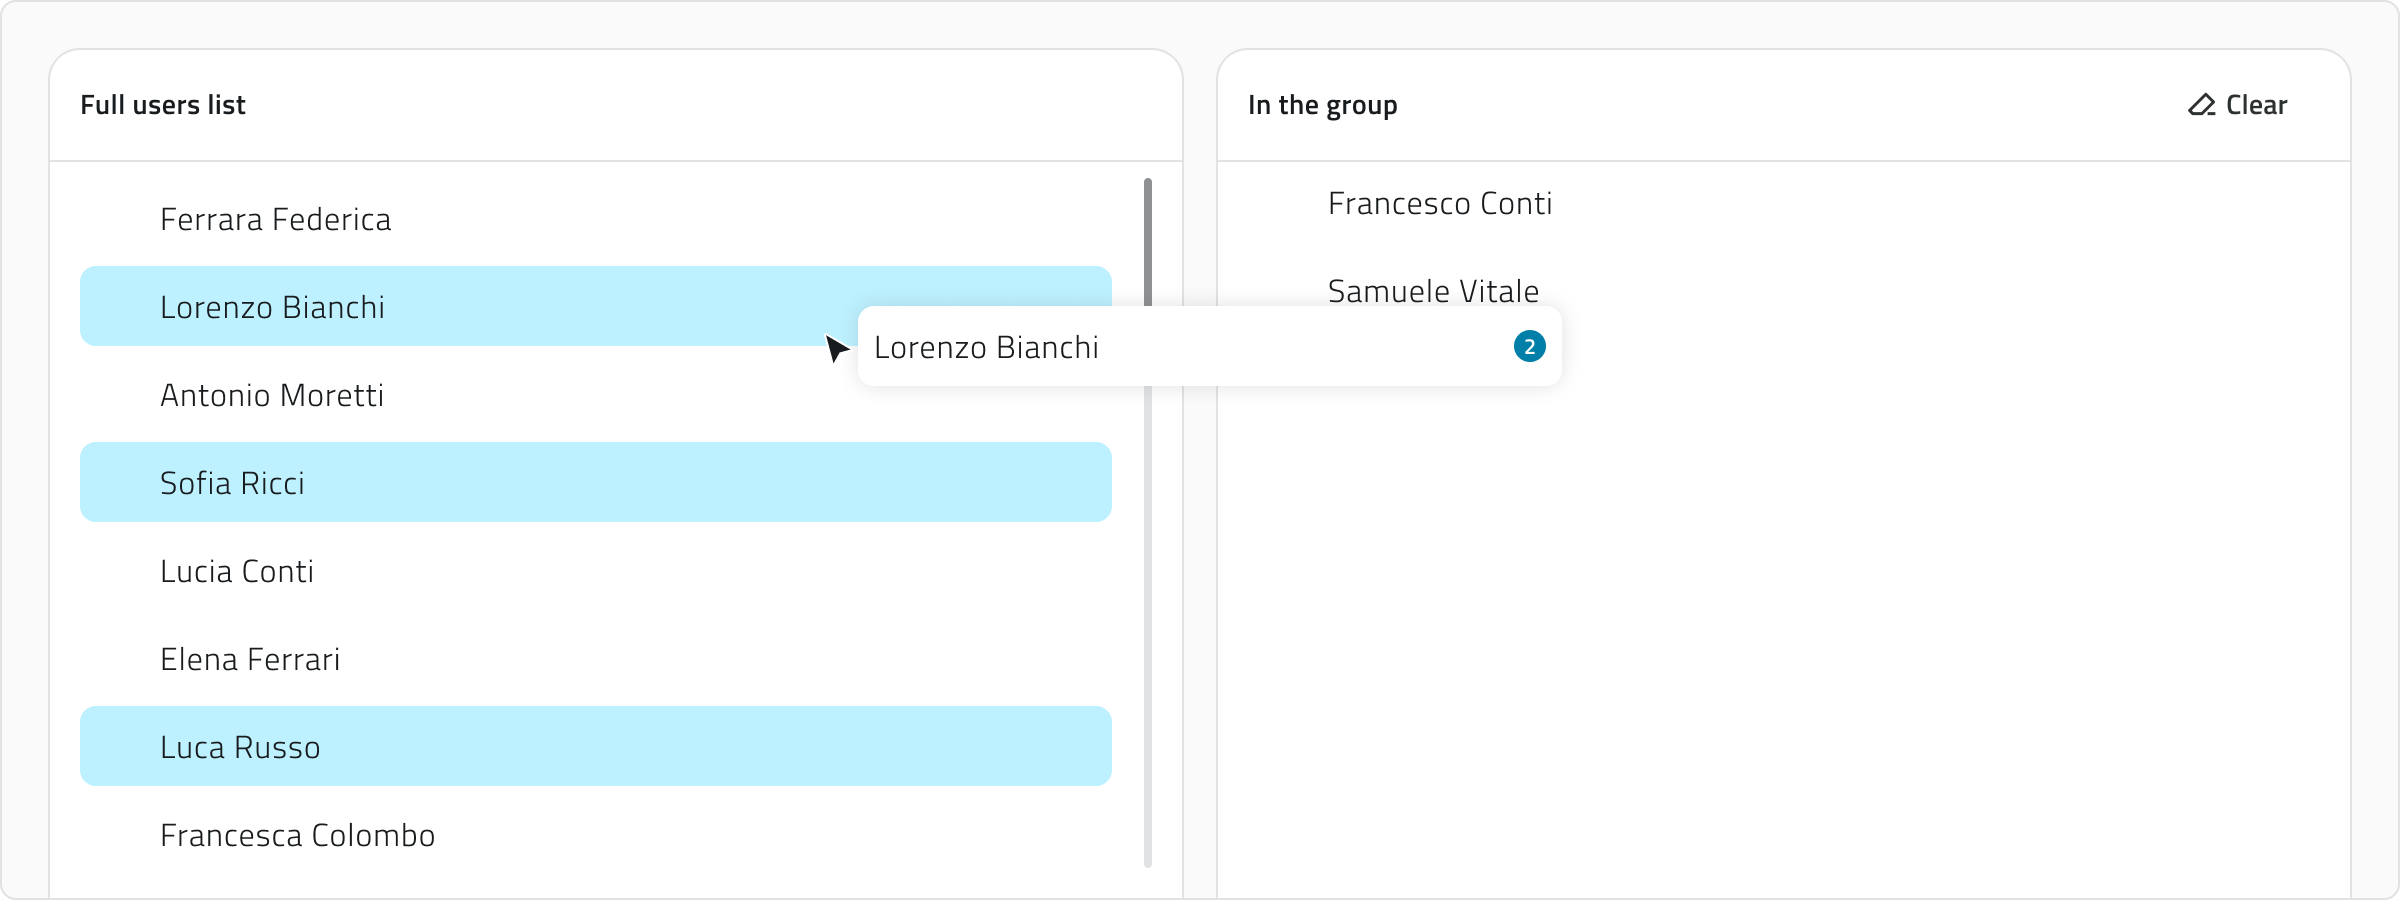](https://wiki.eaglearca.com/uploads/images/gallery/2025-12/xMu4-groups-configuration.png) **5. Save the new group** by clicking **Save** in the top-right corner (after assigning at least one user). 💡**Tip**: Use the *search bar* to filter users in both lists. 💡**Tip**: Make sure to assign only those users who need the same level of access to the projects. --- ### Viewing and Editing Groups **To edit a group**, click the blue button with the arrow icon that appears when you hover over the item. **To duplicate a group**, select an item from the list. Once selected, the **Duplicate** button will appear. --- ### Links - *[Overview of users, roles and groups](https://wiki.eaglearca.com/books/access-and-overview/page/overview-of-users-roles-and-groups "Overview of users, roles and groups")* - *[Introduction to Object Classes](https://wiki.eaglearca.com/books/access-and-overview/page/introduction-to-object-classes "Introduction to Object Classes")* - *[Create and manage Object Classes](https://wiki.eaglearca.com/books/backoffice/page/create-and-manage-object-classes "Create and manage Object Classes")* - *[Create and manage Projects](https://wiki.eaglearca.com/books/backoffice/page/create-and-manage-projects "Create and manage Projects")* ---  **Italian version** Un gruppo raccoglie utenti con lo stesso **ruolo** e **permessi**, consentendo loro di lavorare sugli stessi progetti con un set di operazioni coerenti. Creare un gruppo serve a **associare** [*utenti*](https://wiki.eaglearca.com/books/backoffice/page/create-and-manage-users "Create and manage Users") e **assegnare loro un** [*ruolo*](https://wiki.eaglearca.com/books/backoffice/page/create-and-manage-roles "Create and manage Roles"), semplificando la gestione dei permessi in modo scalabile.Disponibile solo per utenti con permesso **backoffice**. Per creare un gruppo è necessario che nel sistema sia **già presente** il **ruolo** a cui il gruppo deve essere collegato.
--- ### Passaggi **1. Accedi al Backoffice** e clicca su **Gruppi** nel menu sul lato sinistro. La lista mostra nome, data di creazione, progetti associati, utenti aggiunti e il ruolo collegato.  **2.** Clicca sul pulsante **Nuovo gruppo** in alto a destra.  **3. Compila i campi obbligatori** (nome e ruolo): - Inserisci un nome univoco nel campo **Nome gruppo**. - Seleziona il **Ruolo** da associare tramite il menu a tendina. [](https://wiki.eaglearca.com/uploads/images/gallery/2025-12/3-name-and-role.png)Nome e Ruolo sono **obbligatori** per il salvataggio.
**4. Aggiungi o rimuovi gli utenti.** La configurazione del gruppo mostra due liste: a **sinistra** sono disponibili **tutti gli utenti dell’organizzazione**, mentre a **destra** sono presenti gli **utenti già aggiunti al gruppo**. **Per aggiungere utenti al gruppo**, seleziona uno o più nominativi dalla lista a sinistra usando `Control` o `Shift` per le selezioni multiple, quindi trascinali nell’area a destra. **Per rimuovere utenti dal gruppo**, seleziona i nominativi dalla lista a destra e trascinali nella lista a sinistra. Per rimuovere tutti gli utenti aggiunti, clicca **Cancella**. [](https://wiki.eaglearca.com/uploads/images/gallery/2025-12/xMu4-groups-configuration.png) **5. Salva il nuovo gruppo** cliccando **Salva** in alto a destra (dopo aver assegnato almeno un utente). 💡**Suggerimento**: Usa la barra di ricerca per filtrare gli utenti in entrambe le liste. 💡**Suggerimento**: Assicurati di assegnare solo gli utenti che devono avere lo stesso livello di accesso ai progetti. --- ### Visualizzazione e Modifica dei Gruppi **Per modificare un gruppo**, clicca sul pulsante blu con l’icona di una freccia, che appare al passaggio del mouse sull’elemento. **Per duplicare un gruppo**, seleziona un elemento dalla lista. Dopo la selezione, compare il pulsante **Duplica**. --- ### Collegamenti - *[Panoramica utenti, ruoli e gruppi](https://wiki.eaglearca.com/books/access-and-overview/page/overview-of-users-roles-and-groups "Overview of users, roles and groups")* - *[Introduzione alle Classi Oggetto](https://wiki.eaglearca.com/books/access-and-overview/page/introduction-to-object-classes "Introduction to Object Classes")* - *[Creare e gestire le Classi Oggetto](https://wiki.eaglearca.com/books/backoffice/page/create-and-manage-object-classes "Create and manage Object Classes")* - *[Creare e gestire i Progetti](https://wiki.eaglearca.com/books/backoffice/page/create-and-manage-projects "Create and manage Projects")* --- ***Last update:** 07 May 2026*