Available only to users with `backoffice` permission.
--- ### Create the Class **1. Access the Backoffice** and navigate to **Object Classes**.  **2.** Click the **New Object** button.  **3. Enter the Name** (unique) and choose the object **Type**: [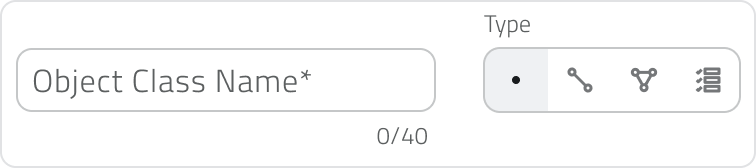](https://wiki.eaglearca.com/uploads/images/gallery/2025-12/XNw3-type.png)| **Object Type** | **Key Properties** |
| **Point** | Shape, Size, Stroke, Fill, Orientation |
| **Line** | Style (solid, dashed, dotted), Thickness, Stroke |
| **Polygon** | Fill, Stroke |
| **All vector objects** | Map visibility |
| Attribute type | Function | Attribute properties | Object Class properties |
|---|---|---|---|
| **Text field** | Allows you to enter letters, numbers, or text descriptions. | Can be set as **Required** or **Blocked**. A **maximum text length** can be defined. | Can be set as **Main Attribute** or **Group By Attribute**. |
| **Numeric field** | Allows you to enter numeric values, quantities, or measurements. | Can be set as **Required** or **Blocked**. You can choose between **integer** or **real** numbers and define a **value range**. | Can be set as **Main Attribute** or **Group By Attribute**. |
| **Value list** | Allows you to select one or more values from a predefined list. | Can be set as **Required** or **Blocked**. The selection can be configured as **single answer** or **multiple answers**. | Can be set as **Main Attribute** or **Group By Attribute**. |
| **Date** | Allows you to enter a date or a date with time. | Can be set as **Required** or **Blocked**. You can choose between **date only** or **date and time**. | Can be set as **Main Attribute** or **Group By Attribute**. |
| **Attachments** | Allows you to upload files associated with the object. | Can be set as **Required**. You can define which file types can be uploaded: **images**, **videos**, or **documents**. | No Object Class properties are available. |
| **Size** | Automatically records the object’s geometric information, such as coordinates, length, or area. | No specific attribute properties are available. | Can be set as **Main Attribute**. |
| **True/False** | Allows you to choose between two boolean values. | Can be set as **Blocked**. | Can be set as **Group By Attribute**. |
| **Object list** | Allows you to create a list of related sub-attributes, useful for repeated groups of information. | Can be set as **Blocked**. | No Object Class properties are available. |
Disponibile solo per utenti con permesso `backoffice`.
--- ### Creare la Classe **1.** Accedi **al Backoffice** e naviga in **Classi Oggetto**.  **2.** Clicca sul bottone **Nuovo oggetto**.  **3. Inserisci il Nome** (univoco) e **scegli il Tipo** di oggetto: [](https://wiki.eaglearca.com/uploads/images/gallery/2025-12/XNw3-type.png) **Punto**: Vettoriale, caratterizzato da coordinate. **Linea**: Vettoriale, caratterizzata da lunghezza. **Poligono**: Vettoriale, caratterizzata da area. **Form**: Non vettoriale, senza posizione in mappa e stile. #### Impostazioni Avanzate In base al tipo di oggetto selezionato, possono essere disponibili configurazioni aggiuntive. Se il tipo è **Punto**, puoi attivare **Punto orientato** per memorizzare e rappresentare la direzione dell’oggetto in mappa. L’opzione aggiunge automaticamente un **attributo di sistema non modificabile**. Se il tipo è **Form**, puoi attivare **Form globale** per creare oggetti collegabili a qualsiasi progetto e gestibili dalla sezione **Liste Globali**. --- ### Configurare lo Stile di Default (Solo Vettoriali) Lo stile definito è lo **stile di default** che tutte le istanze ereditano. [](https://wiki.eaglearca.com/uploads/images/gallery/2025-12/mLD5-object-style.png)| **Tipo Oggetto** | **Proprietà Chiave** |
| **Punto** | Forma, Dimensione, Contorno (stroke), Riempimento (fill), Orientamento |
| **Linea** | Stile (continua, a tratti, puntinata), Spessore, Contorno (stroke) |
| **Poligono** | Riempimento (fill), Contorno (stroke) |
| **Tutti i vettoriali** | Visibilità in mappa |
| Tipo di attributo | Funzione | Proprietà dell’attributo | Proprietà della Classe Oggetto |
|---|---|---|---|
| **Campo di testo** | Permette di inserire lettere, numeri o descrizioni testuali. | Può essere impostato come **Obbligatorio** o **Bloccato**. È possibile definire una **lunghezza massima** del testo. | Può essere impostato come **Attributo principale** o come **Raggruppa per attributo**. |
| **Campo numerico** | Permette di inserire valori numerici, quantità o misurazioni. | Può essere impostato come **Obbligatorio** o **Bloccato**. È possibile scegliere tra numeri **interi** o **reali** e definire un **intervallo di valori**. | Può essere impostato come **Attributo principale** o come **Raggruppa per attributo**. |
| **Lista valori** | Permette di selezionare uno o più valori da un elenco predefinito. | Può essere impostata come **Obbligatoria** o **Bloccata**. È possibile configurare la selezione come **risposta singola** o **risposte multiple**. | Può essere impostata come **Attributo principale** o come **Raggruppa per attributo**. |
| **Data** | Permette di inserire una data o una data con orario. | Può essere impostata come **Obbligatoria** o **Bloccata**. È possibile scegliere tra formato **solo data** o **data e ora**. | Può essere impostata come **Attributo principale** o come **Raggruppa per attributo**. |
| **Allegati** | Permette di caricare file associati all’oggetto. | Può essere impostato come **Obbligatorio**. È possibile definire quali tipi di file caricare: **immagini**, **video** o **documenti**. | Non sono disponibili proprietà di Classe Oggetto. |
| **Dimensione** | Registra automaticamente informazioni geometriche dell’oggetto, come coordinate, lunghezza o area. | Non sono disponibili proprietà specifiche dell’attributo. | Può essere impostata come **Attributo principale**. |
| **Vero/Falso** | Permette di scegliere tra due valori booleani. | Può essere impostato come **Bloccato**. | Può essere impostato come **Raggruppa per attributo**. |
| **Lista oggetti** | Permette di creare una lista di sotto-attributi correlati, utile per gruppi di informazioni ripetute. | Può essere impostata come **Bloccata**. | Non sono disponibili proprietà di Classe Oggetto. |