Available only to users with **backoffice** permission.
--- ### Create a new Report **1. Access the Backoffice** and click **Report** in the left-side menu.  **2.** Click the **New report** button in the top-right corner. [](https://wiki.eaglearca.com/uploads/images/gallery/2026-05/nuovo-report.png) **3.** Enter a unique report name in the **Report Name** field (required, maximum 40 characters). **4.** If the report needs to collect data from all projects in the organisation, enable the **Global Report** switch. Global reports are managed from the Home and not from individual projects. [](https://wiki.eaglearca.com/uploads/images/gallery/2026-05/report-globale.png) **5.** Fill in the fields in the two sections. #### Template section In this section, fields unlock progressively. First select the **category** and then the **type** of report: these two fields help you **identify the most suitable template**. You can then select the **base template** and choose one or more output **formats**. [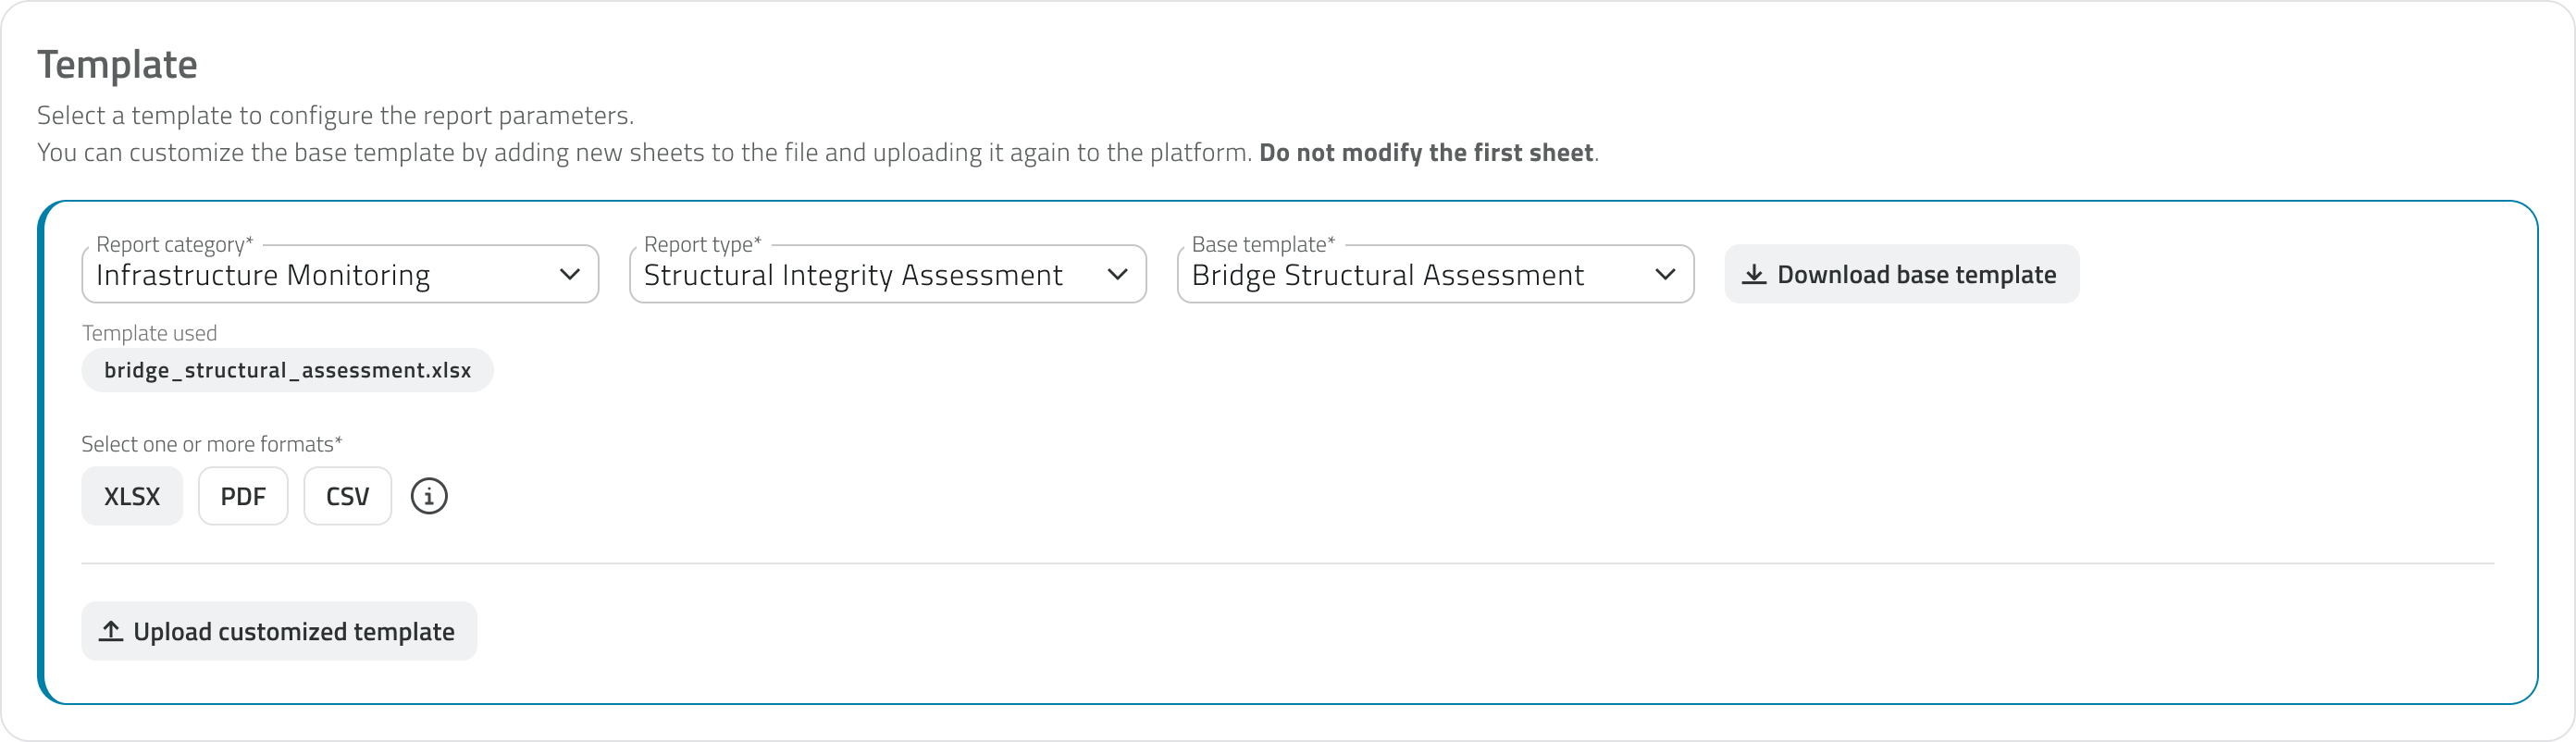](https://wiki.eaglearca.com/uploads/images/gallery/2026-05/CSztemplate-section.png) Once the template has been chosen, you can download it using the **Download base template** button and customise it by adding new sheets to the XLSX file. To use the customised template, re-upload it using the **Upload customised template** button. The uploaded file is shown with its name, upload date and time, and can be downloaded or removed. Removing it will automatically revert to the base template. [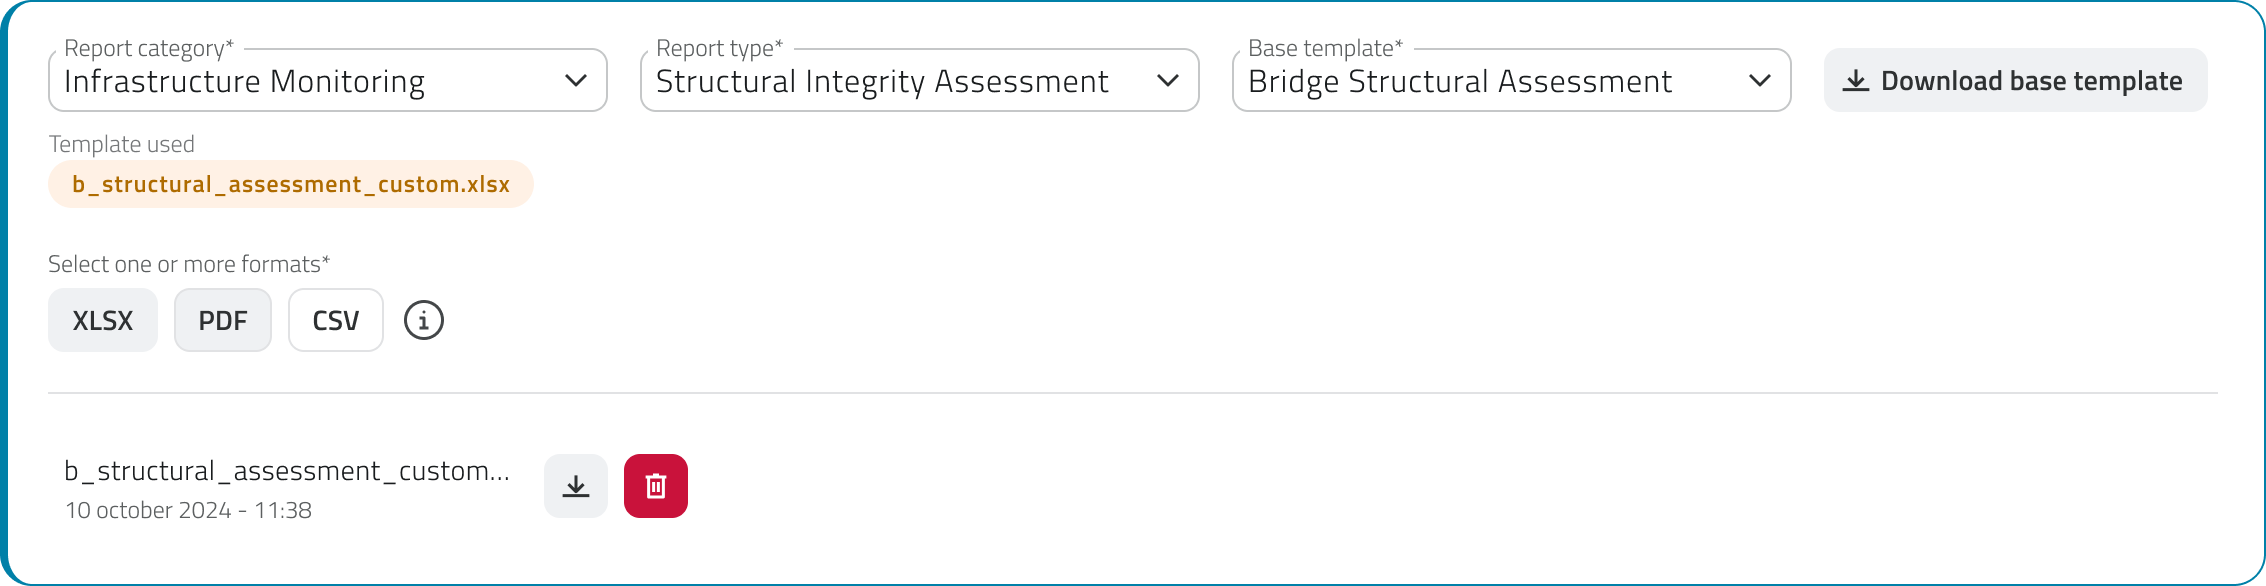](https://wiki.eaglearca.com/uploads/images/gallery/2026-05/custom-template.png)**Do not modify the first sheet** of the XLSX file: it contains the data structure used by the platform to populate the report.
#### Parameters section Once the template has been selected, the **Parameters** section populates with the parameters to configure, which vary depending on the chosen template. Parameters are divided into two groups, **Inputs** and **Filters**, defined by the template itself: - **Inputs** are configured here in the Backoffice by indicating where the system should retrieve the data from. They may be mandatory. - **Filters** are not configurable: they are shown here so you are aware of their presence, and are filled in by the user in the app at the time of generation to refine the report content. For each filter you can optionally set a **display name**, which is shown to the user in the app to help them fill in the field; if left empty, the system name is used. Filters that are mandatory for the user are marked with the **Required in App** label. [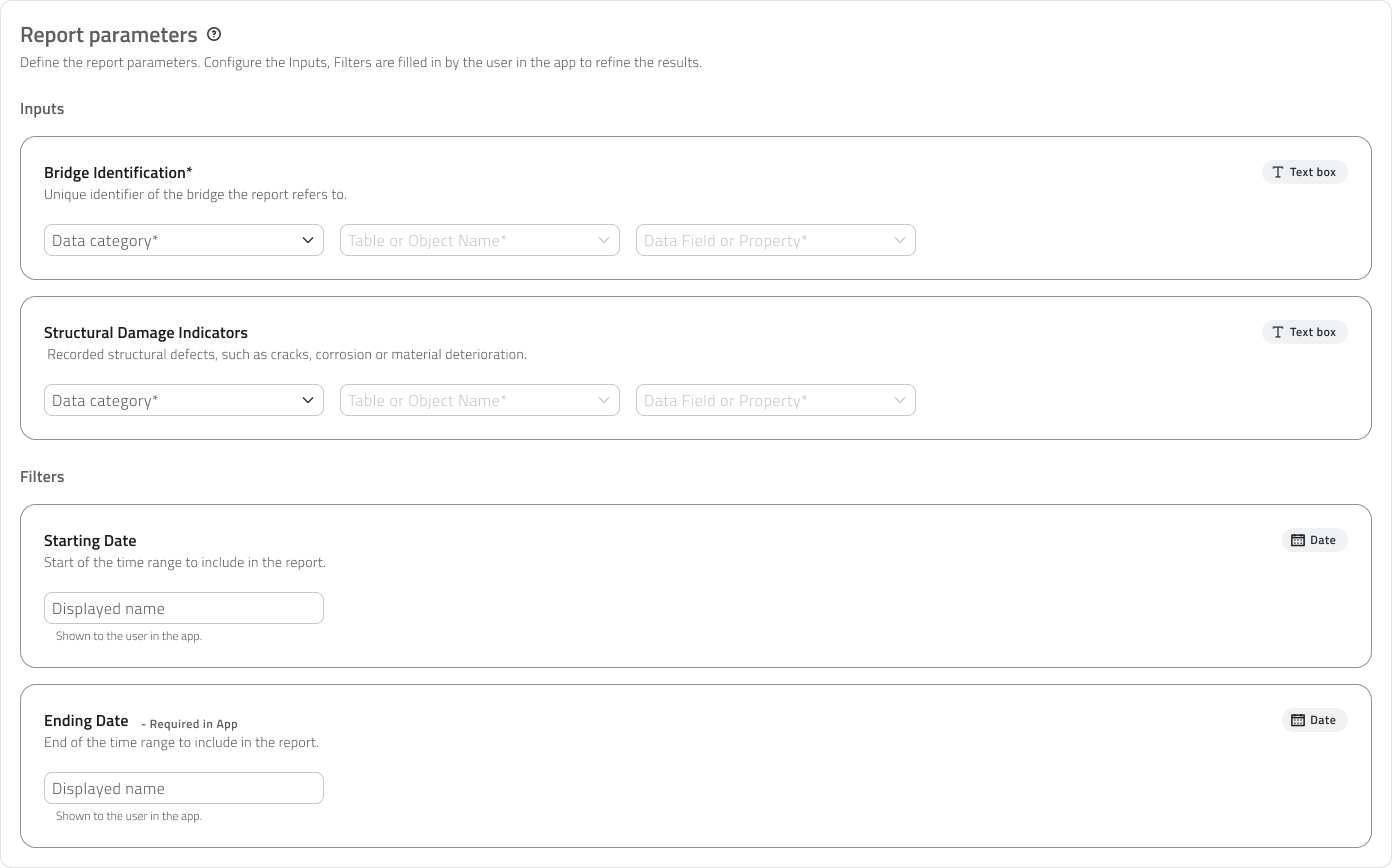](https://wiki.eaglearca.com/uploads/images/gallery/2026-06/parameters-section.png) For each **Input**, the following fields unlock in sequence to indicate where the system should retrieve the data from: - **Data category** The data category to draw from - **Table or Object Name** The specific table or object class - **Data Field or Property** The specific field or property to use Parameters can be of different types, such as **text**, **numbers**, **true/false**, **date** and **date and time**.The parameter type is indicative in the Backoffice and helps guide the configuration. For **Filters**, it determines the type of field the user will need to fill in at the time of generation in the app.
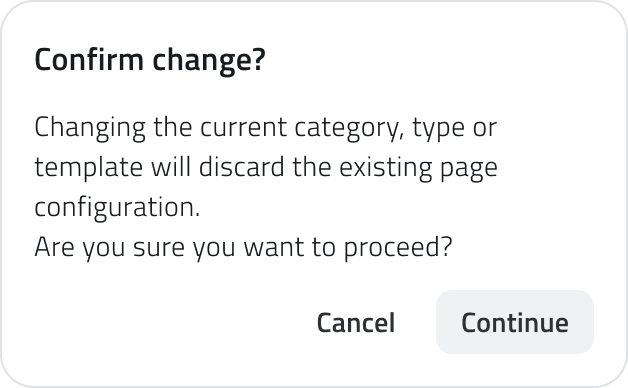
Changing the category, type or base template after having configured the parameters will **reset the entire parameter configuration**. The system will display a confirmation window before proceeding.
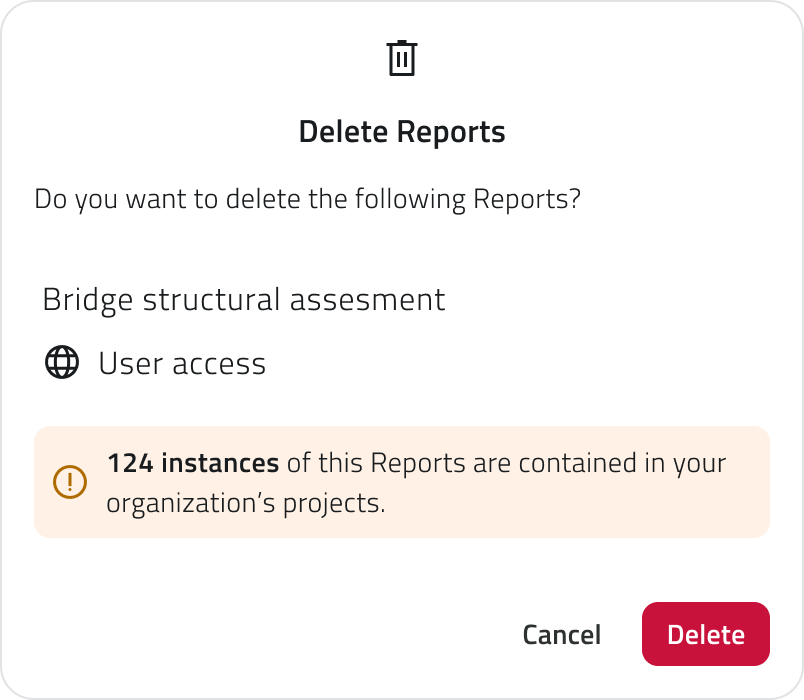
[](https://wiki.eaglearca.com/uploads/images/gallery/2026-05/reset-configuration.png) --- ### Save the Report Click **Save** in the top-right corner to complete the creation. On first save, a window opens to set the **default permission** to assign to the template for all existing roles. This setting can be modified later from the *[Roles page](https://wiki.eaglearca.com/books/backoffice/page/create-and-manage-roles "Create and manage Roles")* of the Backoffice. --- ### View and edit Reports The report list shows the following information for each element: - **Name** - **Base template** The selected base template. - **Formats** - **Parameters** Hovering over the number shows all parameters available for that template. - **Projects** Hovering over the number shows the list of projects in which the template has been added; global reports show 0 because they are managed from the Home. - **Creation date** Global reports are recognisable by the globe icon next to their name. [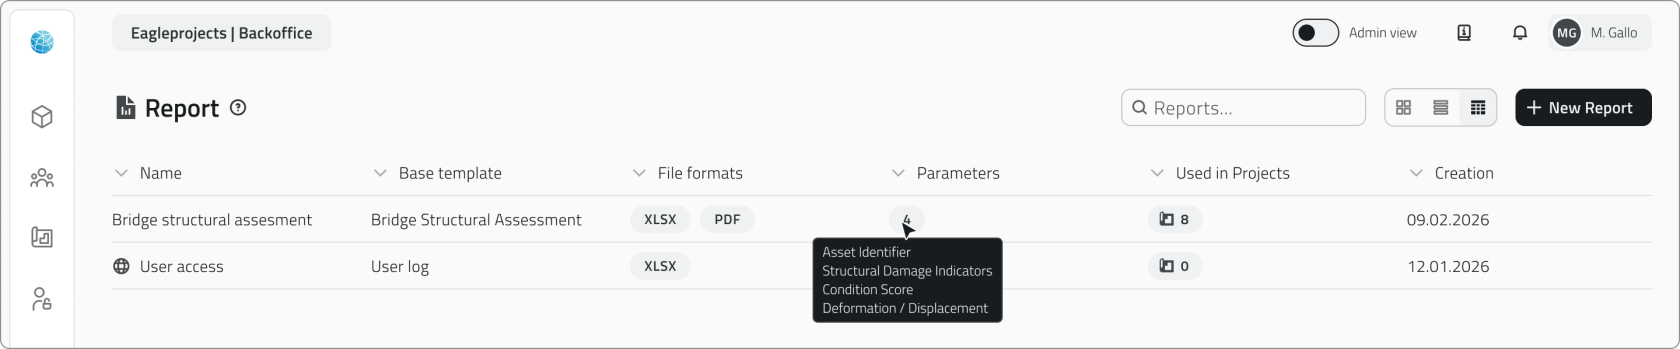](https://wiki.eaglearca.com/uploads/images/gallery/2026-05/report-page.png) #### Edit To **edit a report**, click the blue button with the arrow icon that appears when hovering over the element. #### Duplicate To **duplicate a report**, select an element from the list to display the **Duplicate** button in the top-right corner of the page. #### Delete To delete a report, select one or more elements and click the **Delete** button in the top-right corner of the page. Hold **CTRL** and click to add reports to the selection or remove them from it.Deleting a report template causes the **deletion of all instances** generated from that template in projects and from the Home. The system shows the number of instances involved before proceeding with the confirmation.
[](https://wiki.eaglearca.com/uploads/images/gallery/2026-05/delete-reports.png) --- ### Links - *[Create and manage Projects](https://wiki.eaglearca.com/books/backoffice/page/create-and-manage-projects "Create and manage Projects")* - *[Managing reports in the project](https://wiki.eaglearca.com/books/app-features/page/managing-reports-in-the-project "Managing reports in the project")* ---Disponibile solo per utenti con permesso **backoffice**.
--- ### Creare un nuovo Report **1. Accedi al Backoffice** e clicca su **Report** nel menu laterale sinistro.  **2.** Clicca sul pulsante **Nuovo report** in alto a destra. [](https://wiki.eaglearca.com/uploads/images/gallery/2026-05/nuovo-report.png) **3.** Inserisci un nome univoco del report nel campo **Nome Report** (obbligatorio, massimo 40 caratteri). **4.** Se il report deve raccogliere dati da tutti i progetti dell'organizzazione, attiva lo switch **Global Report**. I report globali vengono gestiti dalla Home e non dai singoli progetti. [](https://wiki.eaglearca.com/uploads/images/gallery/2026-05/report-globale.png) **5.** Compila i campi delle due sezioni. #### Sezione Template In questa sezione i campi si sbloccano progressivamente. Seleziona prima la **categoria** e poi la **tipologia** del report: questi due campi ti aiutano a **individuare il template più adatto**. A questo punto puoi selezionare il **template base** e scegliere uno o più **formati** di output. [](https://wiki.eaglearca.com/uploads/images/gallery/2026-05/CSztemplate-section.png) Una volta scelto il template, è possibile scaricarlo tramite il pulsante **Scarica template base** e personalizzarlo aggiungendo nuovi fogli al file XLSX. Per utilizzare il template personalizzato, ricaricalo tramite il pulsante **Carica template personalizzato**. Il file caricato viene mostrato con nome, data e ora di caricamento e può essere scaricato o rimosso. Rimuovendolo si tornerà automaticamente al template base. [](https://wiki.eaglearca.com/uploads/images/gallery/2026-05/custom-template.png)**Non modificare il primo foglio** del file XLSX: contiene la struttura dati utilizzata dalla piattaforma per popolare il report.
#### Sezione Parametri Una volta selezionato il template, la sezione **Parametri** si popola con i parametri da configurare, che variano in base al template scelto. I parametri si dividono in due gruppi, **Input** e **Filtri**, definiti dal template stesso: - Gli **Input** vengono configurati qui nel Backoffice indicando da dove il sistema deve recuperare il dato. Possono essere obbligatori. - I **Filtri** non sono configurabili: vengono mostrati qui per darti consapevolezza della loro presenza e vengono compilati dall'utente in app al momento della generazione per affinare il contenuto del report. Per ogni filtro puoi facoltativamente impostare un **nome in visualizzazione**, che viene mostrato all'utente in app per aiutarlo nella compilazione del campo; se lasciato vuoto, viene usato il nome di sistema. I filtri obbligatori per l'utente sono contrassegnati dall'etichetta **Required in App**. [](https://wiki.eaglearca.com/uploads/images/gallery/2026-06/parameters-section.png) Per ogni **Input**, i seguenti campi si sbloccano a cascata per indicare da dove il sistema deve recuperare il dato: - **Categoria del dato** La categoria di dati da cui attingere - **Tabella o Nome oggetto** La tabella o la classe oggetto specifica - **Campo del dato o Proprietà** Il campo o la proprietà specifica da utilizzare I parametri possono essere di diversi tipi, come **testo**, **numeri**, **vero/falso**, **data** e **data e ora**.Il tipo di parametro è indicativo nel Backoffice e aiuta a indirizzare la configurazione. Per i **Filtri**, determina il tipo di campo che l'utente dovrà compilare al momento della generazione in app.
Modificare la categoria, la tipologia o il template base dopo aver configurato i parametri **resetterà tutta la configurazione** dei parametri. Il sistema mostrerà una finestra di conferma prima di procedere.
[](https://wiki.eaglearca.com/uploads/images/gallery/2026-05/reset-configuration.png) --- ### Salvare il Report Clicca **Salva** in alto a destra per completare la creazione. Al primo salvataggio si apre una finestra per impostare il **permesso di default** da assegnare al template per tutti i ruoli esistenti. Questa impostazione può essere modificata in seguito dalla *[pagina Ruoli](https://wiki.eaglearca.com/books/backoffice/page/create-and-manage-roles "Create and manage Roles")* del Backoffice. --- ### Visualizzare e modificare i Report Nella lista dei report sono visibili le seguenti informazioni per ogni elemento: - **Nome** - **Template base** Il template base selezionato - **Formati** - **Parametri** Passando il mouse sul numero vengono mostrati tutti i parametri disponibili per quel template. - **Progetti** Passando il mouse sul numero viene mostrata la lista dei progetti in cui il template è stato aggiunto; i report globali mostrano 0 perché sono gestiti dalla Home - **Data di creazione** I report globali sono riconoscibili dall'icona del globo accanto al nome. [](https://wiki.eaglearca.com/uploads/images/gallery/2026-05/report-page.png) #### Modifica Per **modificare un report**, clicca sul pulsante blu con l'icona freccia che appare al passaggio del mouse sull'elemento. #### Duplicazione Se vuoi **duplicare un report**, seleziona un elemento dalla lista per visualizzare il pulsante **Duplica** in alto a destra della pagina. #### Eliminazione Se vuoi eliminare un report puoi selezionare uno o più elementi e cliccare sul pulsante **Elimina** in alto a destra della pagina. Tieni premuto **CTRL** e clicca per aggiungere report alla selezione o toglierli.Eliminare un template di report comporta l'**eliminazione di tutte le istanze** generate da quel template nei progetti e dalla Home. Il sistema mostra il numero di istanze coinvolte prima di procedere con la conferma.
[](https://wiki.eaglearca.com/uploads/images/gallery/2026-05/delete-reports.png) --- ### Collegamenti - *[Creare e gestire i Progetti](https://wiki.eaglearca.com/books/backoffice/page/create-and-manage-projects "Create and manage Projects")* - *[Gestire i report nel progetto](https://wiki.eaglearca.com/books/app-features/page/managing-reports-in-the-project "Managing reports in the project")* --- ***Last update:** 11 June 2026*