
Import shape files
 Italiano
English version
The Upload Shape tool allows you to import geographic data in Shapefile format and automatically create new objects within an object class in the project.
During the import, the geometries in the shapefile are converted into objects of the selected object class and the attributes are filled in using the values present in the file.
Preparing the Shapefile
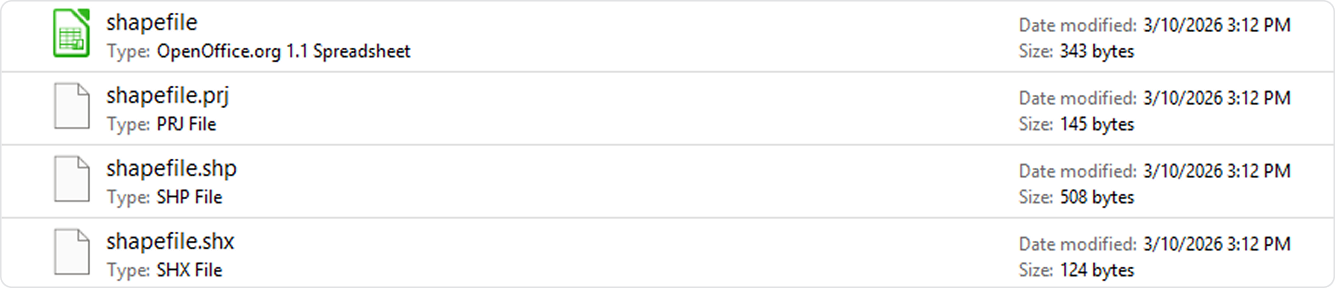
The file must be uploaded in ZIP format and must contain the main shapefile components:
.shp.dbf.shx.prj
All files must have the same name.
The maximum ZIP file size is 10 MB.
Only one Shape file can be uploaded at a time.
Each upload allows you to create objects for one object class only.
Importing a Shapefile
To import a shapefile:
1) Open the Tools section of the project.
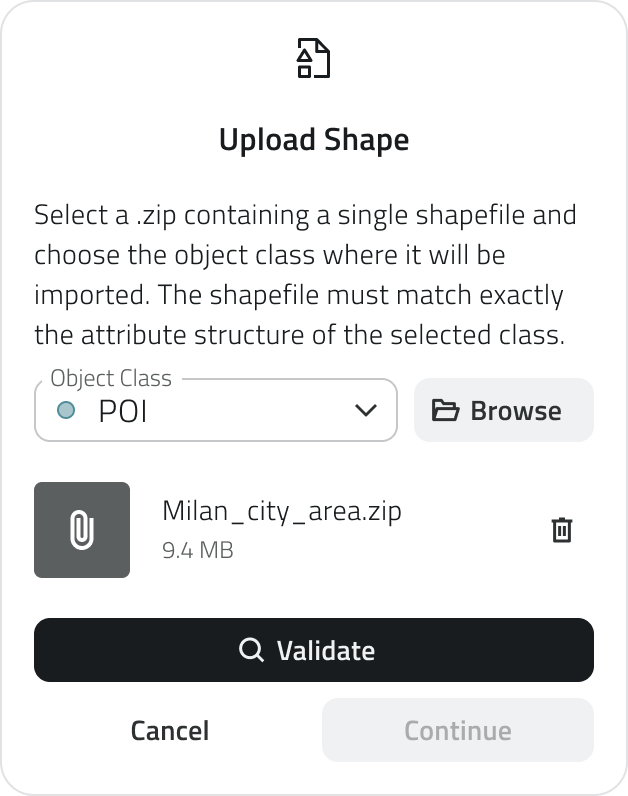
2) Click the Upload Shape button.
3) Select the ZIP file containing the shapefile.
4) Select the object class to import the data into and click the Validate button to verify that the uploaded file meets the necessary requirements.
During this phase the system automatically performs some checks.
In particular it verifies that:
- the geometry type of the shapefile is compatible with the selected object class
- the shapefile contains sufficient attributes to fill in the mandatory ones of the object class
If the checks are passed, you can proceed with the import configuration.
Coordinate systems
The platform is compatible with the following coordinate systems:
| EPSG code | Name | Type |
| EPSG:4326 | WGS 84 | Geographic |
| EPSG:3857 | Web Mercator | Projected |
| EPSG:3003 | Monte Mario / Italy zone 1 (Gauss-Boaga Ovest) | Projected |
| EPSG:3004 | Monte Mario / Italy zone 2 (Gauss-Boaga Est) | Projected |
| EPSG:6707 | RDN2008 / Italy zone (E-N) — TM32 | Projected |
| EPSG:6708 | RDN2008 / Italy zone (E-N) — TM33 | Projected |
| EPSG:25832 | ETRS89 / UTM zone 32N | Projected |
| EPSG:25833 | ETRS89 / UTM zone 33N | Projected |
| EPSG:32632 | WGS 84 / UTM zone 32N | Projected |
| EPSG:32633 | WGS 84 / UTM zone 33N | Projected |
| EPSG:23032 | ED50 / UTM zone 32N | Projected |
| EPSG:23033 | ED50 / UTM zone 33N | Projected |
| EPSG:28992 | Amersfoort / RD New (Netherlands) | Projected |
| EPSG:27700 | OSGB36 / British National Grid | Projected |
| EPSG:2154 | RGF93 / Lambert-93 | Projected |
| EPSG:4258 | ETRS89 (geographic) | Geographic |
| EPSG:4269 | NAD83 (geographic) | Geographic |
| EPSG:4267 | NAD27 (geographic) | Geographic |
| EPSG:4230 | ED50 (geographic) | Geographic |
Mapping shapefile attributes
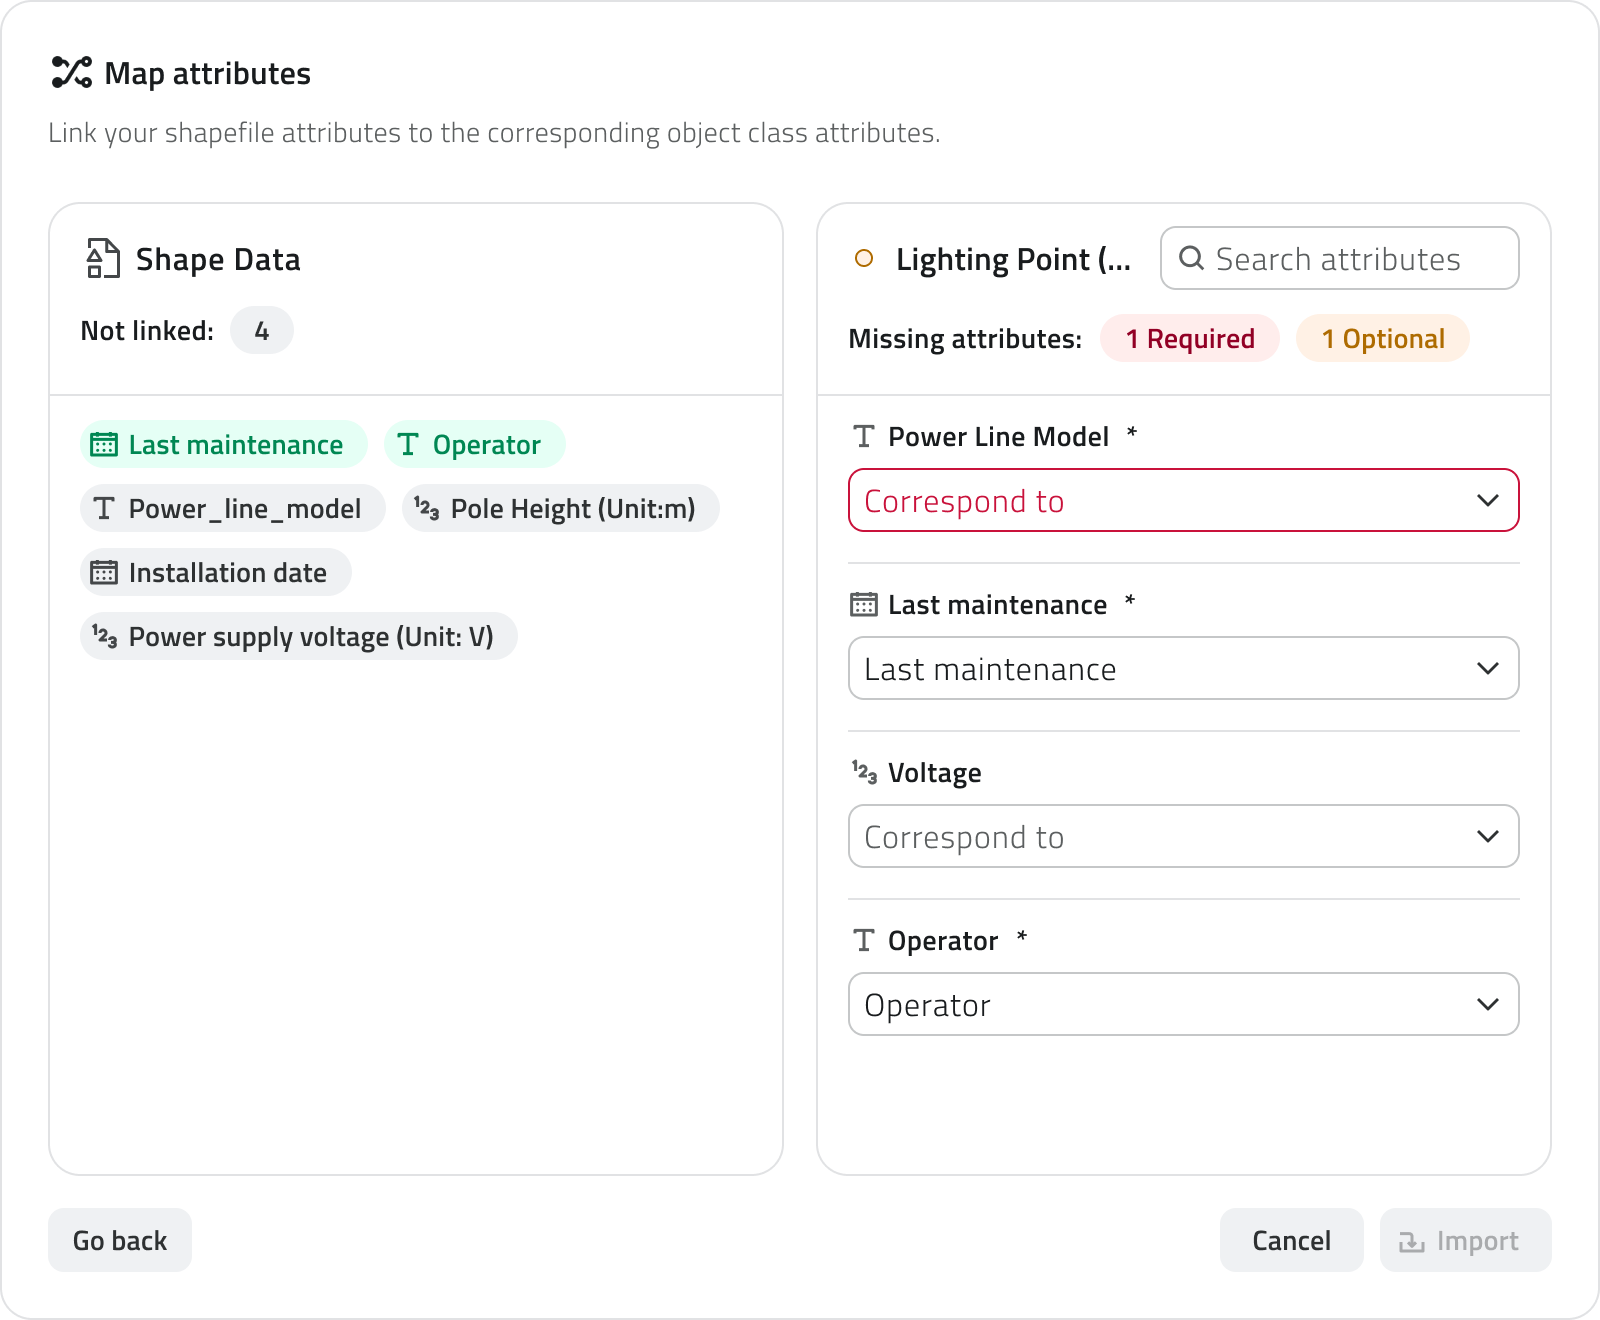
After the file has been validated, a screen is displayed that allows you to manually configure the attribute mappings. The system automatically suggests an initial match between the attributes in the shapefile and those of the object class.
The screen is organised in two columns:
- left: attributes present in the shapefile
- right: attributes of the object class
For each attribute of the object class you can select which shapefile attribute to use.
During configuration, some visual indicators are shown to help complete the mapping correctly.
In particular:
- Mandatory attributes of the selected object class that have not yet been filled in are highlighted in red.
- Shapefile attributes that have already been used are shown as linked and highlighted in green.
- A counter shows how many shapefile attributes have not yet been mapped.
Only attributes of the same type can be mapped together.
If a shapefile attribute is reused, the previous mapping is automatically removed.
Starting the import
When you confirm the import by clicking Import, the system starts the upload process.
During this phase:
- The object class instances are created automatically
- Geometries are imported from the shapefile
- Attribute values are filled in according to the configured mappings
Leaving the project or refreshing the browser page will interrupt all ongoing uploads.
Monitoring the import status
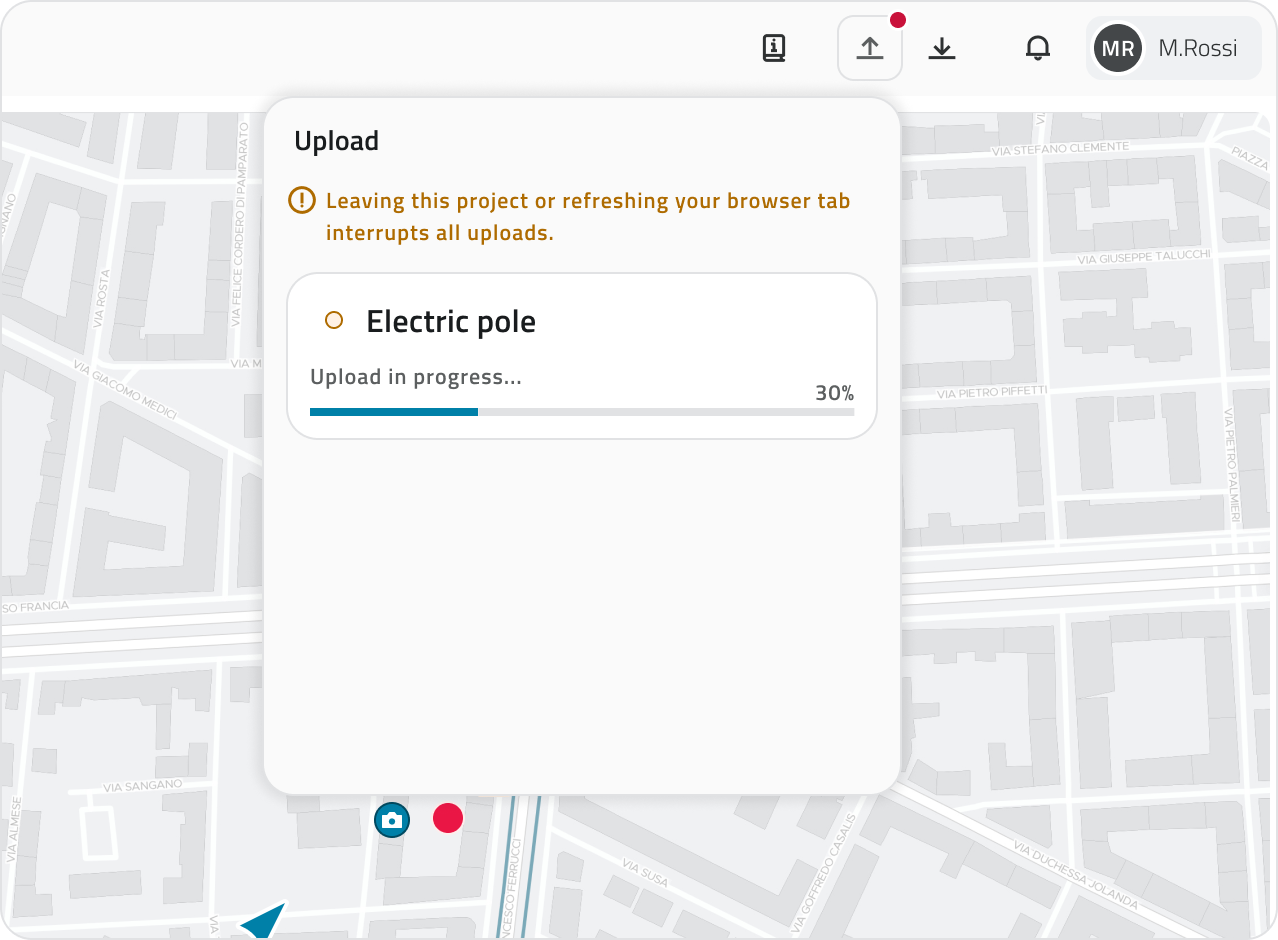
In the page header, the Upload menu is available, which allows you to monitor the status, the import progress of shapefiles and the outcome of the last completed operation.
Information about the last upload remains visible for 4 hours from the start of the import.
Only one Shape file can be uploaded at a time.
If necessary, the ongoing upload can be cancelled using the Cancel button.
Import completed
At the end of the import, the shapefile geometries are created in the selected object class. If some geometries are invalid or incomplete, they may not be imported.
The upload card shows the number of geometries created relative to the total present in the file.
Once the operation is complete, you can always download the import report, which contains a summary of the processed elements and any issues encountered.
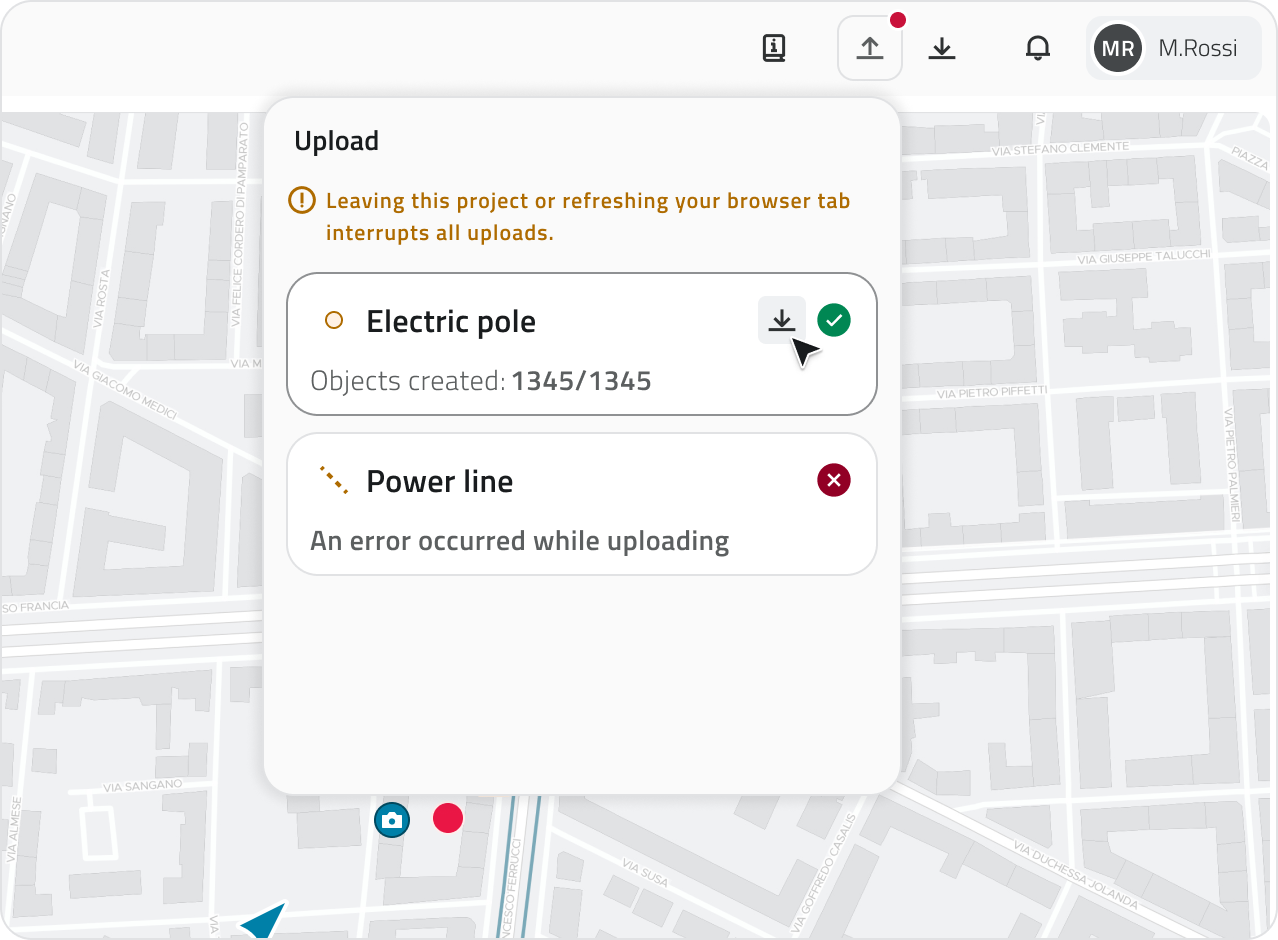
💡 Tip: Use the report to check for any issues: if the import is partial, the report allows you to identify the geometries that were not imported.
Links
Lo strumento Upload Shape permette di importare dati geografici in formato Shapefile e creare automaticamente nuovi oggetti all’interno di una classe oggetto del progetto. Durante l’importazione, le geometrie presenti nello shapefile vengono convertite in oggetti della classe oggetto selezionata e gli attributi vengono compilati utilizzando i valori presenti nel file. Il file deve essere caricato in formato ZIP e deve contenere i principali componenti dello shapefile: Tutti i file devono avere lo stesso nome. La dimensione massima del file ZIP è 10 MB. È possibile caricare un solo file Shape alla volta. Per importare uno shapefile: 1) Apri la sezione Strumenti del progetto. 2) Clicca sul pulsante Carica Shape. 3) Seleziona il file ZIP contenente lo shapefile. 4) Seleziona la classe oggetto in cui importare i dati e clicca sul pulsante Valida per verificare che il file caricato rispetti i requisiti necessari. Durante questa fase il sistema esegue automaticamente alcune verifiche. In particolare controlla che: Se i controlli sono superati è possibile continuare con la configurazione dell’importazione. La piattaforma è compatibile con i seguenti sistemi di coordinate: Codice EPSG Nome Tipo EPSG:4326 WGS 84 Geografico EPSG:3857 Web Mercator Proiettato EPSG:3003 Monte Mario / Italy zone 1 (Gauss-Boaga Ovest) Proiettato EPSG:3004 Monte Mario / Italy zone 2 (Gauss-Boaga Est) Proiettato EPSG:6707 RDN2008 / Italy zone (E-N) — TM32 Proiettato EPSG:6708 RDN2008 / Italy zone (E-N) — TM33 Proiettato EPSG:25832 ETRS89 / UTM zone 32N Proiettato EPSG:25833 ETRS89 / UTM zone 33N Proiettato EPSG:32632 WGS 84 / UTM zone 32N Proiettato EPSG:32633 WGS 84 / UTM zone 33N Proiettato EPSG:23032 ED50 / UTM zone 32N Proiettato EPSG:23033 ED50 / UTM zone 33N Proiettato EPSG:28992 Amersfoort / RD New (Netherlands) Proiettato EPSG:27700 OSGB36 / British National Grid Proiettato EPSG:2154 RGF93 / Lambert-93 Proiettato EPSG:4258 ETRS89 (geographic) Geografico EPSG:4269 NAD83 (geographic) Geografico EPSG:4267 NAD27 (geographic) Geografico EPSG:4230 ED50 (geographic) Geografico Dopo la verifica del file, viene visualizzata una schermata che consente di configurare manualmente le associazioni tra gli attributi. Il sistema propone automaticamente una prima corrispondenza tra gli attributi presenti nello shapefile e quelli della classe oggetto. La schermata è organizzata in due colonne: Per ogni attributo della classe oggetto puoi selezionare quale attributo dello shapefile utilizzare. Durante la configurazione vengono mostrati alcuni indicatori visivi che aiutano a completare correttamente l’associazione. In particolare: È possibile associare solo attributi dello stesso tipo. Se un attributo dello shapefile viene riutilizzato, l’associazione precedente viene automaticamente rimossa. Il pulsante Importa diventa disponibile solo quando tutti gli attributi obbligatori sono stati associati. Quando confermi l’importazione cliccando su Importa, il sistema avvia il processo di caricamento. Durante questa fase: Lasciare il progetto o aggiornare la pagina del browser, comporta l'interruzione di tutti i caricamenti. Nell'intestazione della pagina è disponibile il menu dell' Upload, che consente di monitorare lo stato, il progresso di importazione degli shapefile e l’esito dell’ultima operazione completata. Le informazioni relative all’ultimo upload restano visibili per 4 ore dall'avvio dell'importazione. È possibile caricare un solo file Shape alla volta. Al termine dell’importazione le geometrie dello shapefile vengono create nella classe oggetto selezionata. Se alcune geometrie risultano non valide o incomplete, potrebbero non essere importate. La card dell’upload mostra il numero di geometrie create rispetto al totale presente nel file. Al termine dell’operazione è sempre possibile scaricare il report dell’importazione, che contiene il riepilogo degli elementi elaborati e di eventuali problemi riscontrati. 💡Suggerimento: Usa il report per verificare eventuali problemi: se l'importazione è parziale, ti permette di identificare le geometrie che non sono state importate. Last update: 22 May 2026
Italian
Importa file shape
Preparare il file Shapefile
.shp.dbf.shx.prj
Ogni caricamento permette di creare oggetti per una sola classe oggetto.
Importare uno Shapefile

Sistemi di coordinate
Associare gli attributi dello shapefile
Avviare l’importazione
Monitorare lo stato dell’importazione
Se necessario, il caricamento in corso può essere annullato tramite il pulsante Cancella.
Importazione completata
Collegamenti
 English