
Navigating between views
![]() English version
English version
The project offers several views for interacting with objects and data: 2D Map, 3D Map, Inventory, Reports and Streaming.
Opening and closing views
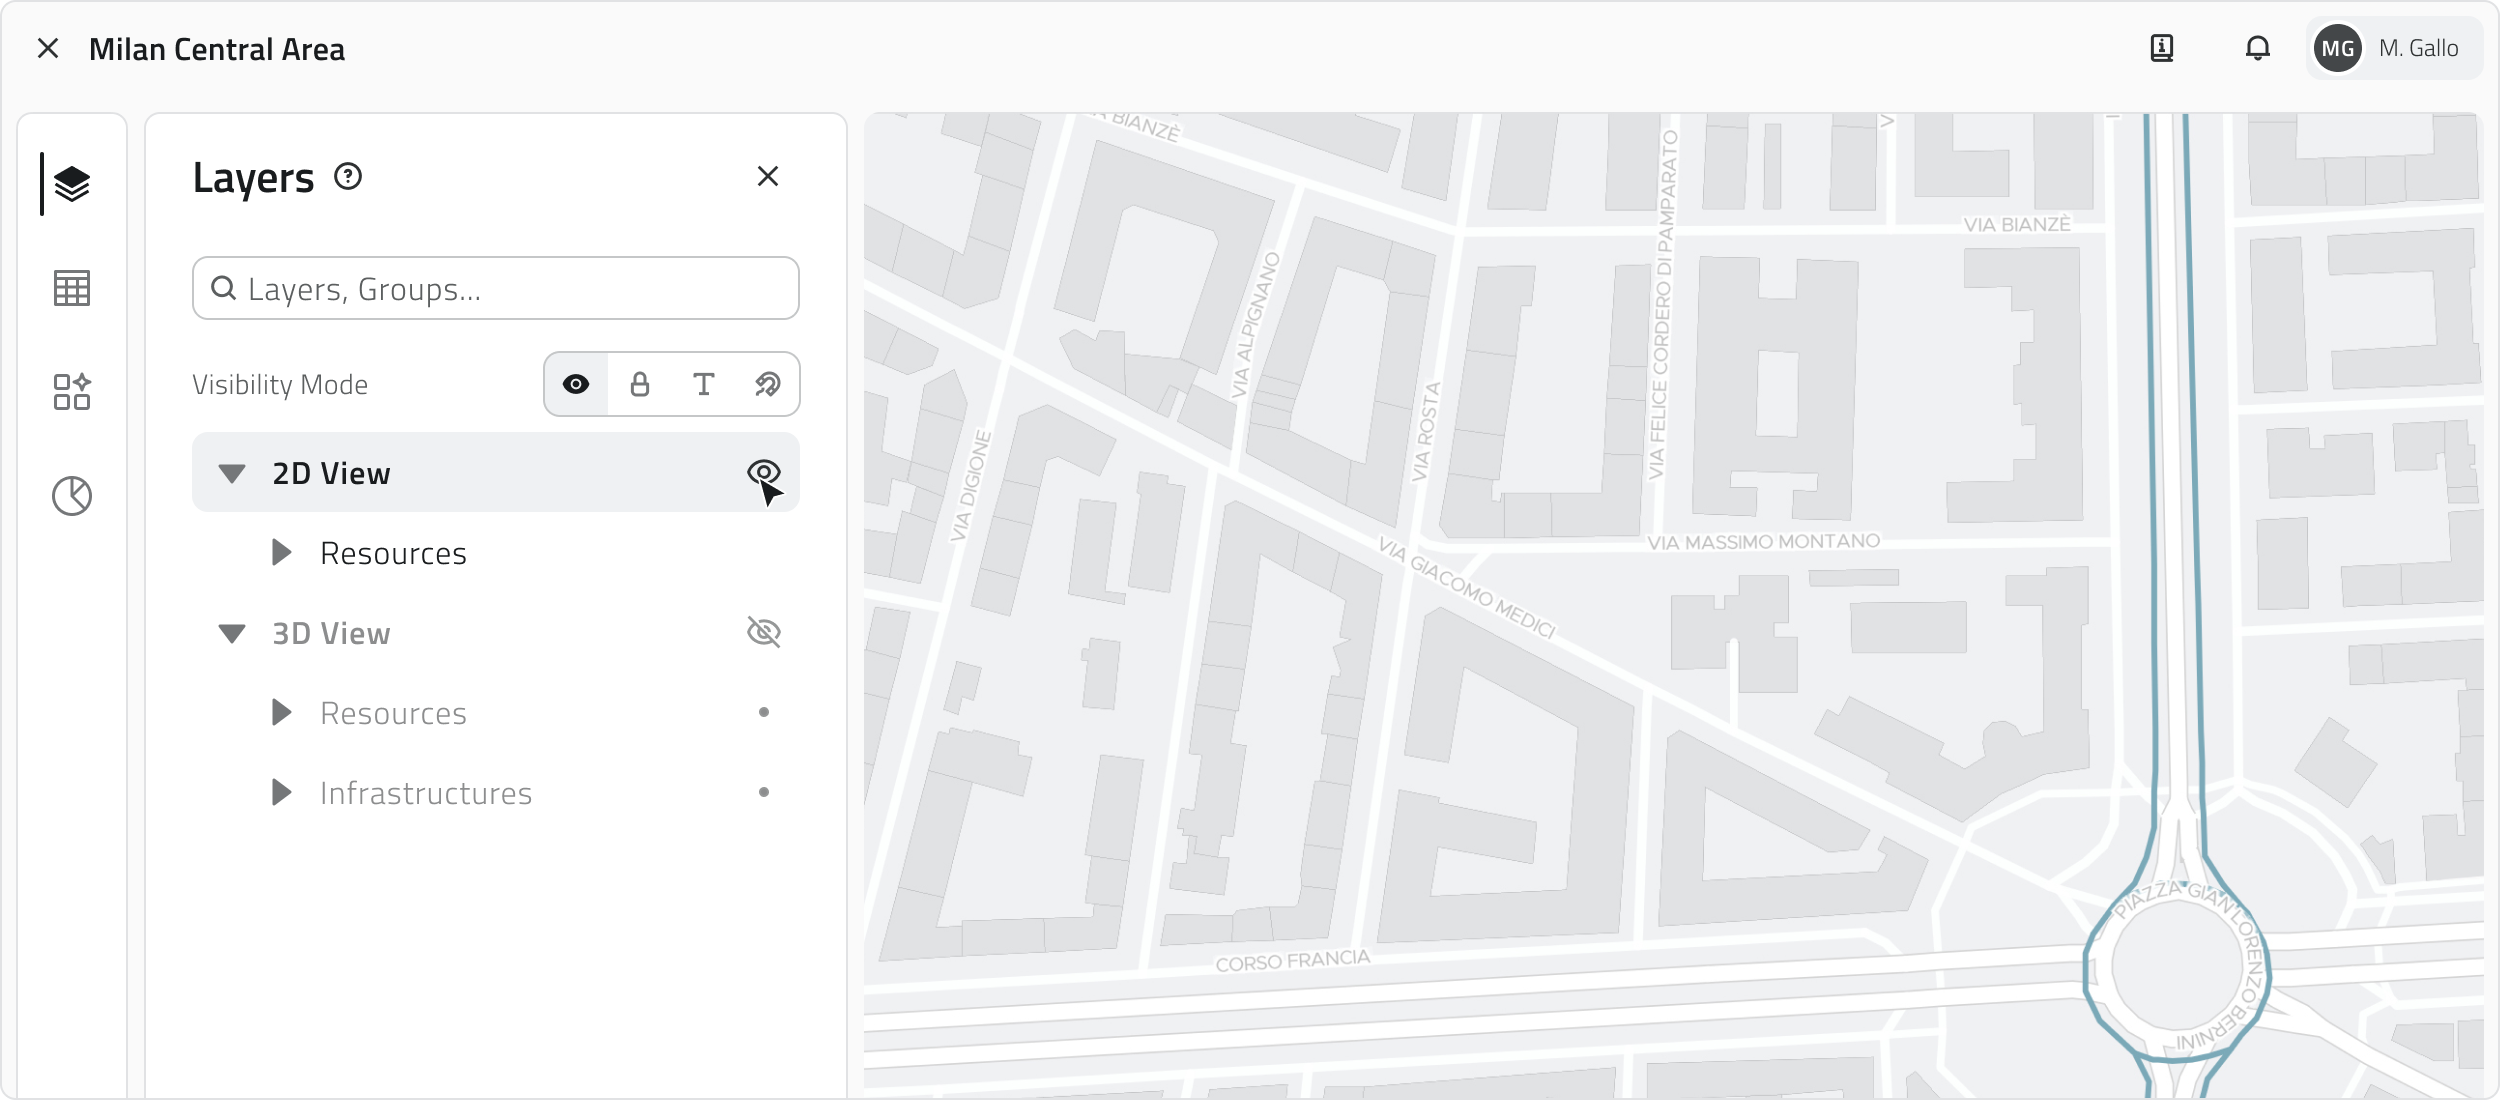
When a project is opened, some views open automatically. Clicking the Layers icon in the left sidebar opens the corresponding panel, from which you can show or hide individual views and object classes using the eye icon.
Navigation and object display
Vector objects are visible in both the 2D and 3D views, regardless of where they were created. In both views, objects are georeferenced and maintain the same geographic position within the workspace. Objects displayed in the 2D map are represented as flat elements on a plane, while in the 3D view they are placed in three-dimensional space.
Some automatically created objects may only be visible in the 2D view.
You can quickly locate a position in the 2D map by hovering over the view: the toolbar will appear, from which you can click the Search button (magnifying glass icon).
A search bar will open where you can type an address or the name of a city. As you type, the system automatically shows suggested results.
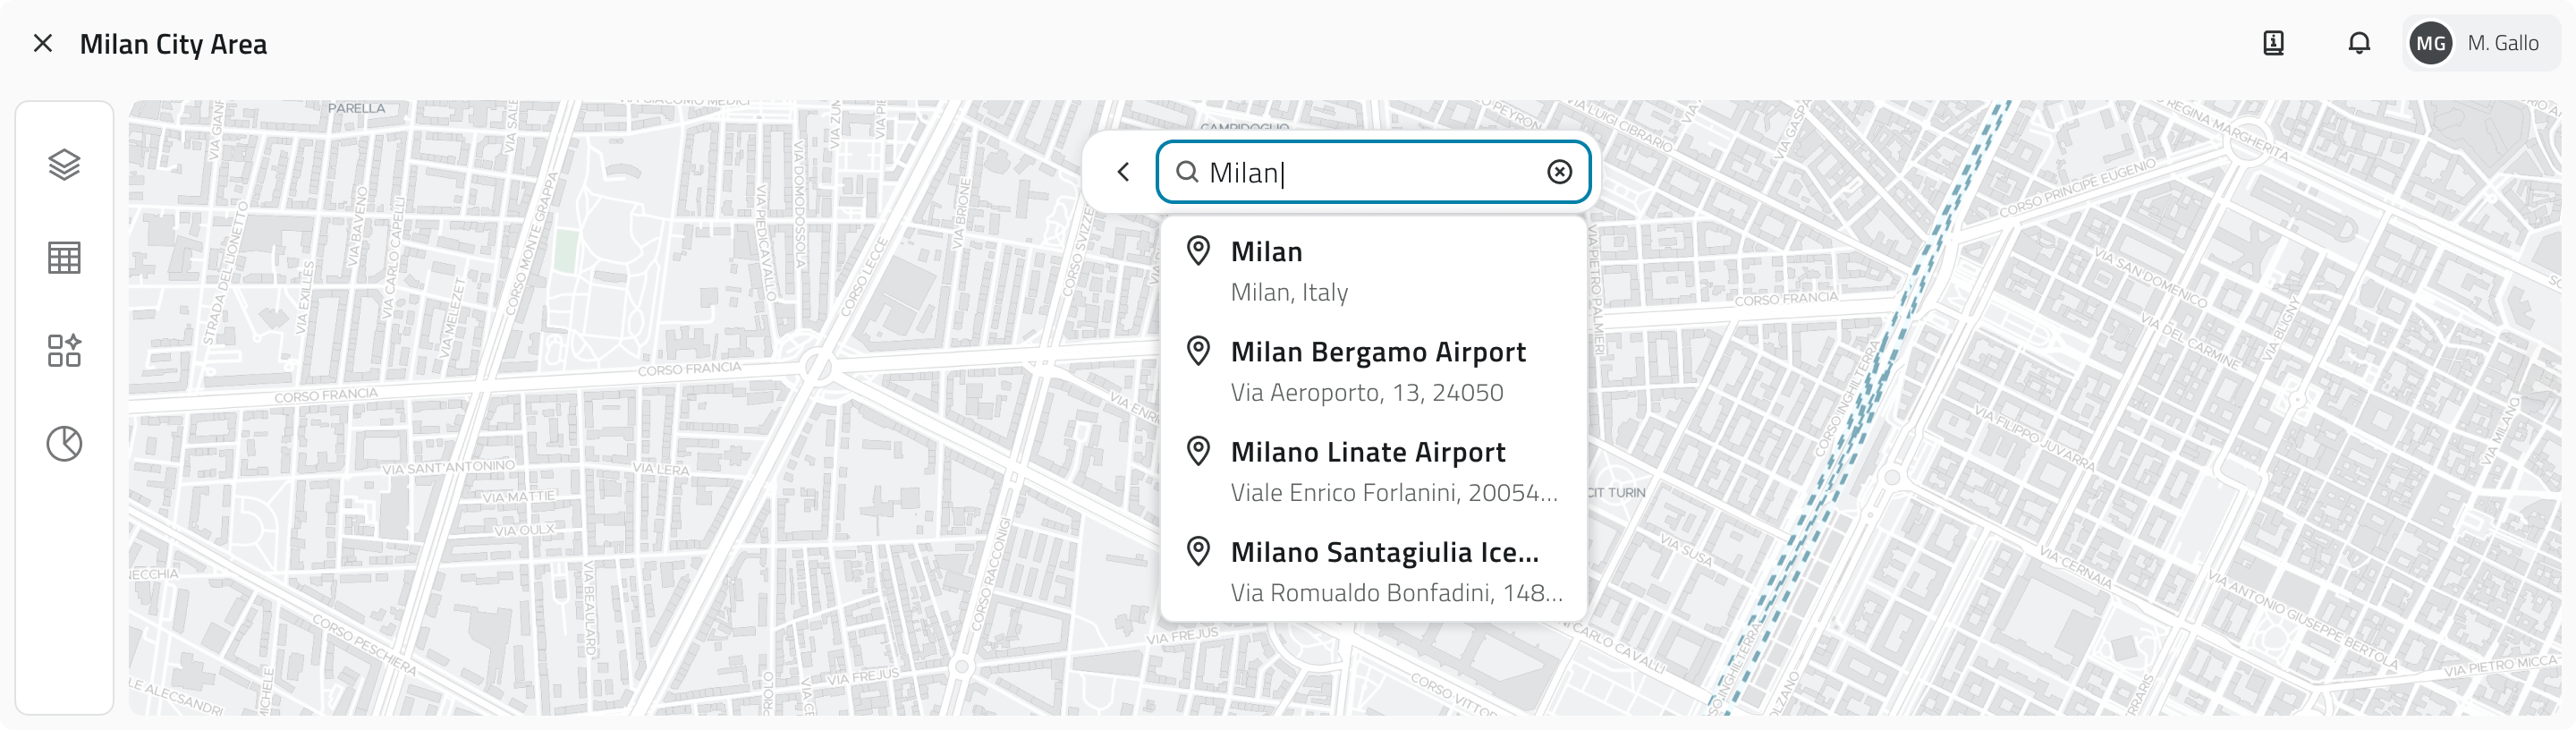
Select one of the suggested results to centre the map on the chosen location.
2D GIS View
Shows the georeferenced map of the project and its objects.
Useful for territorial exploration and verifying the position of assets.
The position indicator, shown in blue on the 2D map, displays the point where the 3D view camera is oriented.
Navigation
| Action | Control |
| Zoom in/out | Mouse wheel / + and – buttons at the bottom right |
| Pan | Hold and drag the left mouse button / mouse wheel |
| Move 3D view |
Move 3D View button |
| Base map | Selector at the bottom left (satellite, street, etc.) |
| Hide view | Button with eye icon at the bottom right |
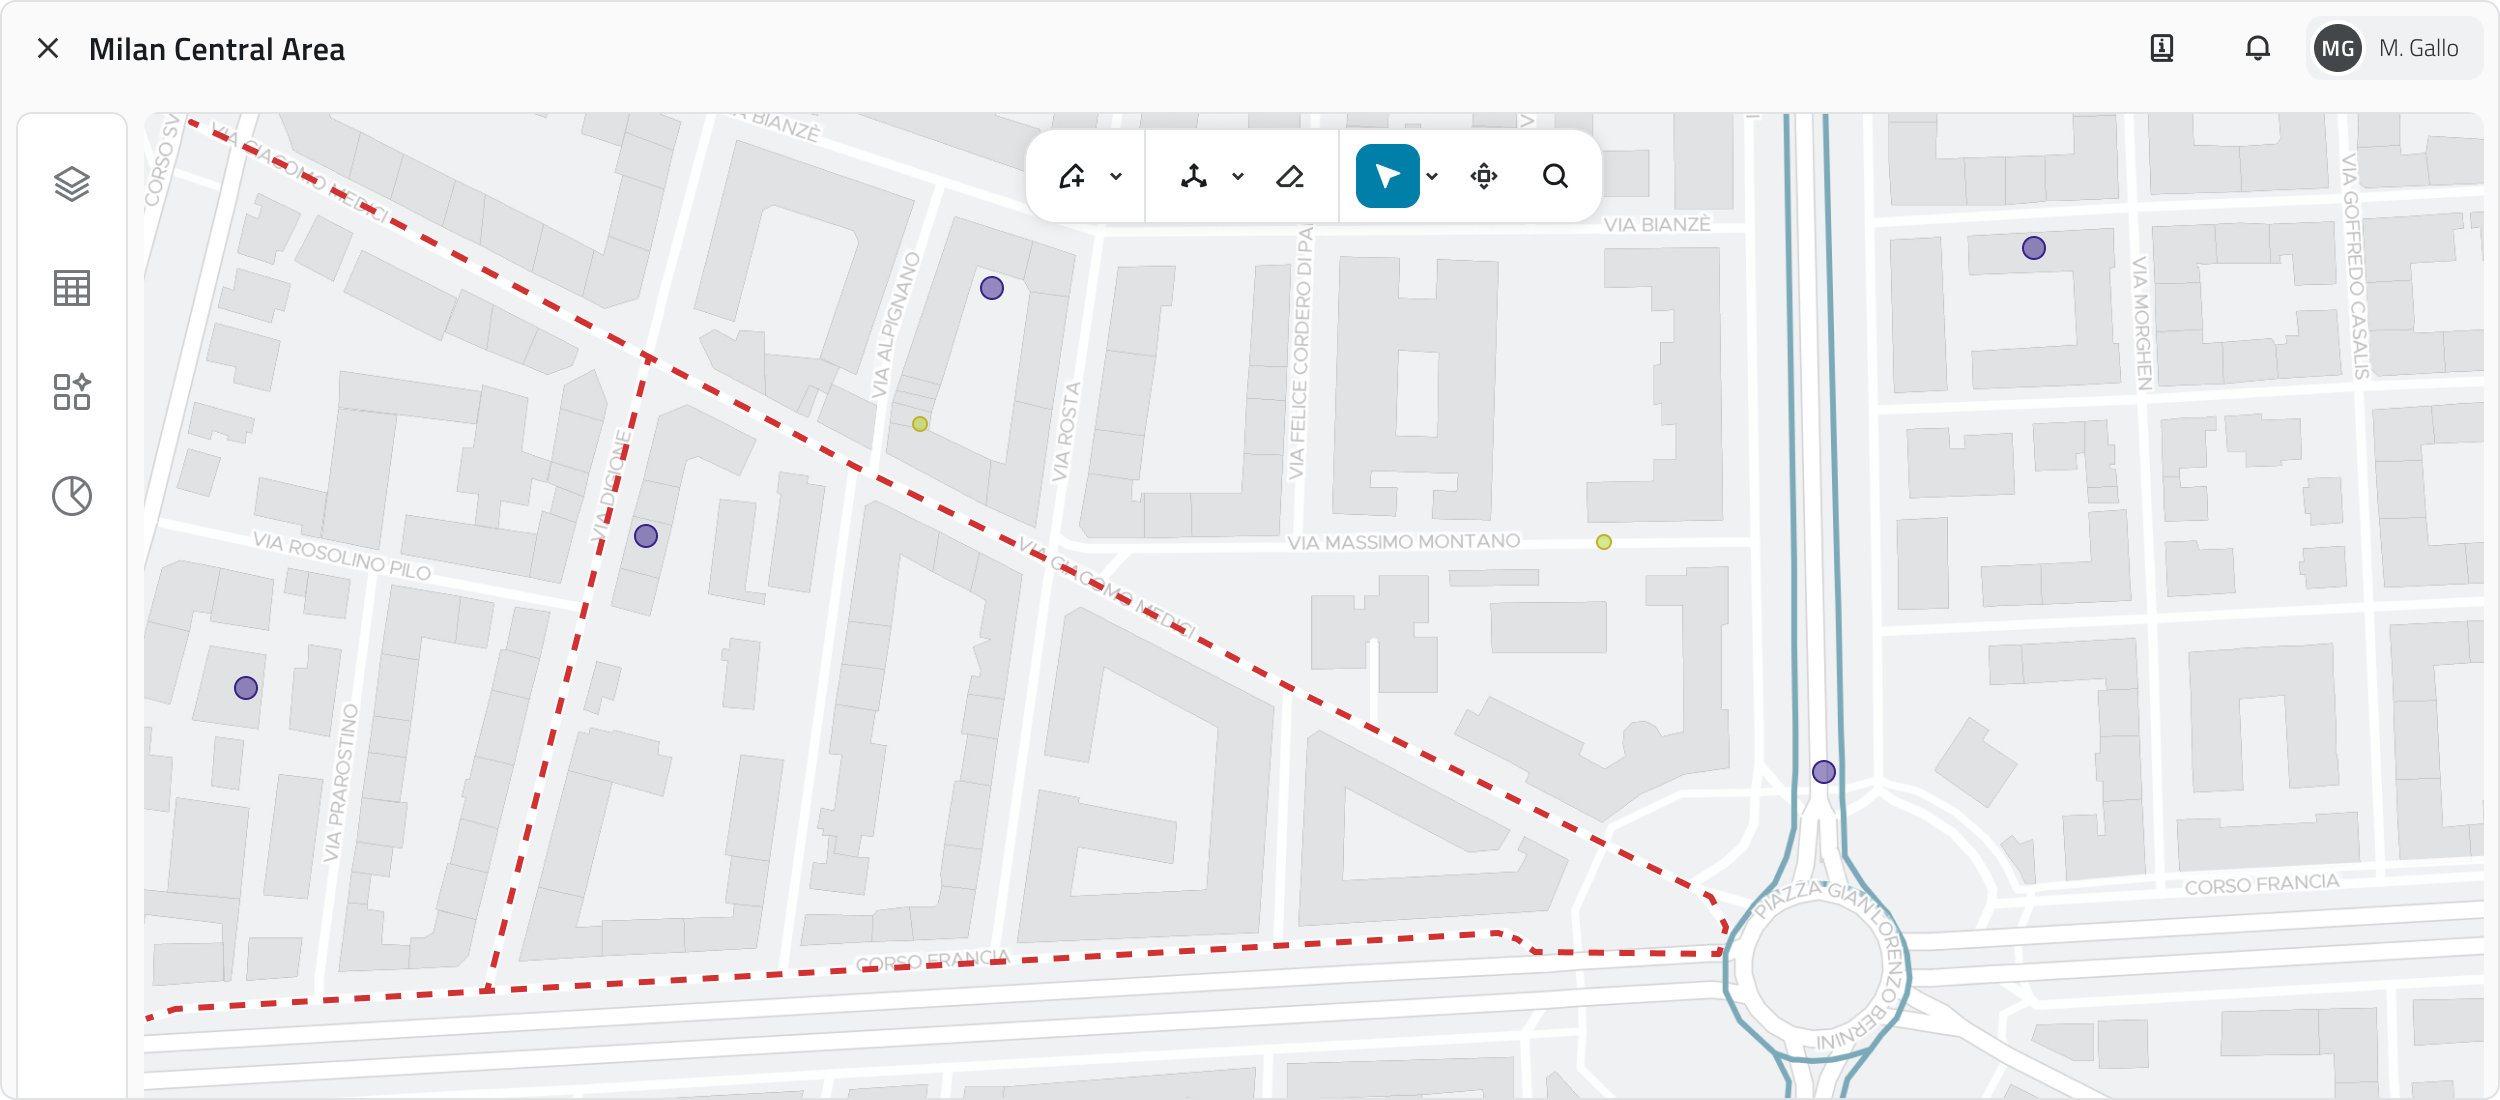
Toolbar
Hover over the 2D view to reveal the toolbar at the top of the view. The available tools are:
| Tool | Function |
| Draw | Select the desired object class to draw a new object |
| Measure | Choose the measurement type to measure distances or areas |
| Select | Choose the selection mode to select one or more objects |
| Move 3D view | Position the position indicator at the desired point to move the 3D camera |
| Search | Search for an address or city to centre the map on that location |
Object selection
Use the Select tool (active by default in Cursor mode on opening). Click the arrow next to the Select button to access the available modes.
| Mode | Action |
| Cursor | Click with the left mouse button to select a single object. Hold SHIFT and click to add or remove objects from the selection. Right-click to manage overlapping objects: if present, a window listing them all will open. |
| Bounding Box | Click and drag with the left mouse button to select all objects within the drawn rectangle. |
| Polygon | Click with the left mouse button to place the polygon vertices. Right-click to close it and select all objects inside. |
| Existing polygon | Click with the left mouse button on an existing polygon on the map to select it along with all objects contained within it. |
Opening object details
To open the Attribute details panel for an object, select it on the map: an info card will appear showing the object class, the main attribute and a label indicating the creation view. Click the Expand button (double arrow icon) to open the full panel.
3D view
Navigation
| Action | Control |
| Rotate view | Hold and drag the left mouse button |
| Zoom in/out | Mouse wheel |
| Movement (Forward/Backward/Left/Right) | W A S D keys |
| Movement (Up/Down) |
Arrow keys |
| Lateral pan | Hold and drag the right mouse button / mouse wheel |
| Hide view | Button with eye icon at the bottom right |
💡 Tip: combine mouse and keyboard when navigating the 3D view for more precise movement.
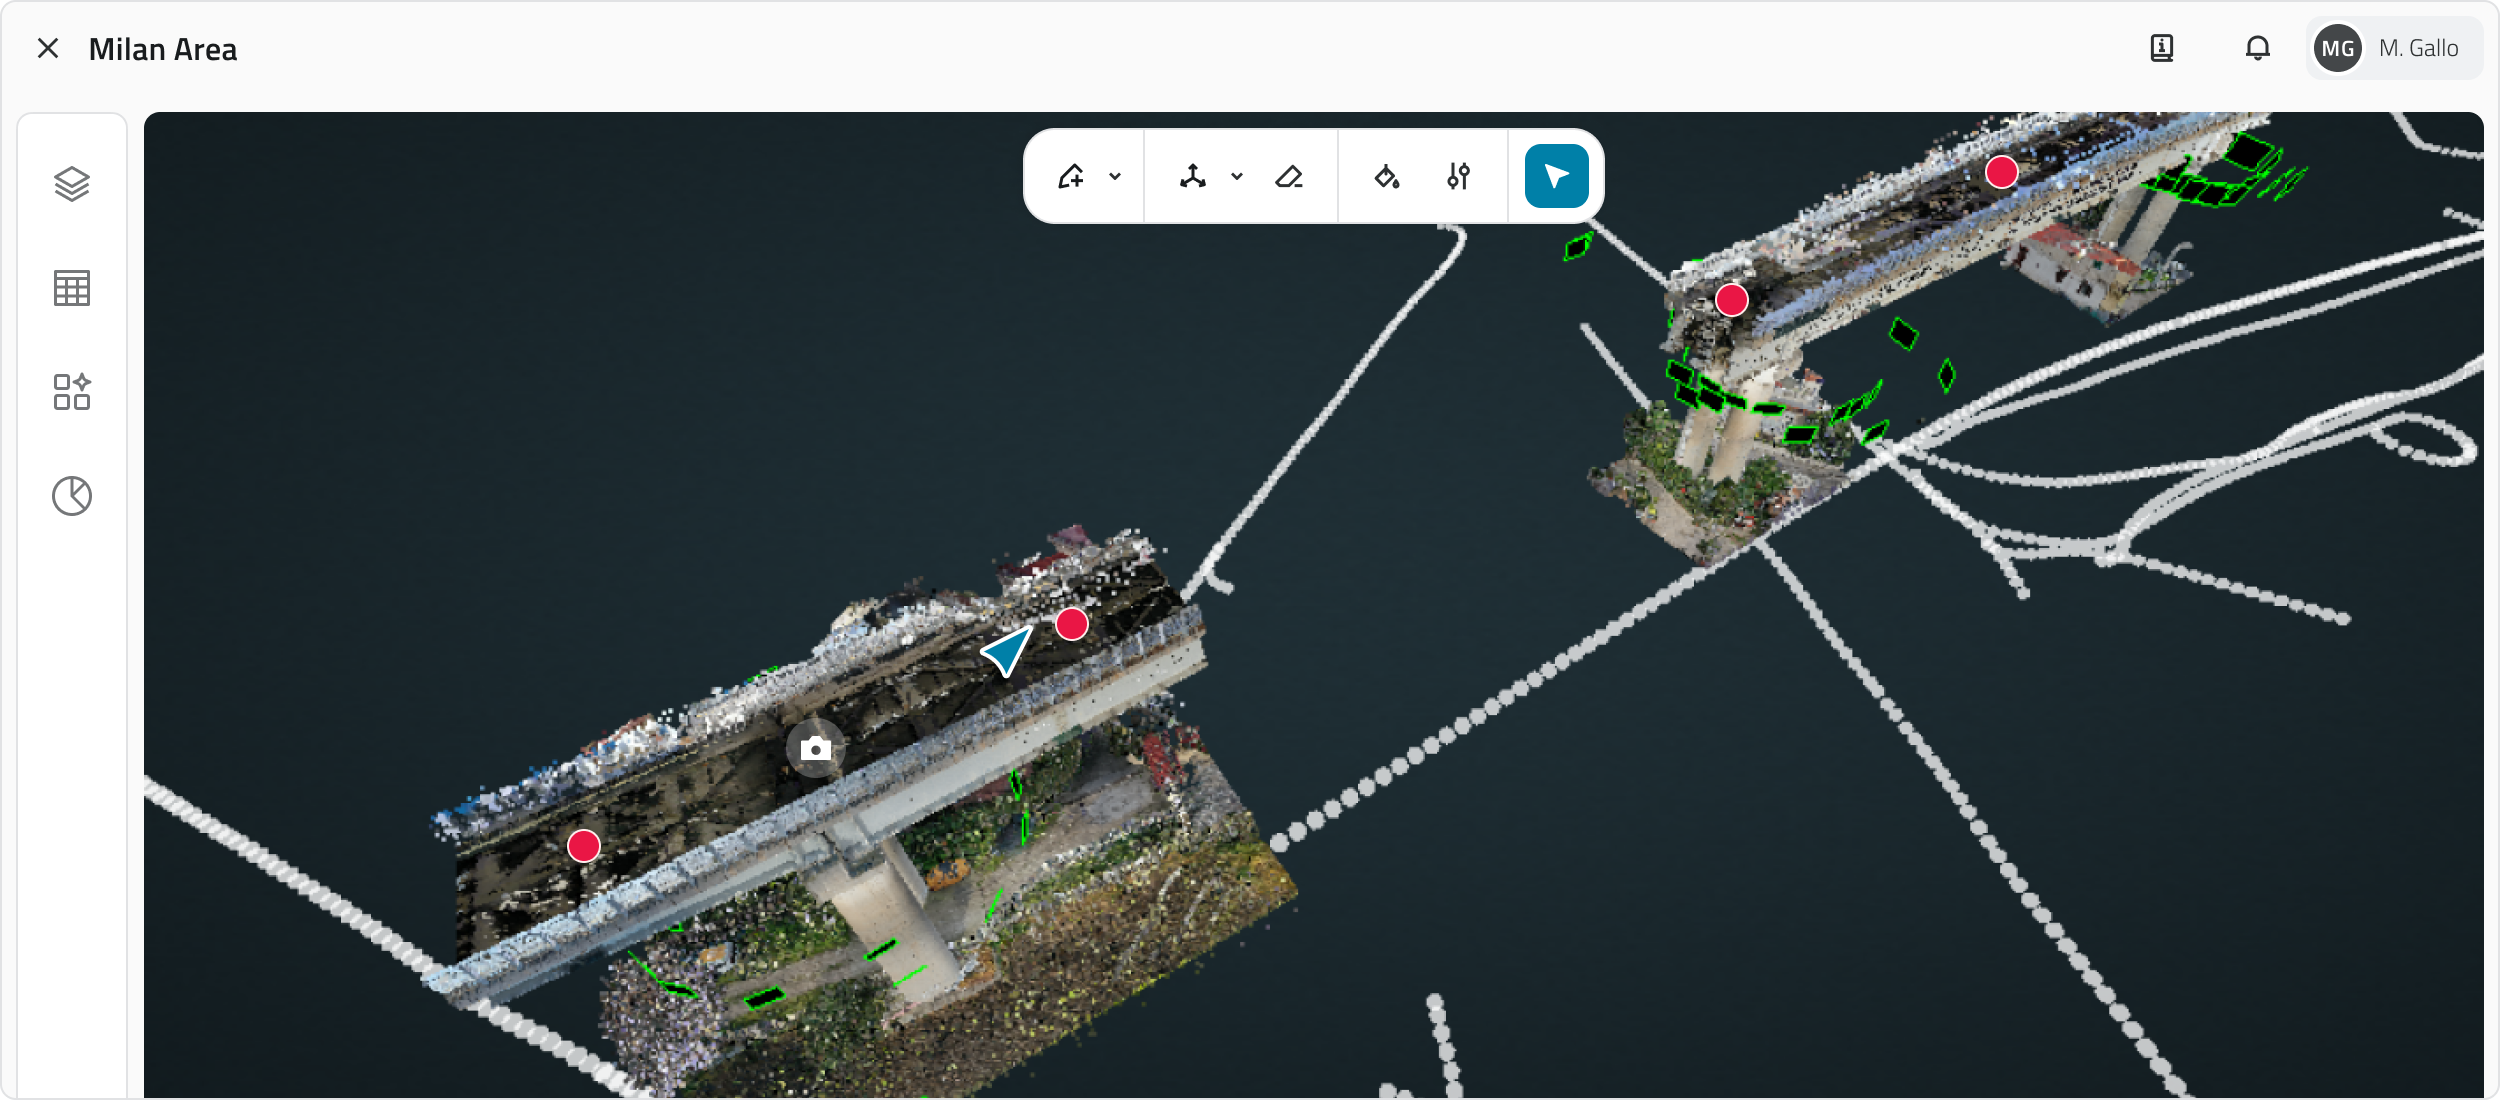
Toolbar
Hover over the 3D view to reveal the toolbar at the top of the view. The available tools are:
| Tool | Function |
| Draw | Select the desired object class to draw a new object |
| Measure | Choose the measurement type to measure distances or areas |
| Export point cloud | Select a section of the point cloud and export it |
| Style | Modify the scene display style |
| Settings | Modify the navigation speed in the 3D view |
| Select | Choose the selection mode to select one or more objects |
The Style and Settings tools are useful for customising the 3D View.
Object selection
Use the Select tool (active by default on opening).
| Mode | Actions |
| Cursor | Click with the left mouse button to select a single object. Hold SHIFT and click to add or remove objects from the selection. |
Opening object details
To open the Attribute details panel for an object, select it on the map: an info card will appear showing the object class, the main attribute and a label indicating the creation view. Click the Expand button (double arrow icon) to open the full panel.
Inventory view
Shows the list of all objects of a specific class. Useful for viewing attributes, searching and comparing data.
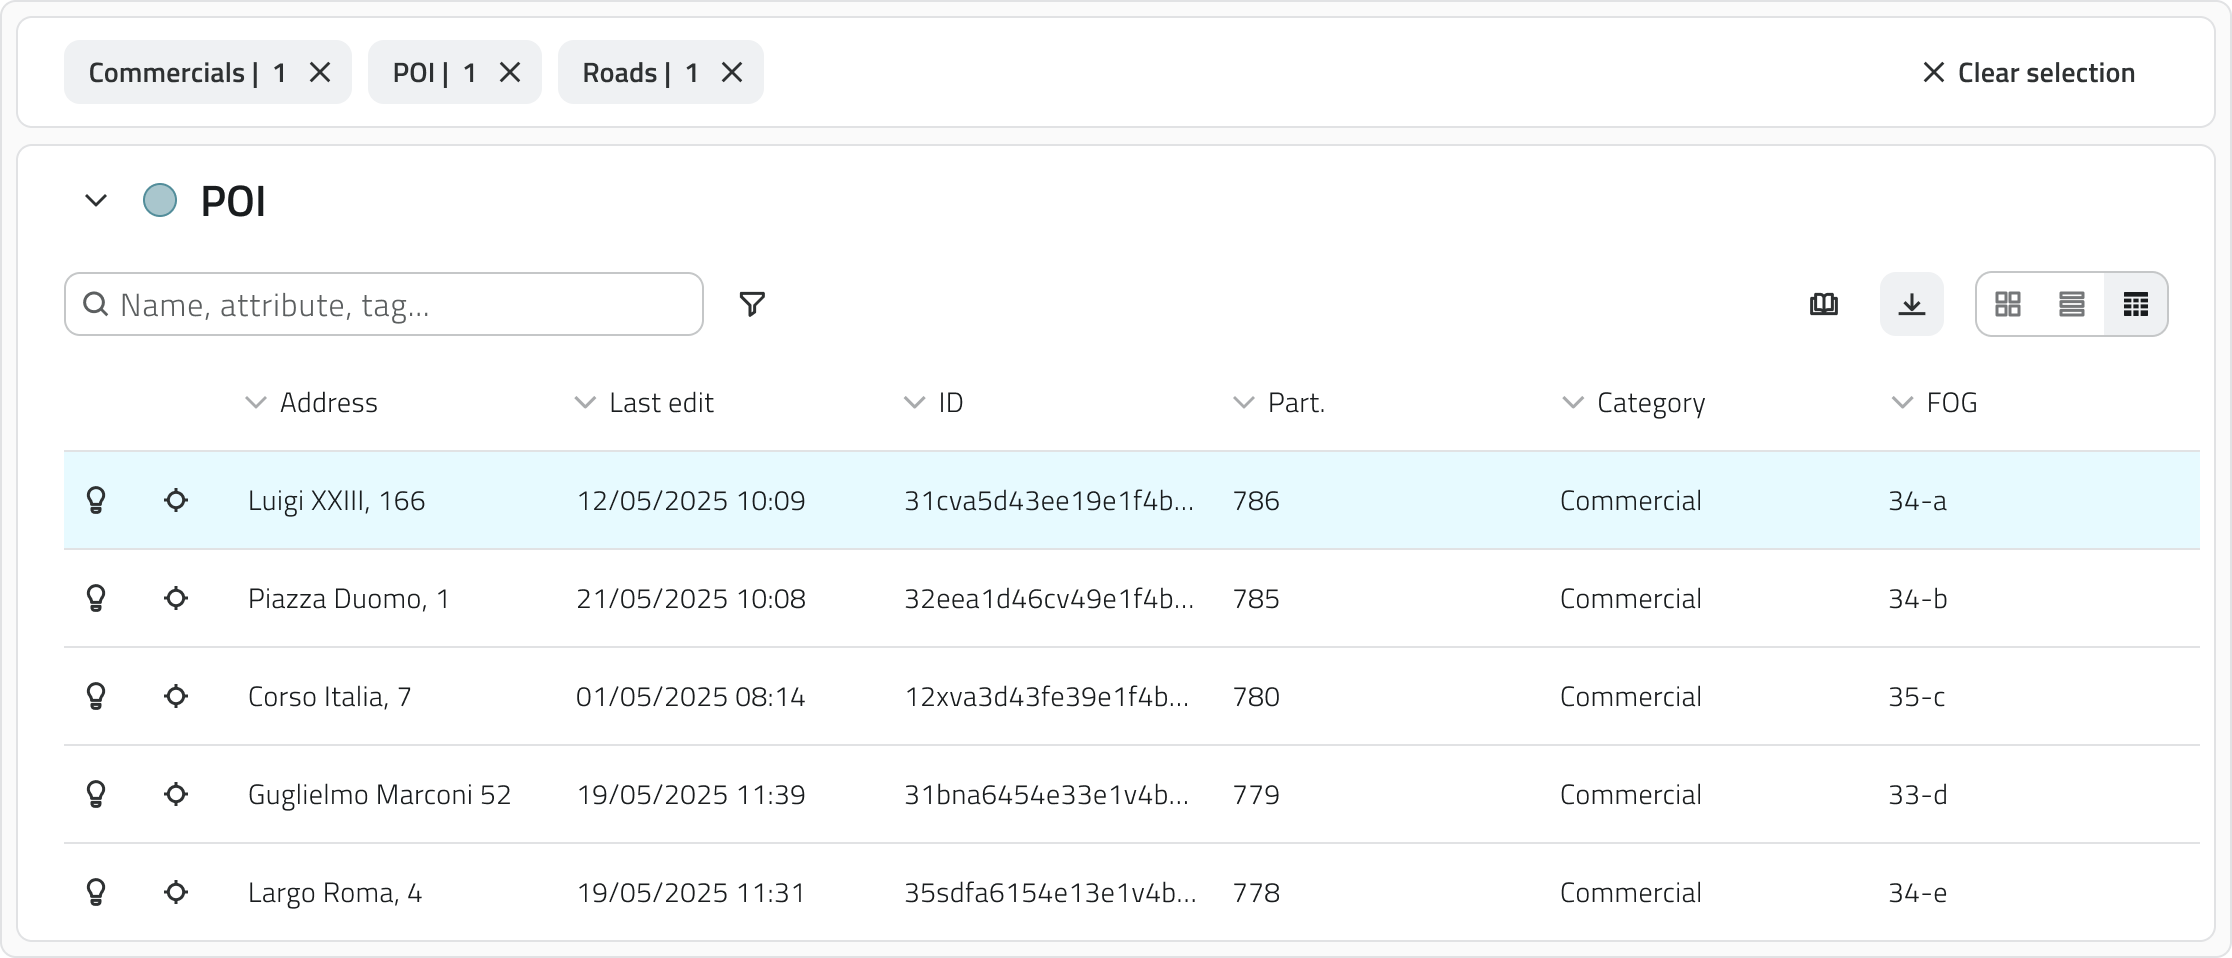
When one or more objects are selected in any view, a selection bar appears above the Inventory view. For each object class involved in the selection, a label appears showing the count of selected elements. Clicking the label opens the Inventory view filtered on that class; clicking X deselects all objects of the corresponding class.
Filtering and sorting
| Tool | Function |
| View | Switch the display mode between card, list or table |
| Search | Search objects by name or attribute using the search bar to filter in real time |
| Filter by selection | To show only the objects currently selected in the project, enable Show selected |
| Sorting | Sort objects by attribute value by clicking the column headers in table view |
Functionality
| Tool | Function |
| New Object | Create an instance of the object class (available only for Form-type classes and with edit permissions) |
| Download | Download a CSV file of the list |
| Delete | Delete the selected objects (available only with edit permissions) |
| Locate | Highlight the object in the 2D and 3D views (available only for vector object classes) |
| Go to | Center the view on the object in the 2D and 3D views (available only for vector object classes) |
Object selection
| Mode | Actions |
| Single object | Click with the left mouse button. |
| Multiple objects (card/list/table) | Hold CTRL and click the desired objects. |
| Multiple objects (table only) | Click an object, hold SHIFT and click another: all elements between the two are selected. |
Opening object details
To open the Attribute details panel for an object, click the blue Open button that appears when hovering over the element.
💡 Tips:
- To quickly compare a larger number of elements, use the table display.
- If you have applied filters or searches, the exported CSV file will only contain the elements currently displayed.
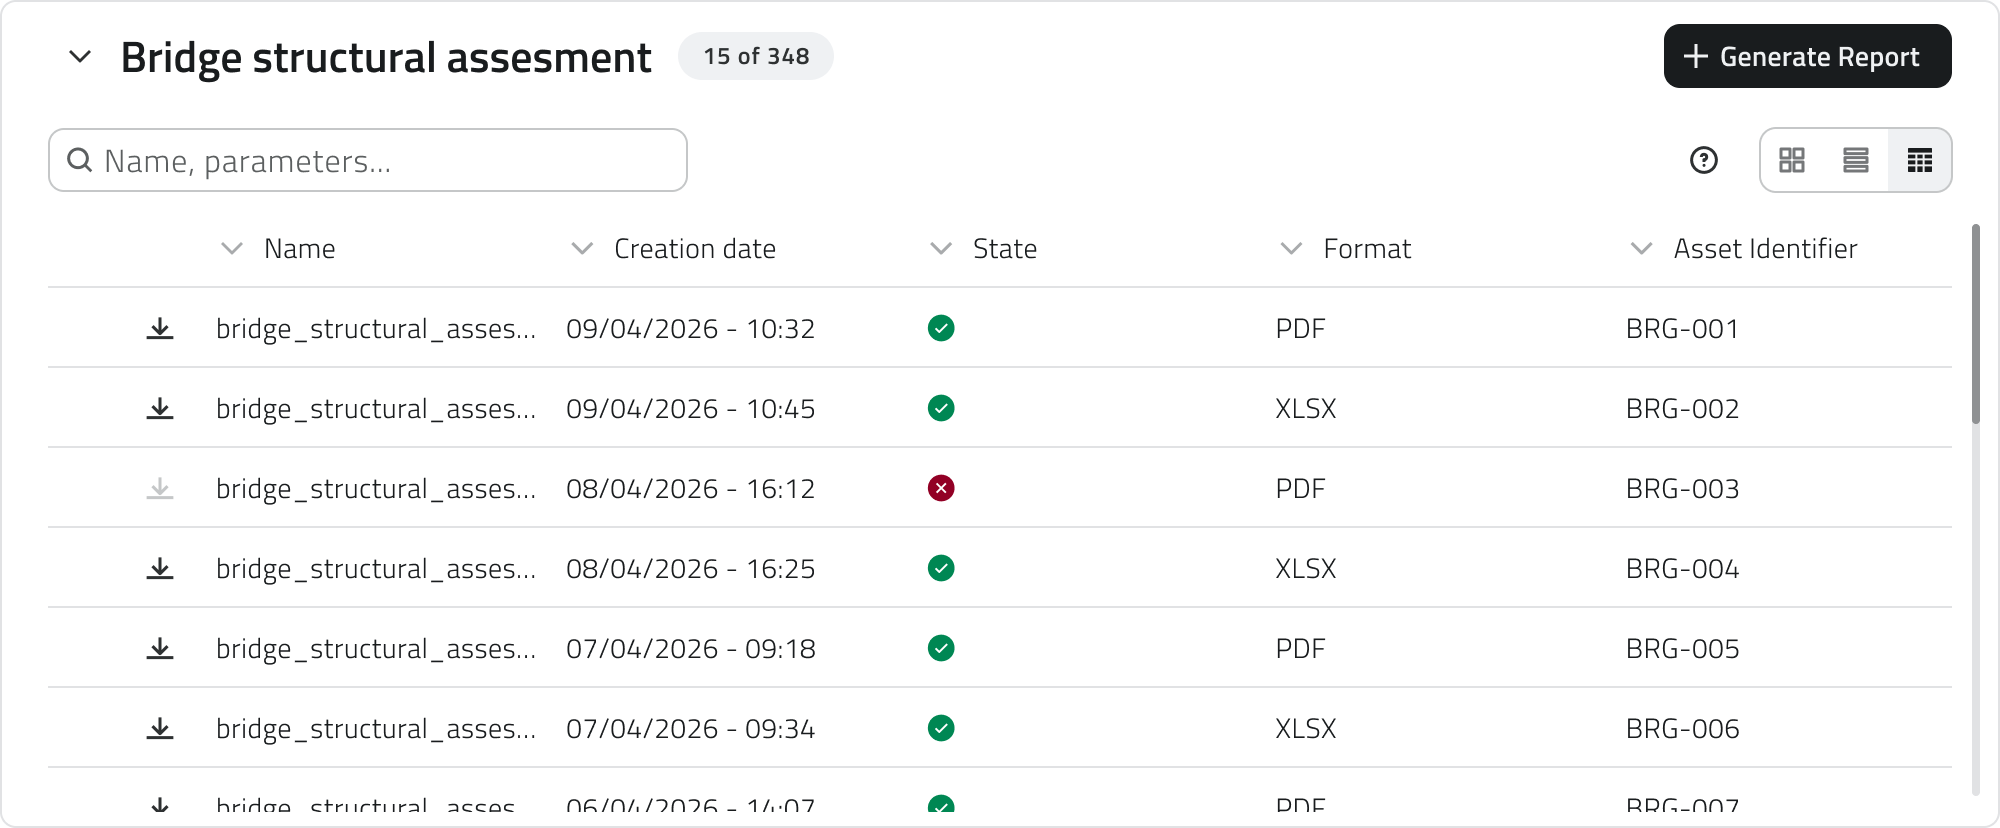
Reports view
Shows the list of all elements generated by a specific report template. Useful for downloading, browsing and analysing the data collected in the project.
Filtering and sorting
| Tool | Function |
| View | Switch the display mode between card, list or table |
| Search | Search reports by name or attribute using the search bar to filter in real time |
| Filter by selection | To show only the reports currently selected in the project, enable Show selected |
| Sorting | Sort reports by attribute value by clicking the column headers in table view |
Functionality
| Tool | Function |
| Download | Downloads the report file; the button is present on every row of the list |
| Download selected reports | Downloads the files of all selected reports |
| Generate report | Generates a new report from the template (requires edit permissions) |
| Delete | Deletes the selected reports (appears only after selecting one or more elements; requires edit permissions) |
Report selection
| Mode | Actions |
| Single object | Click with the left mouse button. |
| Multiple objects (card/list/table) | Hold CTRL and click the desired objects. |
| Multiple objects (table only) | Click an object, hold SHIFT and click another: all elements between the two are selected. |
Report Details
To open the details of a report, click the blue Open button that appears when hovering over the element.
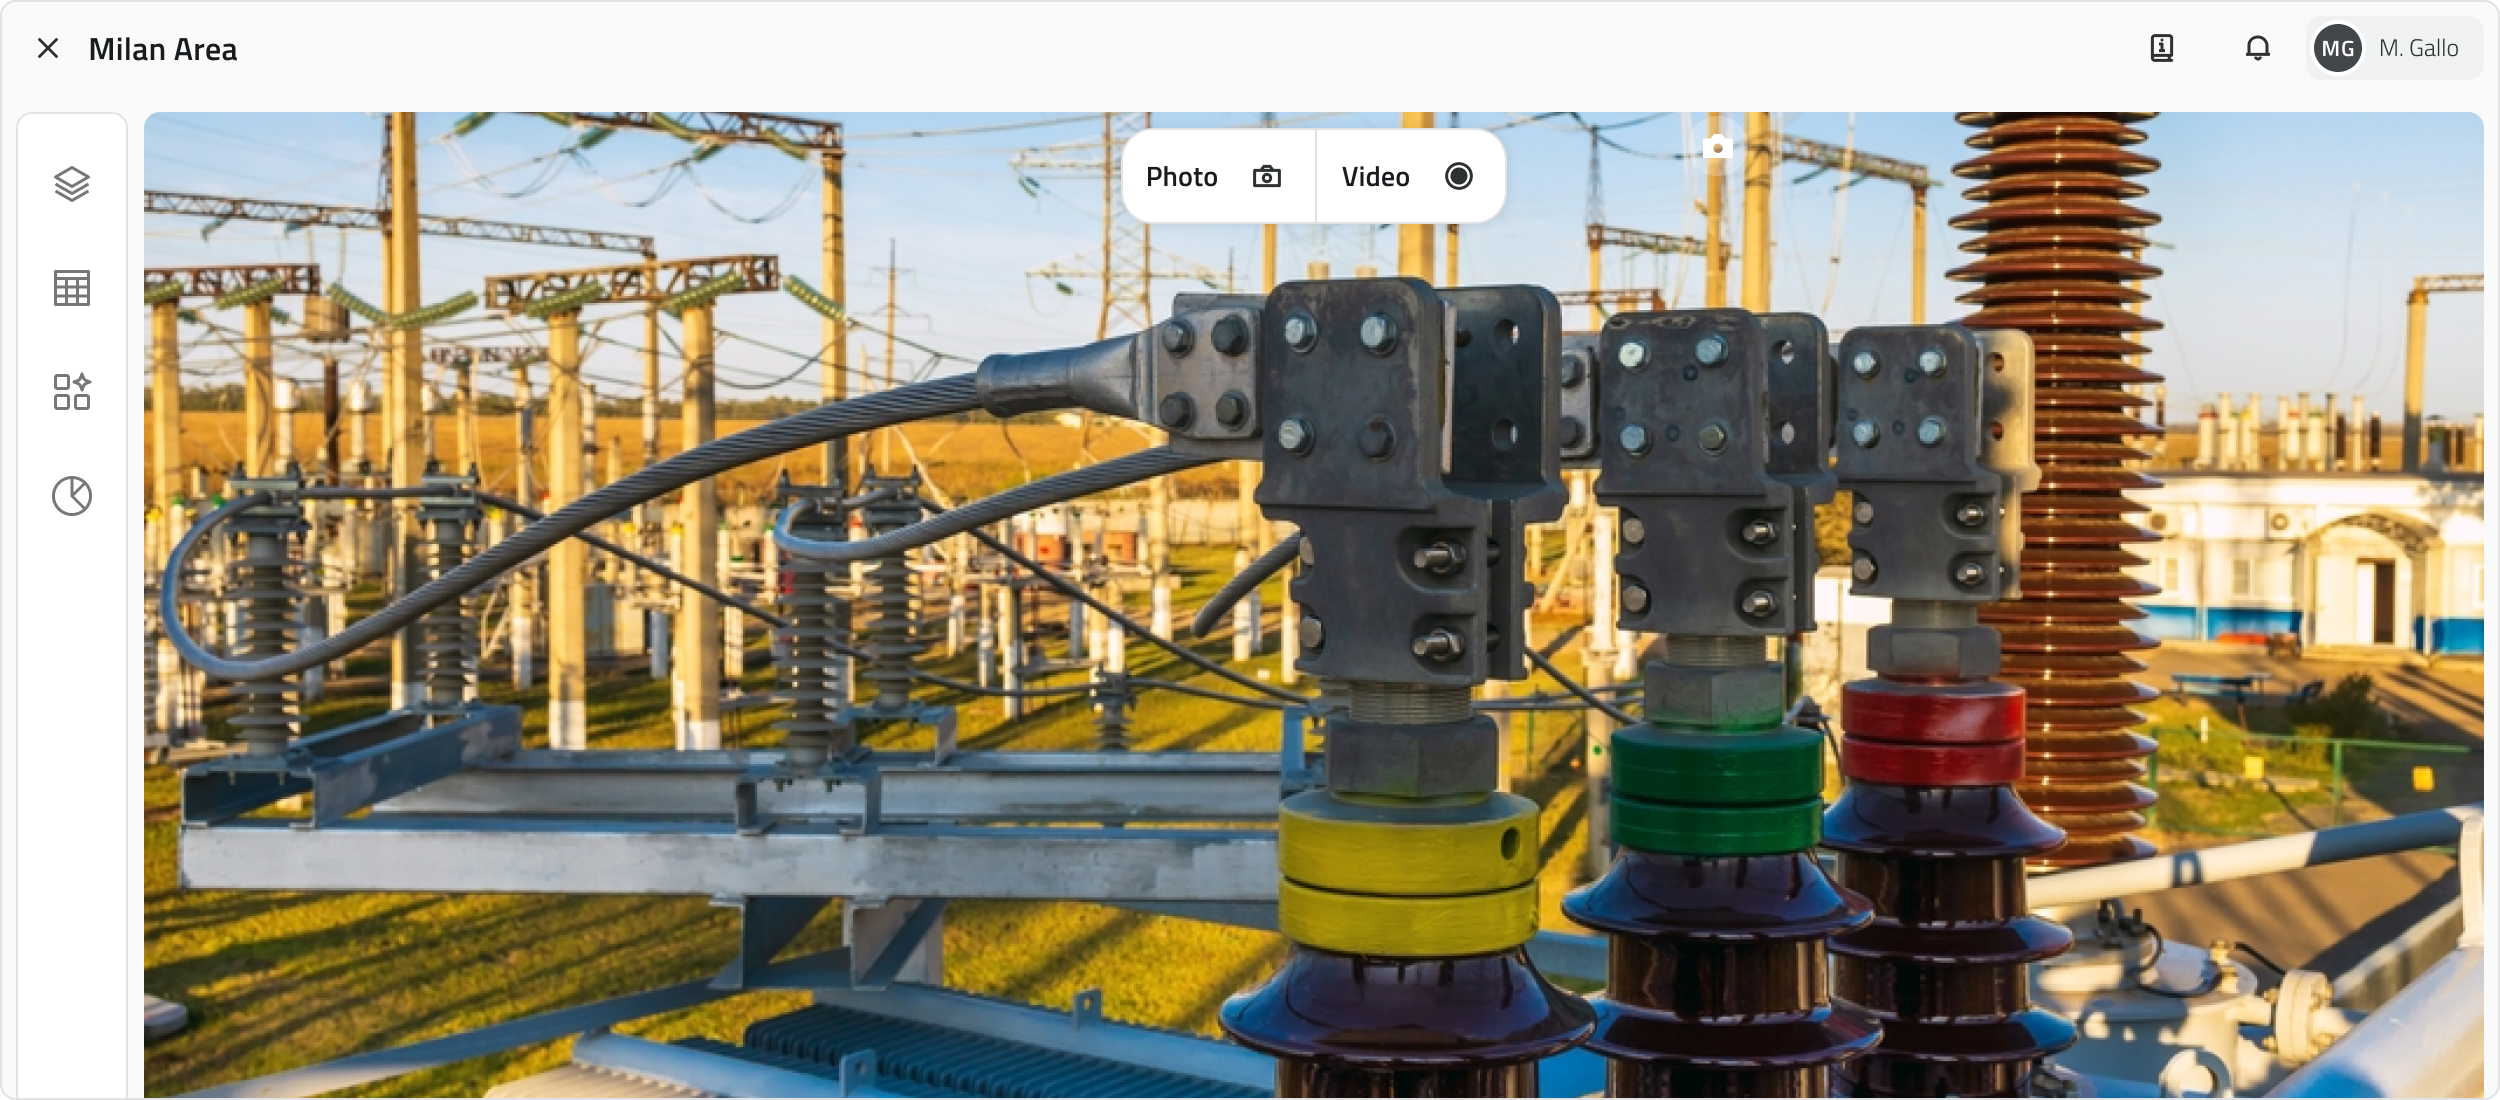
Streaming view
Plays video streams from robots (Mission Units) and connected add-ons. Useful for following missions in real time, recording video and taking photos.
Functionality
| Tool | Function |
| Pause/Resume | Pauses and resumes playback from the same point |
| Streaming time | Shows the duration of the current stream |
| Real Time | Use the progress bar to return to live immediately after a pause |
| Audio | Adjusts the streaming volume |
| Expand | Enables full screen or picture in picture mode |
💡 Tip: To return to live immediately after a pause, drag the progress bar to the end.
Object Details
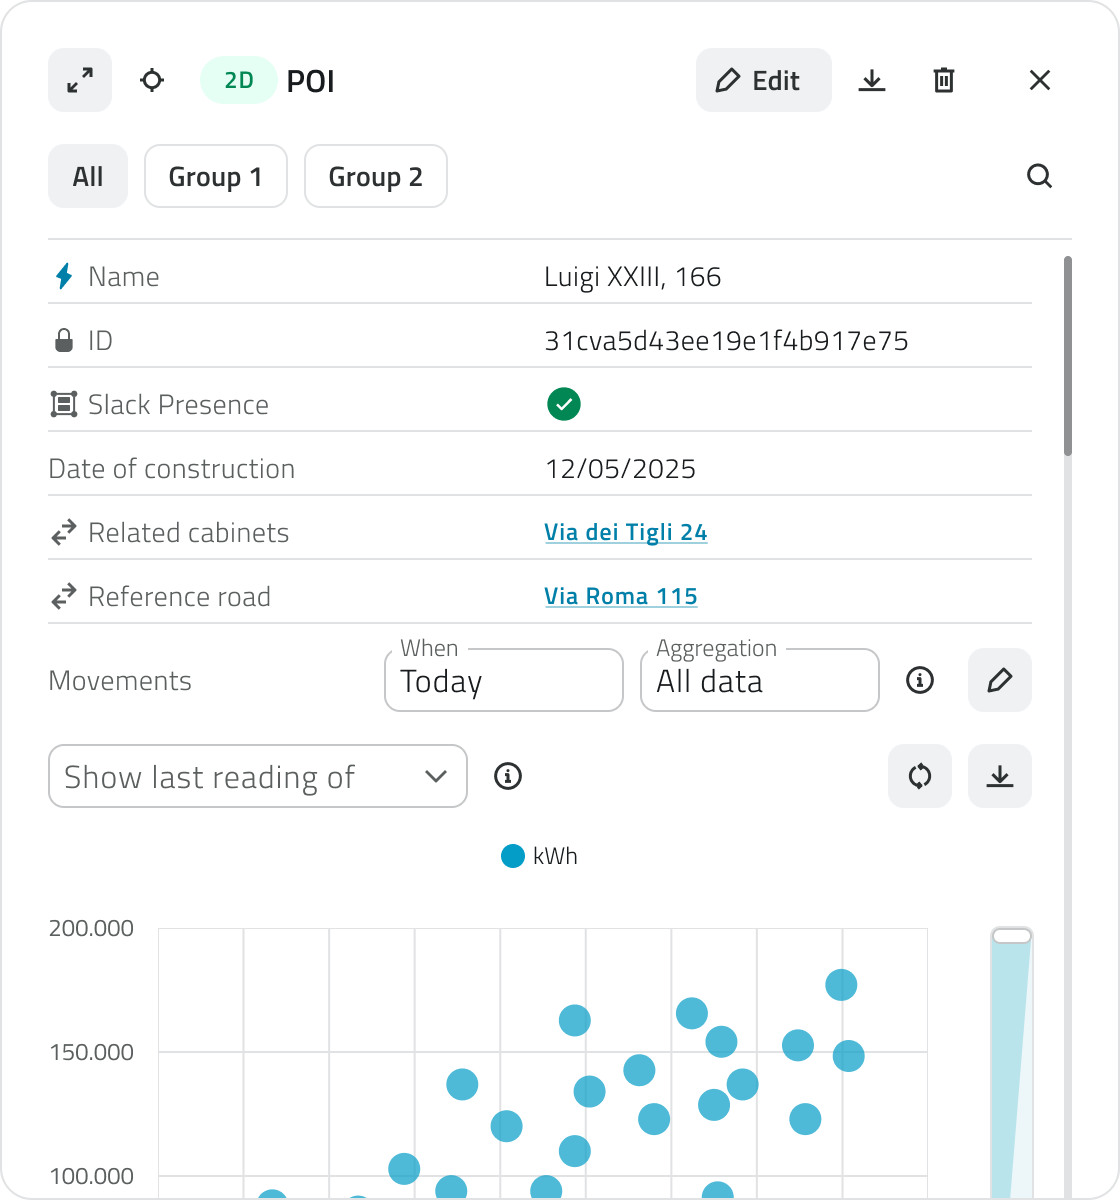
At the top left you will find the Expand button, which brings the panel to full screen, the Locate button, which highlights the object in the 2D and 3D views, and the Go to button, which centres the view on the object. If the object is of vector type, a creation label also appears indicating the view in which it was created (2D or 3D). The label is also present for automatically created objects, both vector and form type. This is followed by the name of the object class the object belongs to.
On the right you will find the Edit button, to update attribute values, the Download button, to export the details as a CSV file, the Delete button, to remove the object from the project, and the Close button, to close the panel.
Edit, create and delete actions are only available if you have edit permissions for that object class.
Below the header there is a search bar to quickly filter attributes by name. Below that is the attribute list: the first is always the main attribute, followed by the others in the configured order.
When the panel is expanded to full screen, attributes are arranged in two columns and, if the object has associated charts, these are displayed in a column on the right.
Functionality
| Tool | Function |
| Expand | Brings the panel to full screen, with attributes in two columns and charts on the right |
| Locate | Highlights the object in the 2D and 3D views |
| Go to | Centres the 2D and 3D view on the object |
| Edit | Edit attribute values (requires edit permissions) |
| Download | Download the details as a CSV file |
| Delete | Removes the object from the project (requires edit permissions) |
| Close | Closes the panel |
Links
- Create and manage Projects
- Managing objects in the project
- Robot Dog - Tracking a live mission
- Drone - Tracking a live mission
![]() Italian version
Italian version
Il progetto offre diverse viste per interagire con gli oggetti e i dati: Mappa 2D, Mappa 3D, Inventory, Report e Streaming.
Apertura e chiusura delle viste
All'avvio del progetto alcune viste si aprono automaticamente. Cliccando sull'icona Layers nella barra laterale sinistra si apre il pannello omonimo, dal quale è possibile attivare o disattivare la visualizzazione delle singole viste e delle classi oggetto tramite l'icona dell'occhio.
Navigazione e visualizzazione degli oggetti
Gli oggetti vettoriali sono visibili sia nella vista 2D che nella vista 3D, indipendentemente da dove vengono creati. In entrambe le viste gli oggetti sono georeferenziati e mantengono la stessa posizione geografica all'interno dello spazio di lavoro. Gli oggetti visualizzati nella mappa 2D sono rappresentati come elementi piatti su un piano, mentre nella vista 3D sono collocati nello spazio tridimensionale.
Alcuni oggetti creati in modo automatico potrebbero essere visibili solo nella vista 2D.
Puoi localizzare rapidamente una posizione nella mappa 2D passando con il mouse sopra la vista: comparirà la barra degli strumenti, dalla quale puoi cliccare il pulsante Cerca (icona della lente di ingrandimento).
Si aprirà una barra di ricerca in cui puoi digitare un indirizzo o il nome di una città. Durante la digitazione il sistema mostra automaticamente i risultati suggeriti.
Seleziona uno dei risultati proposti per centrare la mappa sulla posizione scelta.
Vista GIS 2D
Mostra la mappa georeferenziata del progetto e degli oggetti.
Utile per l'esplorazione territoriale e la verifica della posizione degli asset.
L'indicatore di posizione, visibile in blu nella mappa 2D, mostra il punto in cui è orientata la camera nella vista 3D.
Navigazione
| Azione | Controllo |
| Zoom in/out | Rotellina del mouse / Bottoni + e - in basso a destra |
| Spostamento | Tieni premuto il tasto sinistro/la rotellina del mouse e trascina |
| Sposta vista 3D |
Pulsante Sposta Vista 3D |
| Mappa di base | Selettore in basso a sinistra (satellitare, stradale, ecc.) |
| Nascondi vista | Pulsante con icona occhio in basso a destra |
Barra degli strumenti
Passando con il mouse sopra la vista 2D compare la barra degli strumenti nella parte alta della vista. Gli strumenti disponibili sono:
| Strumento | Funzione |
| Disegna | Seleziona la classe oggetto desiderata per disegnare un nuovo oggetto |
| Misura | Scegli il tipo di misura per misurare distanze o aree |
| Seleziona | Scegli la modalità di selezione per selezionare uno o più oggetti |
| Sposta vista 3D | Posiziona l'indicatore di posizione nel punto desiderato per spostare la telecamera 3D |
| Cerca | Cerca un indirizzo o una città per centrare la mappa sulla posizione |
Selezione degli oggetti
Utilizza lo strumento Seleziona (attivo di default in modalità Cursore all'apertura). Clicca la freccia accanto al pulsante Seleziona per accedere alle modalità.
| Modalità | Azioni |
| Cursore | Clicca con il tasto sinistro per selezionare un singolo oggetto. Tieni premuto SHIFT e clicca per aggiungere o rimuovere oggetti dalla selezione. Clicca con il tasto destro per gestire gli oggetti sovrapposti: se presenti, si apre una finestra che li elenca tutti. |
| Bounding Box | Clicca e trascina con il tasto sinistro per selezionare tutti gli oggetti compresi nel rettangolo disegnato. |
| Poligono | Clicca con il tasto sinistro per inserire i vertici del poligono. Clicca con il tasto destro per chiuderlo e selezionare tutti gli oggetti al suo interno. |
| Poligono esistente | Clicca con il tasto sinistro su un poligono già presente in mappa per selezionarlo insieme a tutti gli oggetti contenuti al suo interno. |
Aprire i dettagli di un oggetto
Per aprire il Dettaglio attributi di un oggetto, selezionalo sulla mappa: comparirà un'info card con la classe oggetto, l'attributo principale e un'etichetta che indica la vista di creazione. Clicca il pulsante Espandi (icona con due frecce) per aprire il pannello completo.
Vista 3D
Permette di navigare in un ambiente tridimensionale, visualizzando nuvole di punti, mesh e foto 360°.
Navigazione
| Azione | Controllo |
| Rotazione visuale | Tieni premuto il tasto sinistro del mouse e trascina |
| Zoom in/out | Rotellina del mouse |
| Movimento (Avanti/Indietro/Sinistra/Destra) | Tasti W A S D |
| Movimento (Su/Giù) | Frecce della tastiera |
| Spostamento Trasversale (Pan) | Tieni premuto il tasto destro/la rotellina del mouse e trascina |
| Nascondi vista | Pulsante con icona occhio in basso a destra |
💡 Suggerimento: nella navigazione 3D combina mouse e tastiera per spostarti con più precisione.
Barra degli strumenti
Passando con il mouse sopra la vista 3D compare la barra degli strumenti nella parte alta della vista. Gli strumenti disponibili sono:
| Strumento | Funzione |
| Disegna | Seleziona la classe oggetto desiderata per disegnare un nuovo oggetto |
| Misura | Scegli il tipo di misura per misurare distanze o aree |
| Esporta nuvola di punti | Seleziona una sezione della nuvola di punti ed esportala |
| Stile | Modifica lo stile di visualizzazione della scena |
| Impostazioni | Modifica la velocità di navigazione nella vista 3D |
| Seleziona | Scegli la modalità di selezione per selezionare uno o più oggetti |
Gli strumenti Stile e Impostazioni sono utili per personalizzare la Vista 3D.
Selezione degli oggetti
Utilizza lo strumento Seleziona (attivo di default all'apertura).
| Modalità | Azioni |
| Cursore | Clicca con il tasto sinistro per selezionare un singolo oggetto. Tieni premuto SHIFT e clicca per aggiungere o rimuovere oggetti dalla selezione. |
Aprire i dettagli di un oggetto
Per aprire il Dettaglio attributi di un oggetto, selezionalo sulla mappa: comparirà un'info card con la classe oggetto, l'attributo principale e un'etichetta che indica la vista di creazione. Clicca il pulsante Espandi (icona con due frecce) per aprire il pannello completo.
Vista Inventory
Mostra l’elenco di tutti gli oggetti di una specifica classe. Utile per visualizzare attributi, cercare e confrontare dati.
Selezionando uno o più oggetti, in qualsiasi vista, compare una barra di selezione sopra la vista Inventory. Per ogni classe oggetto coinvolta nella selezione appare un'etichetta con il conteggio degli elementi selezionati. Cliccando sull'etichetta si apre la vista Inventory filtrata su quella classe; cliccando la X si deselezionano tutti gli oggetti della classe corrispondente.
Filtro e ordinamento
| Strumento | Funzione |
| Visualizzazione | Cambia la modalità di visualizzazione in card, lista o tabella |
| Ricerca | Cerca oggetti per nome o attributo tramite la barra di ricerca per filtrare in tempo reale |
| Filtra per selezione | Per visualizzare solo gli oggetti selezionati attivamente nel progetto, attiva Mostra selezionati |
| Ordinamento | Ordina gli oggetti in base al valore dell'attributo cliccando sulle intestazioni di colonna nella vista a tabella |
Funzionalità
| Strumento | Funzione |
| Nuovo oggetto | Crea un'istanza per la classe oggetto (disponibile solo per le classi di tipo Form e con permessi di modifica) |
| Download | Scarica un file CSV dell'elenco |
| Elimina | Elimina gli oggetti selezionati (disponibile solo con permessi di modifica) |
| Individua | Evidenzia l'oggetto nelle viste 2D e 3D (disponibile solo per le classi oggetto vettoriali) |
| Vai a | Centra la visuale sull'oggetto nelle viste 2D e 3D (disponibile solo per le classi oggetto vettoriali) |
Selezione degli oggetti
| Modalità | Azioni |
| Singolo oggetto | Clicca il tasto sinistro del mouse. |
| Oggetti multipli (card/lista/tabella) | Tieni premuto CTRL e clicca sugli oggetti desiderati. |
| Oggetti multipli (solo tabella) | Clicca su un oggetto, tieni premuto SHIFT e clicca su un altro: vengono selezionati tutti gli elementi compresi tra i due. |
Aprire i dettagli di un oggetto
Per aprire il Dettaglio attributi di un oggetto, clicca il pulsante blu Apri che compare al passaggio del mouse sull'elemento.
💡 Suggerimenti:
- Se vuoi confrontare rapidamente un maggior numero di elementi usa la visualizzazione a tabella.
- Se hai applicato filtri o ricerche, il file CSV esportato conterrà soltanto gli elementi attualmente visualizzati.
Vista Report
Mostra l'elenco di tutti gli elementi generati da uno specifico template di report. Utile per scaricare, consultare e analizzare i dati raccolti nel progetto.
Filtro e ordinamento
| Strumento | Funzione |
| Visualizzazione | Cambia la modalità di visualizzazione in card, lista o tabella |
| Ricerca | Cerca report per nome o attributo tramite la barra di ricerca per filtrare in tempo reale |
| Filtra per selezione | Per visualizzare solo i report selezionati attivamente nel progetto, attiva Mostra selezionati |
| Ordinamento | Ordina i report in base al valore dell'attributo cliccando sulle intestazioni di colonna nella vista a tabella |
Funzionalità
| Strumento | Funzione |
| Download | Scarica il file del report; il pulsante è presente su ogni riga dell'elenco |
| Download report selezionati | Scarica i file di tutti i report selezionati |
| Genera report | Genera un nuovo report dal template (richiede permessi di modifica) |
| Elimina | Elimina i report selezionati (compare solo dopo aver selezionato uno o più elementi; richiede permessi di modifica) |
Selezione dei report
| Modalità | Azioni |
| Singolo oggetto | Clicca il tasto sinistro del mouse. |
| Oggetti multipli (card/lista/tabella) | Tieni premuto CTRL e clicca sugli oggetti desiderati. |
| Oggetti multipli (solo tabella) | Clicca su un oggetto, tieni premuto SHIFT e clicca su un altro: vengono selezionati tutti gli elementi compresi tra i due. |
Dettagli dei report
Per aprire i dettagli di un report, clicca il pulsante blu Apri che compare al passaggio del mouse sull'elemento.
Vista Streaming
Riproduce flussi video da robot (Mission Units) e add-on connessi. Utile per seguire missioni in tempo reale, registrare video e scattare foto.
Funzionalità
| Strumento | Funzione |
| Pausa/Riprendi | Mette in pausa e riprende la riproduzione dallo stesso punto |
| Tempo di Streaming | Mostra la durata dello streaming in corso |
| Real Time | Usa la barra di avanzamento per tornare subito al live dopo una pausa |
| Audio | Regola il volume dello streaming |
| Espansione | Attiva la modalità a schermo intero o picture in picture |
💡 Suggerimento: Per tornare subito al live dopo una pausa, porta la barra di avanzamento fino alla fine.
Dettagli di un Oggetto
In alto a sinistra si trovano il pulsante Espandi, che porta il pannello a schermo intero, il pulsante Individua, che evidenzia l'oggetto nelle viste 2D e 3D, e il pulsante Vai a, che centra la visuale sull'oggetto. Se l'oggetto è di tipo vettoriale, compare inoltre un'etichetta di creazione che indica la vista in cui è stato creato (2D o 3D). L'etichetta è presente anche per gli oggetti creati automaticamente, sia vettoriali che di tipo form. Segue il nome della classe oggetto a cui appartiene l'oggetto.
Sulla destra si trovano il pulsante Modifica, per aggiornare i valori degli attributi, il pulsante Download, per esportare i dettagli in formato CSV, il pulsante Elimina, per rimuovere l'oggetto dal progetto, e il pulsante Chiudi, per chiudere il pannello.
Le azioni di modifica, creazione ed eliminazione sono disponibili solo se si dispone dei permessi di modifica per quella classe oggetto.
Sotto l'intestazione è presente una barra di ricerca per filtrare rapidamente gli attributi per nome. Al di sotto si trova l'elenco degli attributi: il primo è sempre l'attributo principale, seguito dagli altri nell'ordine configurato.
Espandendo il pannello a schermo intero, gli attributi vengono distribuiti su due colonne e, se l'oggetto ha grafici associati, questi vengono visualizzati in una colonna sulla destra.
Funzionalità
| Strumento | Funzione |
| Espandi | Porta il pannello a schermo intero, con attributi su due colonne e grafici a destra |
| Individua | Evidenzia l'oggetto nelle viste 2D e 3D |
| Vai a | Centra la visuale del 2D e 3D sull'oggetto |
| Modifica | Modifica i valori degli attributi (richiede permessi di modifica) |
| Download | Scarica i dettagli in formato CSV |
| Elimina | Elimina l'oggetto dal progetto (richiede permessi di modifica) |
| Chiudi | Chiude il pannello |
Collegamenti
- Creare e gestire i Progetti
- Gestire gli oggetti nel progetto
- Robot Dog - Monitorare una missione live
- Drone - Monitorare una missione live
Last update: 20 May 2026
No comments to display
No comments to display