
Create a Mission
English version
Configuring a mission takes five steps. You choose the unit to deploy, what it carries, what kind of mission it is, where it runs and when it starts. At the end the mission is created as a Draft and the planning screen opens, where you place the route on the map.
Start from the Missions tab, Live & Planned, with the New Mission button.
A Mission Unit and an Equipment must be registered before a mission can be created.
Which path you are on
The configuration adapts to what you choose. These are the main combinations, and they differ in the number of steps and in what you define along the way.
| Path | Steps | Map | Home Position | On the map |
| Robot dog, Autonomous | 5 | Chosen from the Maps Library | Marked automatically | Waypoints, Geofencing, Danger Zones |
| Robot dog, Discovery | 4 | Built by the robot dog during the mission | Marked automatically | Nothing to place |
| Drone | 5 | Geographic, fixed | Drawn on the map | Waypoints |
Move between the steps with Next and Back. The numbers at the bottom show where you are and how many steps are left.
Step 1: Mission Unit to deploy
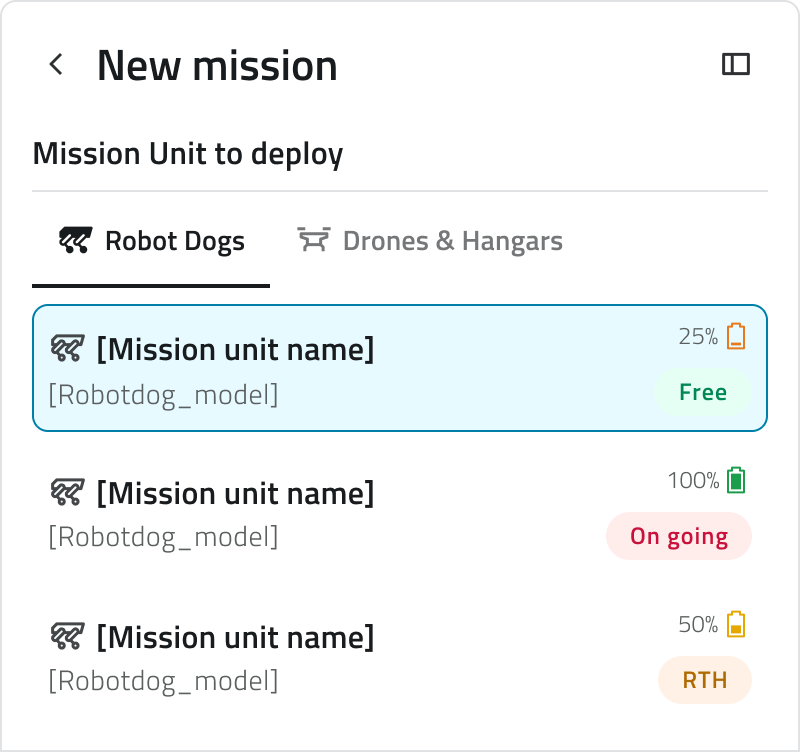
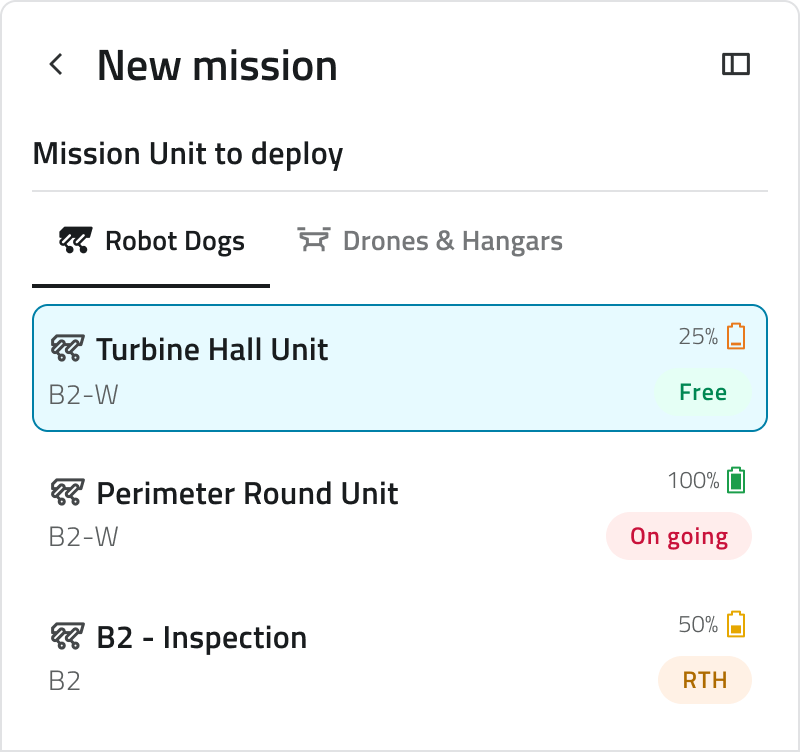
Choose the unit that will carry out the mission. Two tabs separate the types: Robot Dogs and Drones & Hangars.
Each robot dog shows its name, its model, the battery level and a chip with what it is doing:
| Chip | What it means |
| Free | The unit is available and can be assigned to this mission. |
| On going | The unit is already carrying out another mission. |
| RTH | The unit is returning to its Home Position. |
Battery level and status chip are shown for a robot dog. In Drones & Hangars each unit shows its name and model.
A mission with a robot dog uses one unit.
A mission with a drone uses two units: one drone and one hangar, both required, one of each. Select both to continue. Until you do, a message reminds you.
Step 2: Equipment & AI Algorithm
Choose what the unit carries and what it can do during the mission. Three tabs: Equipments, AI Algorithms and Continuous Actions.
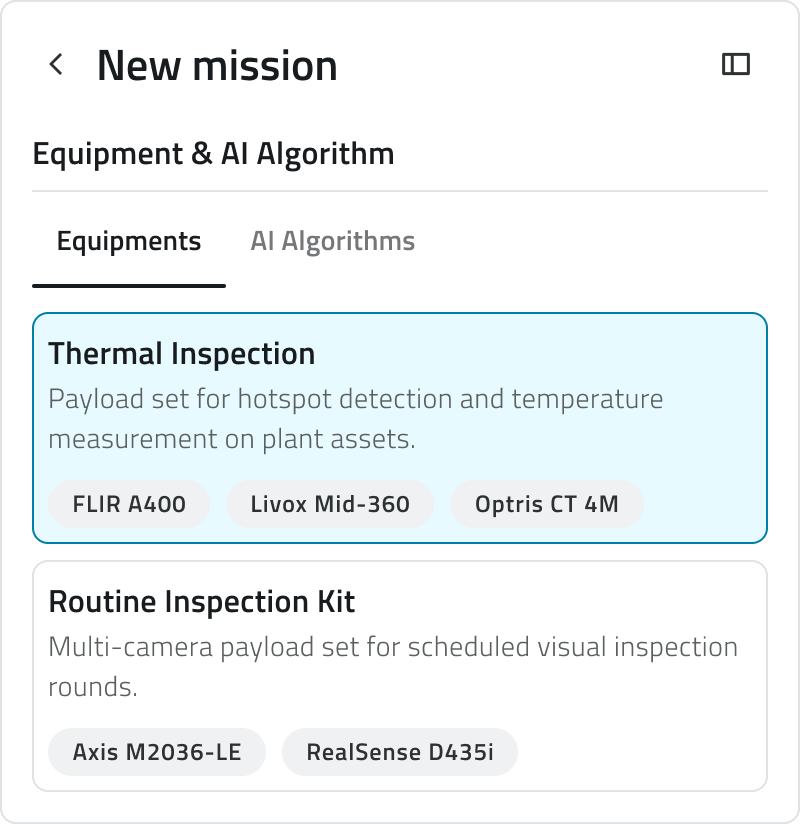
Equipments
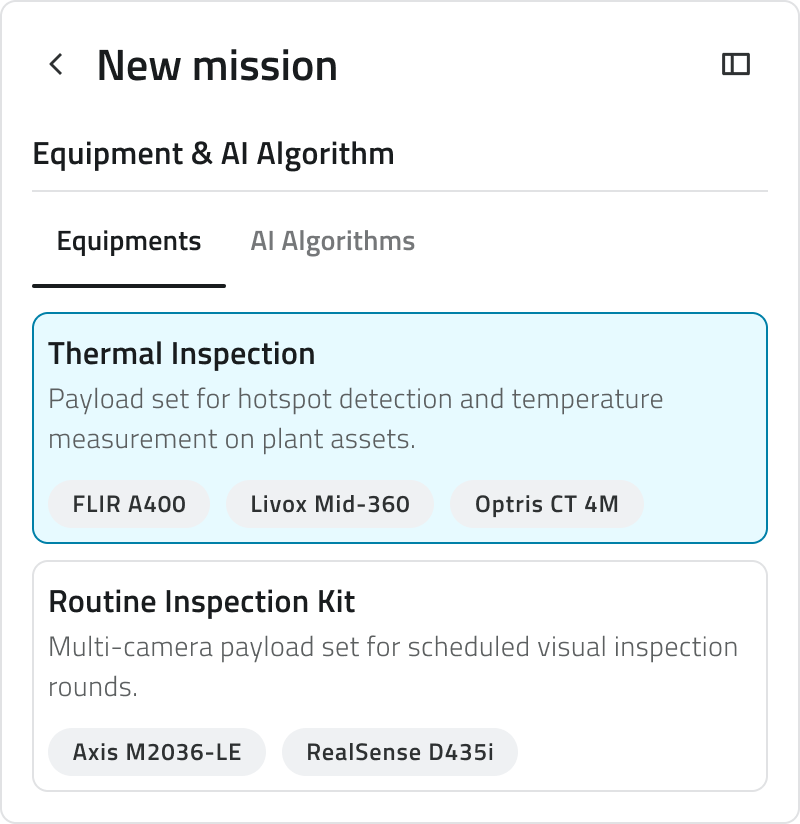
Select the Equipment the unit will carry. Each card shows the name, the description and the add-on models it contains.
Only the Equipment compatible with the unit chosen at step 1 is listed. Equipment is defined in advance from the Global Lists: here you pick one, you do not assemble it.
AI Algorithms
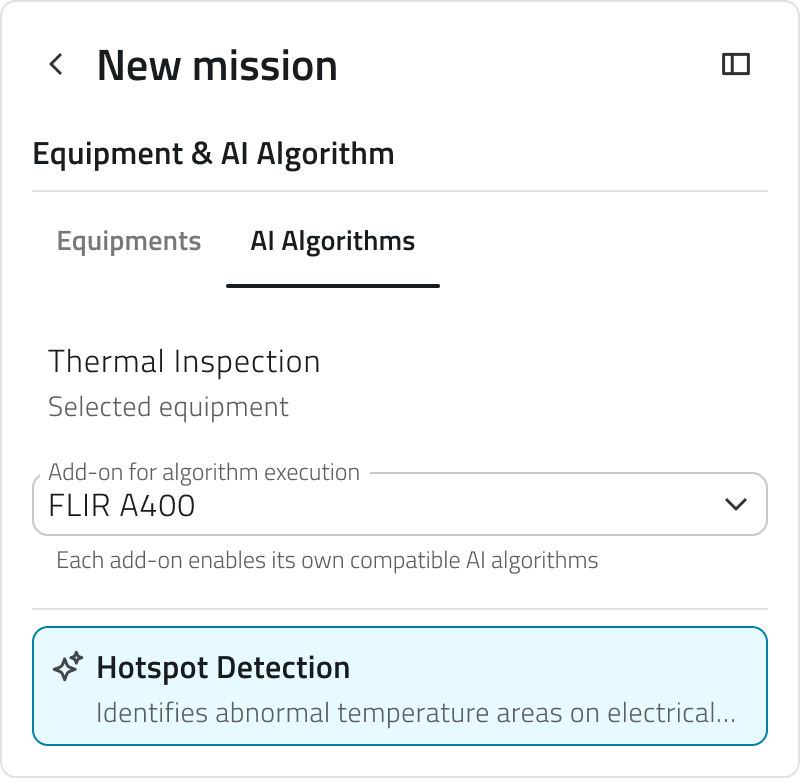
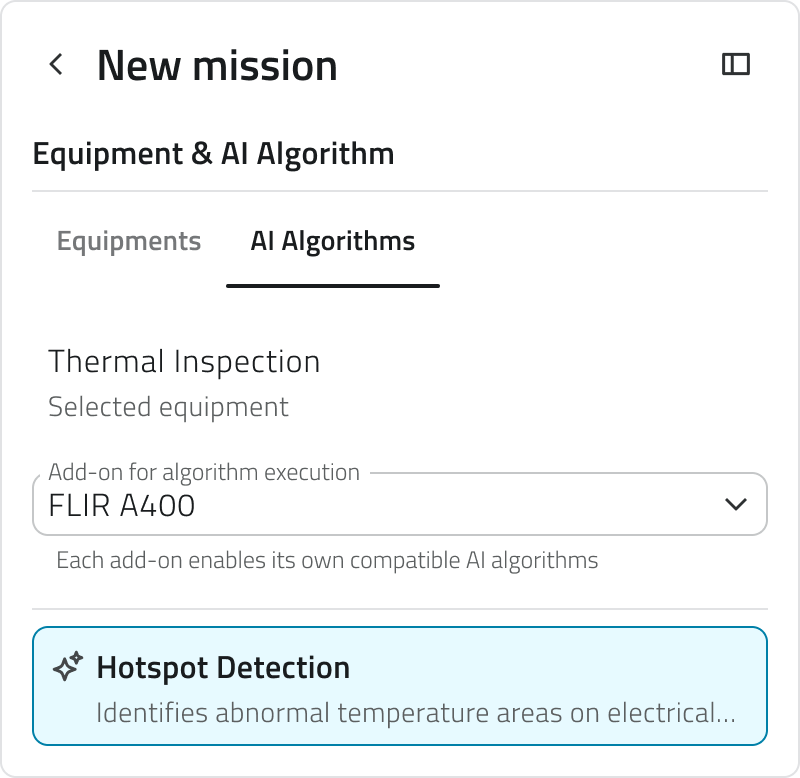
Assign an algorithm that will run on one of the add-ons. Select an Equipment first, then choose the add-on that will carry out the algorithm and the algorithm itself: each add-on works with its own compatible algorithms.
Continuous Actions
Continuous actions run in the background for the whole mission, from the moment it starts. Turn on the ones you need with their switch.
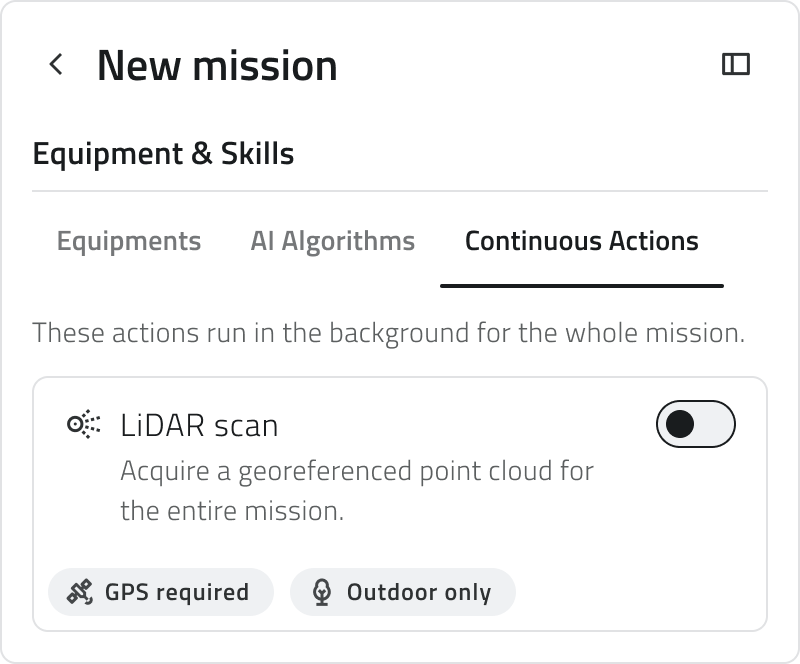
A continuous action can be turned on when the mission satisfies the conditions on its card. For example, LiDAR scan needs an Equipment that includes GPS and an outdoor mission.
Step 3: Mission Name & Typology
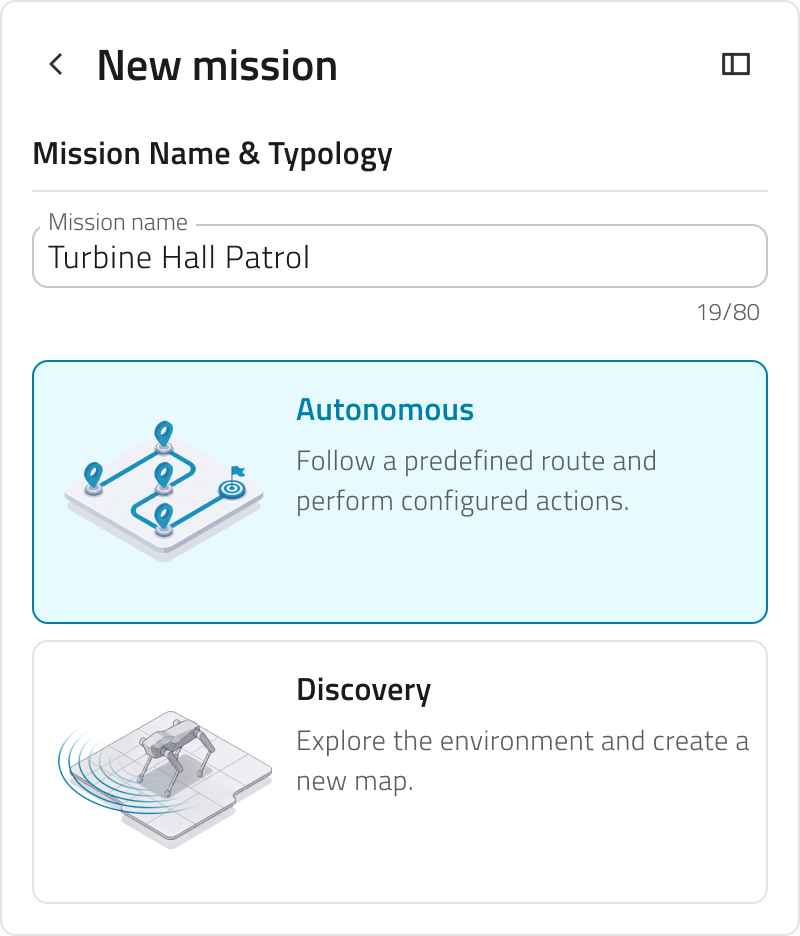
Give the mission a name, up to 80 characters, then choose the typology:
| Typology | What the mission does |
| Autonomous | The unit follows a route you define and performs the actions you configure on each waypoint. |
| Discovery | The robot dog explores the environment and builds a new map of it. |
Selecting Discovery removes the Mission Environment step: the map is produced by the mission itself, so there is nothing to choose. The configuration continues on Launch Mode.
A mission with a drone is always Autonomous, so you find the typology already chosen for you.
Step 4: Mission Environment
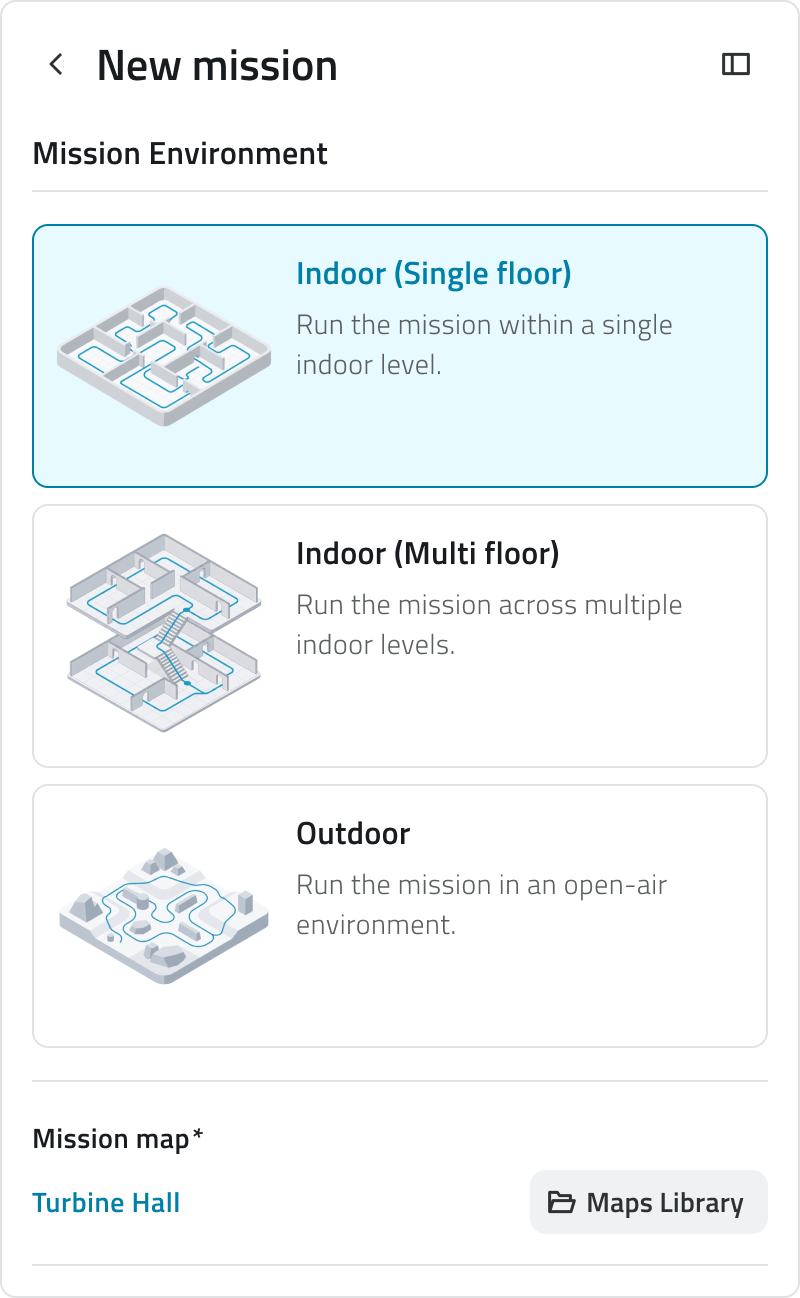
Choose where the mission runs, then which map it runs on.
| Environment | Where the mission runs |
| Indoor (Single floor) | Within a single indoor level. |
| Indoor (Multi floor) | Across several indoor levels. |
| Outdoor | In an open-air environment. |
Once the environment is chosen, select the map under Mission map: open Maps Library, pick a map from the list and confirm with Apply. The list shows only the maps that suit the environment you selected, and the preview shows the map with its type and the date of its last change. You need to select a map before you can move on to the next step.
Drone: Outdoor and flight parameters
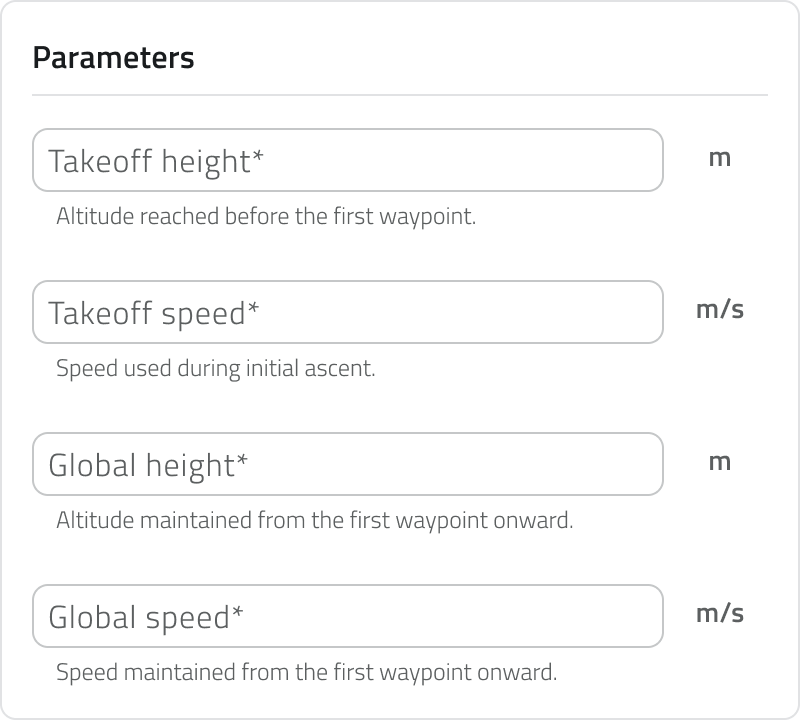
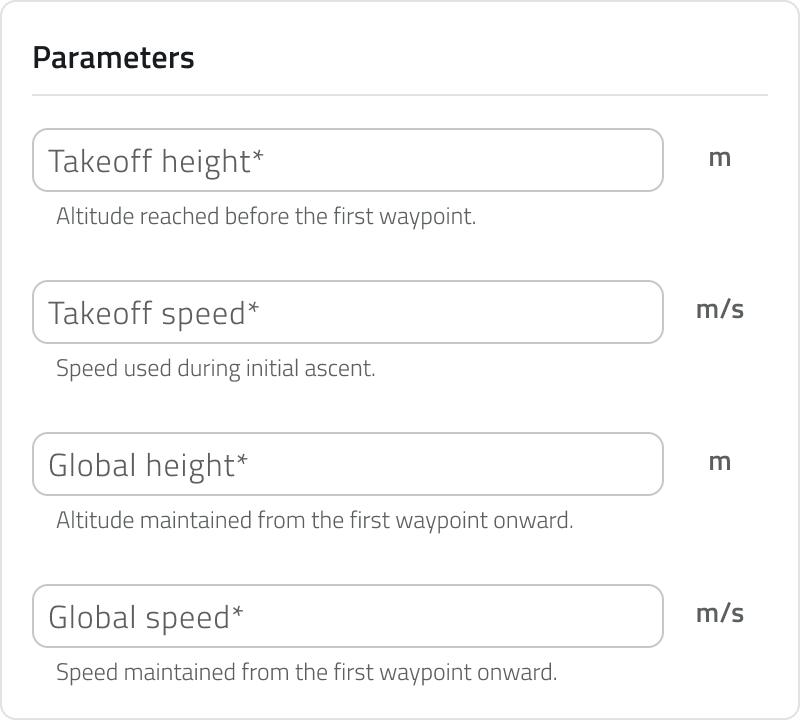
A mission with a drone always runs Outdoor, on a geographic map. This step asks instead for the flight parameters:
| Parameter | What it sets |
| Takeoff height | The altitude reached before the first waypoint. |
| Takeoff speed | The speed used during the initial ascent. |
| Global height | The altitude maintained from the first waypoint onward. |
| Global speed | The speed maintained from the first waypoint onward. |
Step 5: Launch Mode
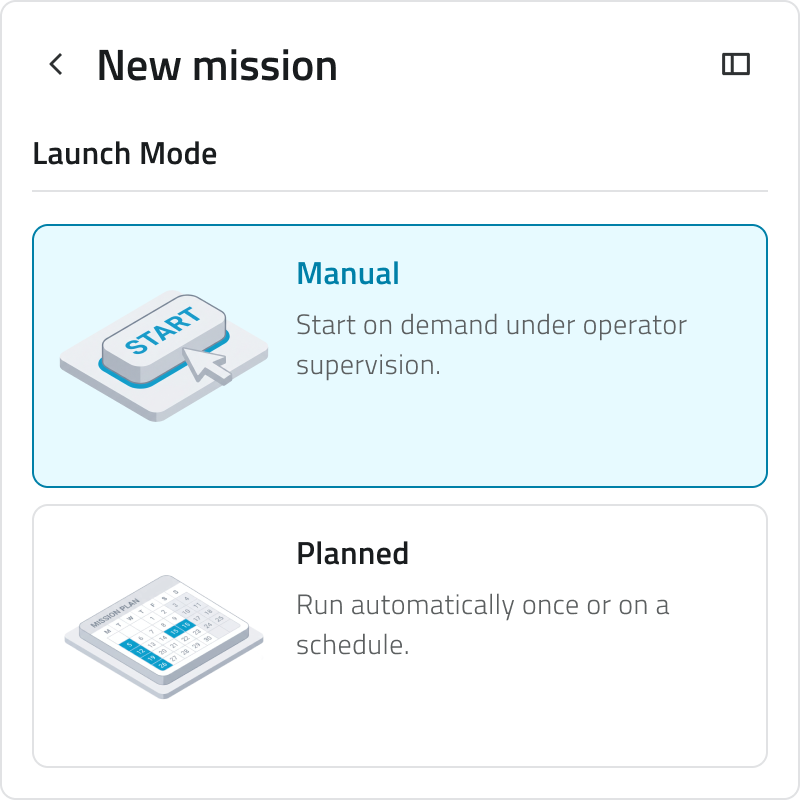
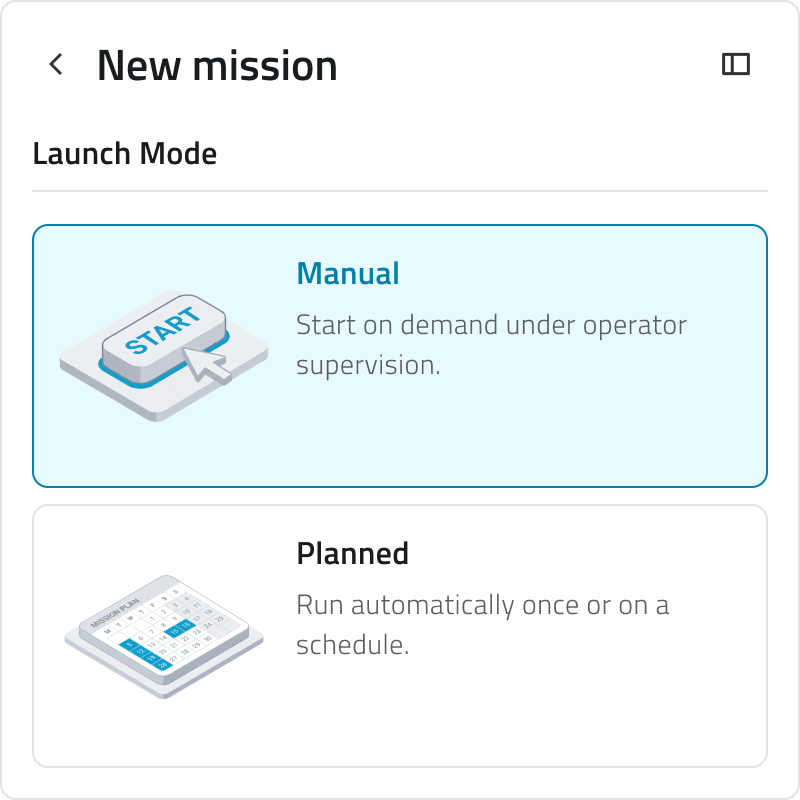
Decide when the mission starts:
| Launch Mode | When the mission starts |
| Manual | On demand, under the supervision of an operator. |
| Planned | Automatically, once or on a schedule. |
Choosing Planned opens the scheduling options, where you set the date and time and, if you want, make the mission repeat.
A mission with a drone always starts in Manual mode, so you find it already chosen for you.
What happens when you select Proceed
Proceed closes the configuration. In sequence, the mission is created as a Draft, the platform connects to the Mission Unit, and the planning screen opens.
For a robot dog the Home Position is marked automatically, at the point where the unit is. For a drone you draw it on the map from the planning screen.
If the Mission Unit cannot be reached, nothing of your work is lost: the mission is created as a Draft and you can retry with Retry Mission Unit Connection. The Home Position and the Pre Check stay out of reach until the connection succeeds, because both depend on what the unit reports.
Leaving the configuration
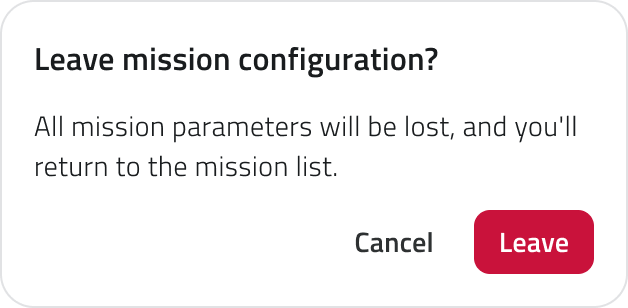
Leaving the configuration before Proceed asks for a confirmation: Leave mission configuration? Choose Cancel to stay, or Leave to return to the mission list.
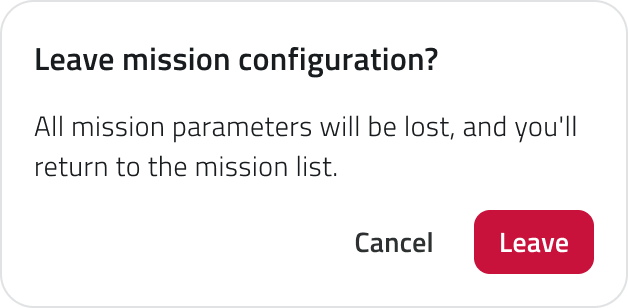
Leaving discards all the mission parameters: nothing is kept, because the mission has not been created yet.
Links
- Draw the mission on the map: where you land after Proceed.
- Schedule a mission: the options behind Planned.
- Edit a mission's configuration: change these choices later.
 Italian version
La configurazione di una missione si svolge in cinque step: scegli l'unità da impiegare, la sua strumentazione, il tipo di missione, l'ambiente in cui si svolge e il momento in cui parte. Al termine la missione viene creata come Bozza e si apre la schermata di pianificazione, dove disegni il percorso sulla mappa.
Si parte dalla sezione Missioni, in Live & Planned, con il pulsante Nuova missione.
Per creare una missione servono almeno una Mission Unit e un Equipment già censiti.
Quale percorso stai seguendo
La configurazione si adatta alle tue scelte. Queste sono le combinazioni principali, che cambiano il numero di step e gli elementi da definire.
| Percorso | Step | Mappa | Home Position | In mappa |
| Robot dog, Autonoma | 5 | Scelta dalla Libreria mappe | Marcata in automatico | Waypoints, Geofencing, Zone di pericolo |
| Robot dog, Esplorativa | 4 | Costruita dal robot dog durante la missione | Marcata in automatico | Niente da collocare |
| Drone | 5 | Geografica, fissa | Disegnata in mappa | Waypoints |
Per muoverti tra gli step usa Avanti e Indietro. I numeri in basso indicano a che punto sei e quanti step restano.
Step 1: Mission Unit da schierare
Scegli l'unità che eseguirà la missione: due sezioni separano i tipi, Robot Dog e Droni & Hangar.
Ogni robot dog mostra il nome, il modello, il livello di batteria e un chip che indica cosa sta facendo:
| Chip | Cosa significa |
| Libera | L'unità è disponibile e può essere assegnata a questa missione. |
| In corso | L'unità sta già eseguendo un'altra missione. |
| RTH | L'unità sta rientrando alla propria Home Position. |
Livello di batteria e chip di stato compaiono solo per il robot dog: in Droni & Hangar ogni unità riporta soltanto nome e modello.
Una missione con robot dog usa una sola unità.
Una missione con drone usa due unità: un drone e un hangar, entrambi obbligatori, uno per tipo. Selezionali per proseguire; finché non lo fai, un messaggio te lo ricorda.
Step 2: Equipment & AI Algorithm
Qui decidi come equipaggiare l'unità e cosa sarà in grado di fare durante la missione, attraverso tre sezioni: Equipment, Algoritmi AI e Azioni continuative.
Equipment
Seleziona l'Equipment con cui l'unità eseguirà la missione. Ogni card riporta nome, descrizione e i modelli di Add-on che contiene.
L'elenco mostra solo gli Equipment compatibili con l'unità scelta allo step 1. Gli Equipment vengono definiti in precedenza dalle Liste Globali: qui si sceglie tra quelli esistenti.
Algoritmi AI
Assegna un algoritmo a uno degli add-on. Scegli prima un Equipment, poi l'add-on che eseguirà l'algoritmo e infine l'algoritmo stesso: ogni add-on funziona con i propri algoritmi compatibili.
Azioni continuative
Le azioni continuative restano attive dall'avvio e per tutta la durata della missione. Attiva quelle che ti servono con l'interruttore sulla card.
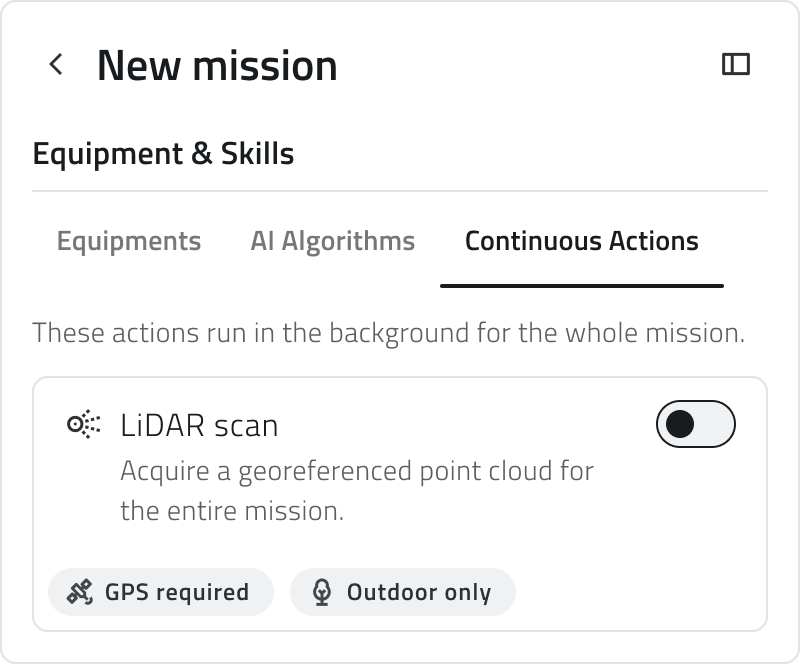
Puoi attivare un'azione continuativa solo se la missione soddisfa le condizioni riportate sulla sua card. LiDAR scan, per esempio, richiede un Equipment con GPS e una missione all'aperto.
Step 3: Nome Missione & Tipologia
Dai un nome alla missione, fino a 80 caratteri, poi scegli la tipologia:
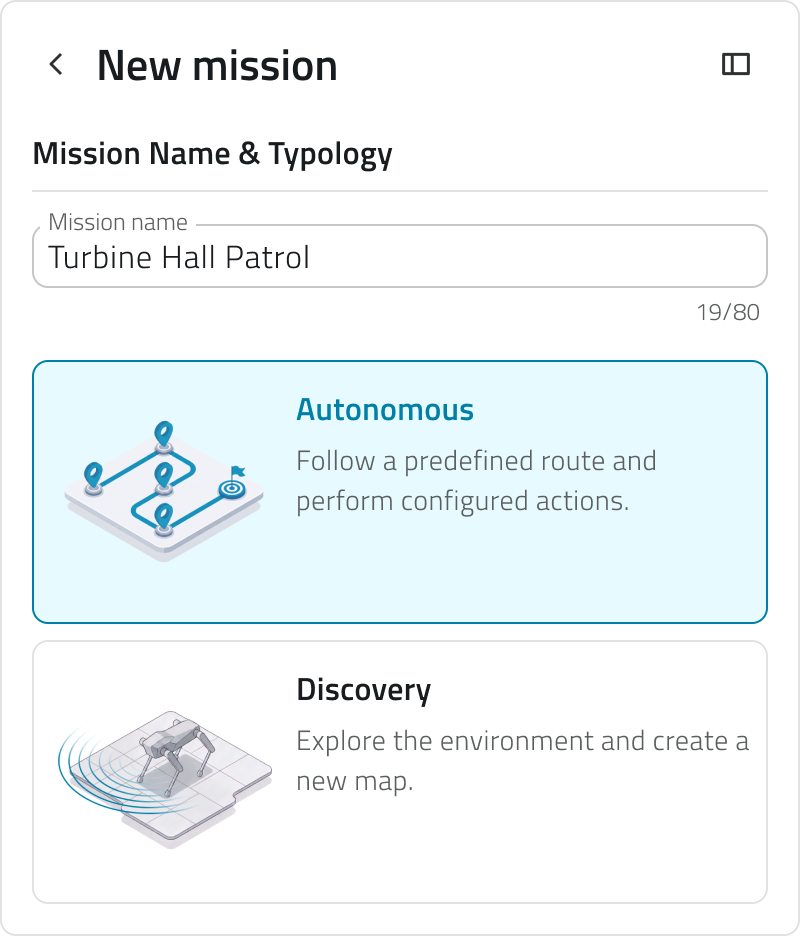
| Tipologia | Cosa fa la missione |
| Autonoma | L'unità segue un percorso che definisci tu ed esegue le azioni configurate su ciascun waypoint. |
| Esplorativa | Il robot dog esplora l'ambiente e ne costruisce una nuova mappa. |
Scegliendo Esplorativa, lo step Ambiente della missione non compare: la mappa viene prodotta dalla missione stessa, quindi non c'è nulla da scegliere. La configurazione prosegue con Modalità di avvio.
Una missione con drone è sempre Autonoma, quindi trovi la tipologia già scelta per te.
Step 4: Ambiente della missione
Scegli dove si svolge la missione, poi su quale mappa.
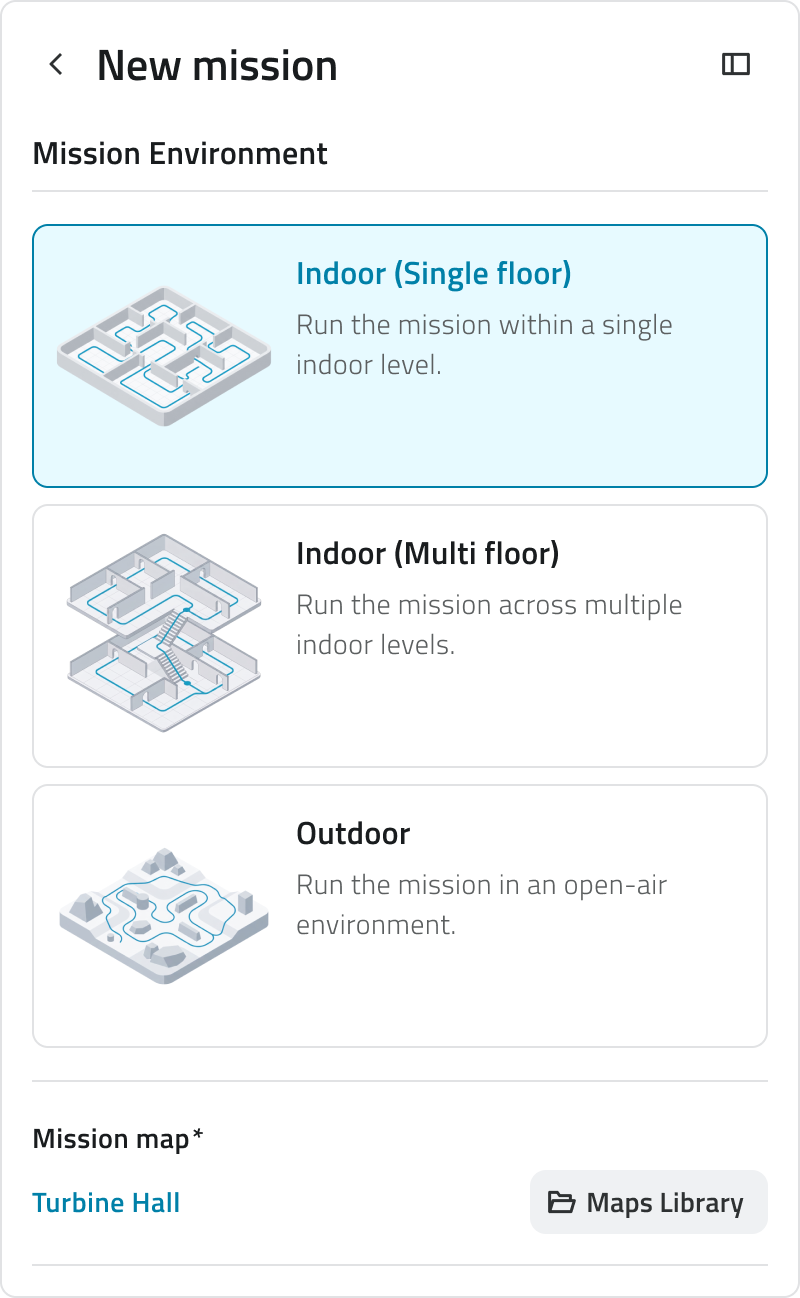
| Ambiente | Dove si svolge la missione |
| Interno (piano unico) | Su un solo livello al chiuso. |
| Interno (multipiano) | Su più livelli al chiuso. |
| All'aperto | In un ambiente all'aperto. |
Per la mappa apri Libreria mappe, seleziona una voce dall'elenco e conferma con Applica. L'elenco mostra solo le mappe adatte all'ambiente scelto, mentre l'anteprima ne riporta il tipo e la data dell'ultima modifica. Per passare allo step successivo devi aver scelto una mappa.
Drone: All'aperto e parametri di volo
Una missione con drone si svolge sempre All'aperto, su mappa geografica: in questo step imposti quindi i parametri di volo.
| Parametro | Cosa imposta |
| Altezza di decollo | La quota raggiunta prima del primo waypoint. |
| Velocità di decollo | La velocità usata durante la salita iniziale. |
| Altezza globale | La quota mantenuta dal primo waypoint in poi. |
| Velocità globale | La velocità mantenuta dal primo waypoint in poi. |
Step 5: Modalità di avvio
Decidi quando parte la missione:
| Modalità di avvio | Quando parte la missione |
| Manuale | Su richiesta, sotto la supervisione di un operatore. |
| Pianificata | In automatico, una volta sola o secondo una pianificazione. |
Scegliendo Pianificata si aprono le opzioni di pianificazione, dove imposti data e ora e, se necessario, la ripetizione della missione.
Una missione con drone parte sempre in modalità Manuale, quindi la trovi già scelta per te.
Cosa succede quando selezioni Procedi
Procedi chiude la configurazione. Nell'ordine: la missione viene creata come Bozza, la piattaforma si collega alla Mission Unit e si apre la schermata di pianificazione.
Per il robot dog la Home Position viene marcata in automatico, nel punto in cui si trova l'unità. Per il drone la disegni in mappa dalla schermata di pianificazione.
Se la Mission Unit non è raggiungibile il lavoro non va perso: la missione viene creata come Bozza e puoi ritentare con Riprova la connessione alla Mission Unit. Home Position e Pre Check restano fuori portata finché il collegamento non riesce, perché dipendono dai dati dell'unità.
Uscire dalla configurazione
Se esci dalla configurazione prima di Procedi ti viene chiesta una conferma: Esci dalla configurazione della missione? Scegli Annulla per restare, oppure Esci per tornare all'elenco delle missioni.
Uscendo perdi tutti i parametri impostati, perché la missione non è ancora stata creata.
Collegamenti
- Disegnare la missione in mappa: dove arrivi dopo il Procedi.
- Pianificare una missione: le opzioni dietro Pianificata.
- Modificare la configurazione di una missione: cambiare queste scelte in un secondo momento.
Last update: 31 July 2026