Mission Planner
The Mission Planner allows you to plan, configure, and monitor the robotic missions. You can configure the robotic units, define operational profiles, and create missions. It allows you to monitor mission status and review the data collected. This book guides you from initial configuration to real-time management and monitoring of completed missions, and is useful for automation and surveying contexts.
Il Mission Planner consente di pianificare, configurare e monitorare le missioni robotiche. È possibile configurare le unità robotiche, definire i profili operativi e creare le missioni. Permette di monitorare lo stato delle missioni e consultare i dati raccolti. Questo libro ti guida dalla configurazione iniziale alla gestione in tempo reale e al monitoraggio delle missioni concluse, ed è utile in contesti di automazione e rilievo.
- Initial Setup
- Robot Dog – Create and start a mission
- Drone – Create and start a mission
- Robot Dog - Tracking a live mission
- Drone - Tracking a live mission
- Archived Missions
Initial Setup
![]() English version
English version
The mission planner module is constantly evolving and receives monthly updates. Many features are currently being integrated and improved.
Before planning a mission, some basic system resources must be configured.
These configurations define the assets used by the Mission Planner within projects.
The initial setup is managed through Global Lists and is a prerequisite for correctly enabling mission planning.
Initial setup through Global Lists
From the app selection page, select the Operational App.
Then, from the nav rail on the left, open the Global Lists section.
![]()
The main lists used for mission planning are:
- Mission Unit
Represents the robotic units available in the project. - Add-on
Represents sensors, cameras, and accessories, either native or additional, used to support mission objectives. - Profiles
Represents technical configurations composed of one or more Add-on.
Register a Mission Unit
To use a Mission Unit in mission planning, it must first be registered in the platform.
The Mission Unit models available for integration are:
- Unitree B2
- Unitree B2 Wheel
- Unitree Go2
- DJI Matrice 4TD
- DJI Dock 3
- H1 (integrated only for telemetry and position reception)
- G1 (integrated only for telemetry and position reception)
To add a new Mission Unit, open the Mission Units global list and click the New object button.
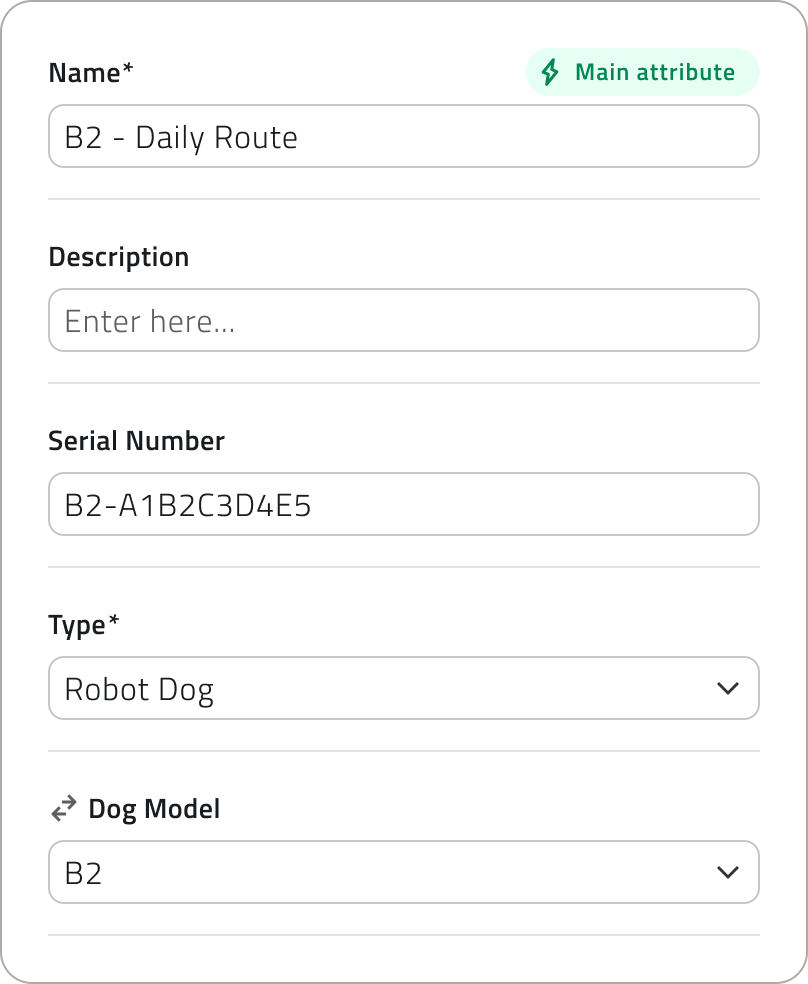
Robot dog
To register a robot dog, complete the following fields:
- Name
- Description
- Serial Number
Unique identification code displayed on the body of the robot dog. Its position may vary depending on the model. - Type
Select Robot dog from the list. - Dog model
Select the specific robot dog model from the list.
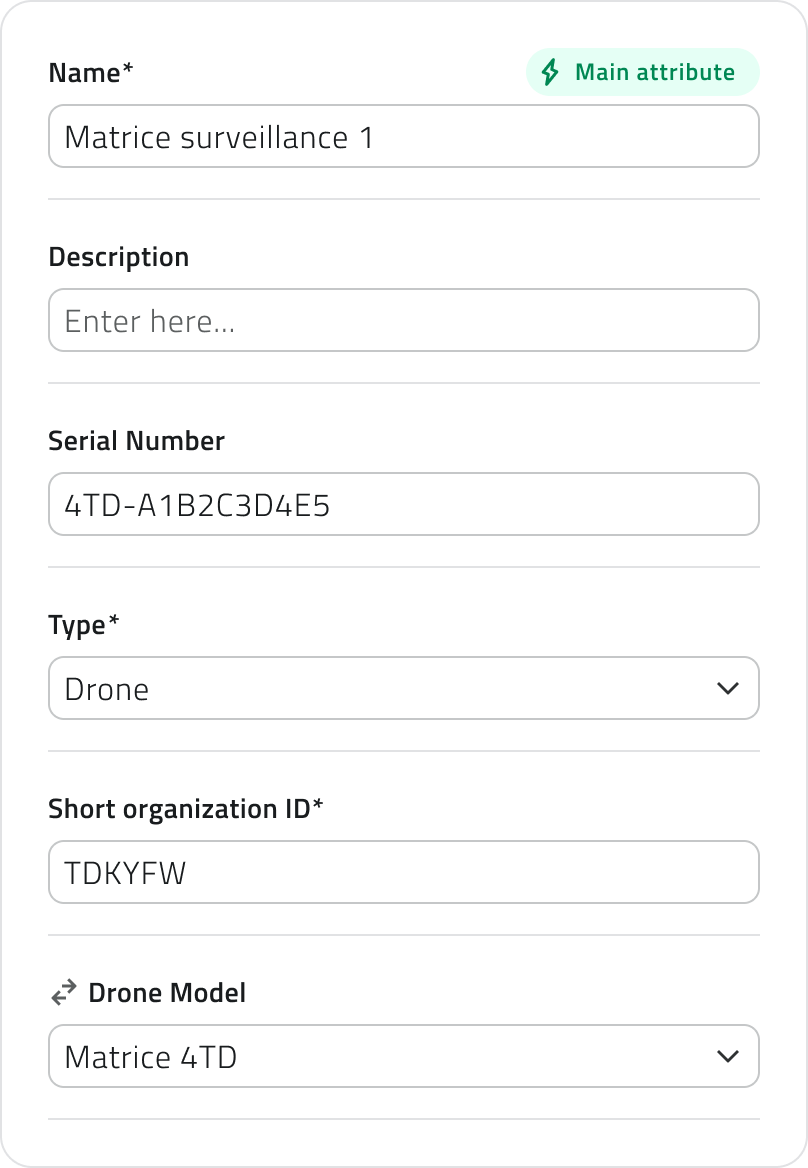
Drone
To register a drone, complete the following fields:
- Name
- Description
- Serial Number
Unique identification code displayed on the body of the drone. Its position may vary depending on the model. - Type
Select Drone from the list. - Short organization ID
A unique identification code that must match the one specified for both the hangar and the drone. - Drone model
Select the specific drone model from the list.
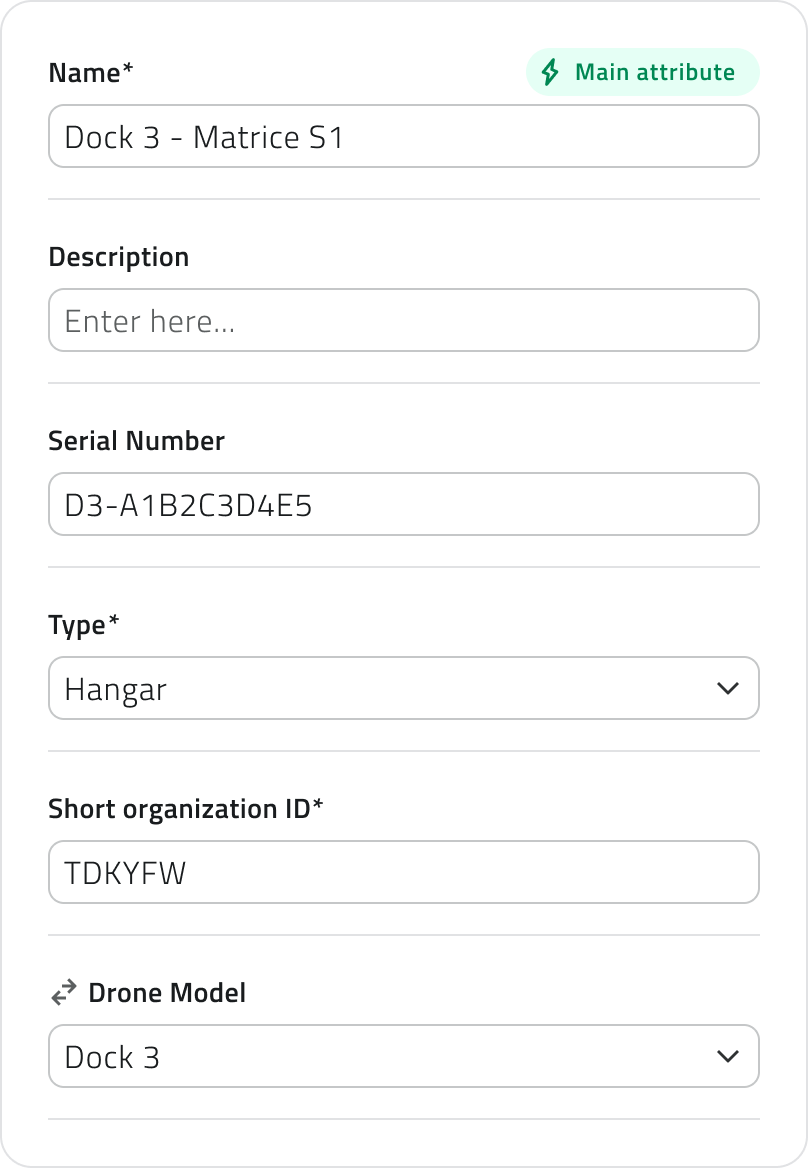
Hangar
To register a hangar, complete the following fields:
- Name
- Description
- Serial Number
Unique identification code displayed on the body of the hangar. Its position may vary depending on the model. - Type
Select Hangar from the list. - Short organization ID
A unique identification code that must match the one specified for both the hangar and the drone. - Drone model
Select the specific hangar model from the list.
To complete the Mission Unit registration, click Save.
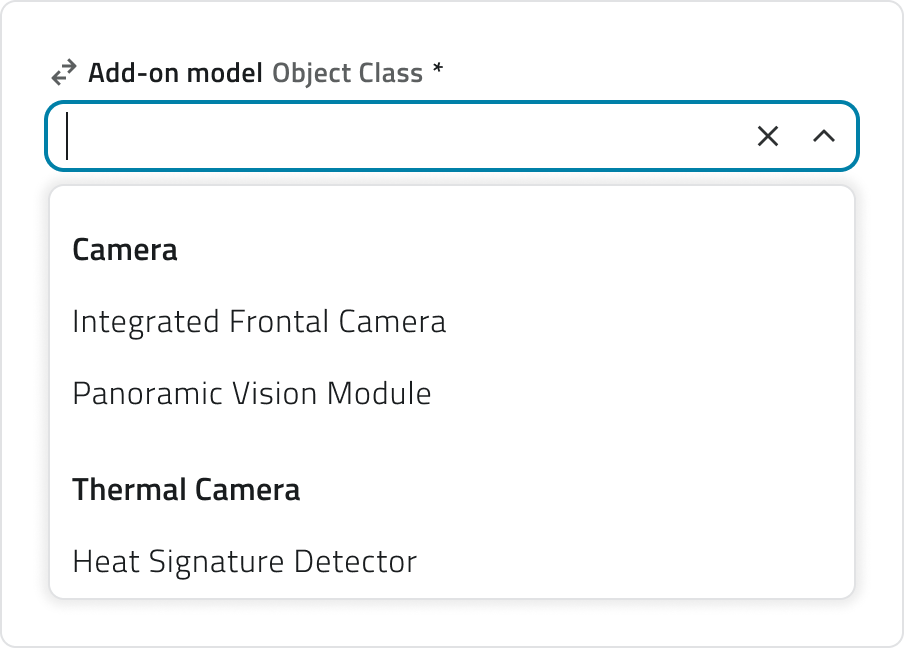
Register an Add-on
Registering Add-ons is required only if you use a Mission Unit of type Robot Dog.
To add a new Add-on, open the Add-ons global list and click the New object button.
Complete the required fields:
- Name
- Description
- Add-on Model
Select the model of the sensor, camera or accessory to register from the list.
The list shows the models compatible with EagleArca.
To register the Add-on and make it available in the system, click Save.
If no external Add-ons are used, the native Add-ons of the Mission Unit must still be registered.
For native assets, make sure you know the model of the sensor or camera installed on the Mission Unit, so that you can select the correct model. This information is available in the technical documentation of the Mission Unit.
If you cannot identify this information, contact support.
💡Tip: If an Add-on model is not available in the list, it means that it is not compatible with the platform. Make sure you use a supported model or contact support.
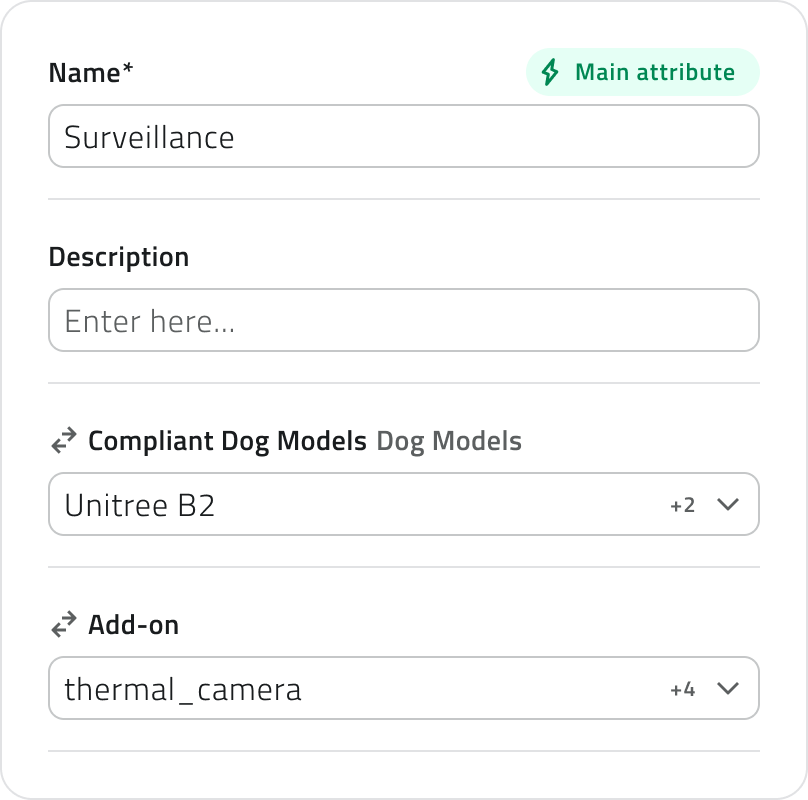
Create a Profile
Profiles can only be associated with Mission Units of type Robot Dog.
To create a new Profile, open the Profiles global list and click the New object button.
Complete the required fields:
- Name
- Description
- Compliant Dog Models
Select the Robot Dog models compatible with the profile. - Add-on
Select one or more previously registered Add-ons.

To complete the creation of the Profile, click Save.
💡Tip: You can associate an Add-on with multiple profiles, but make sure it is compatible with the selected Mission Unit models.
![]() Italian version
Italian version
Il modulo mission planner è in continua evoluzione e riceve aggiornamenti mensili. Molte funzionalità sono in corso di integrazione e miglioramento.
Prima di pianificare una missione è necessario configurare alcune risorse di base del sistema.
Queste configurazioni definiscono gli asset utilizzati dal Mission Planner all’interno dei progetti.
La configurazione iniziale viene gestita tramite le Liste Globali e rappresenta un prerequisito per abilitare correttamente la pianificazione delle missioni.
Configurazione iniziale tramite Global Lists
![]()
Le liste principali per la pianificazione delle missioni sono:
- Mission Unit
Rappresentano le unità robotiche disponibili nel progetto. - Add-on
Rappresentano sensori, telecamere e accessori, nativi o aggiuntivi, utilizzati a supporto degli obiettivi di missione. - Profili
Rappresentano configurazioni tecniche composte da uno o più Add-on.
Censire una Mission Unit
Per utilizzare una Mission Unit nella pianificazione delle missioni, è necessario registrarla in piattaforma.
I modelli di Mission Unit disponibili per l'integrazione sono:
- Unitree B2
- Unitree B2 Wheel
- Unitree Go2
- DJI Matrice 4TD
- DJI Dock 3
- H1 (integrato solo per ricezione di telemetria e posizione)
- G1 (integrato solo per ricezione di telemetria e posizione)
Per aggiungere una nuova Mission Unit, apri la lista globale delle Mission Units e clicca sul pulsante Nuovo oggetto.
Robot dog
Per registrare un robot dog, compila i seguenti campi:
- Nome
- Descrizione
- Serial Number
Codice identificativo univoco riportato sul corpo del robot dog. La posizione può variare in base al modello. - Tipo
Seleziona Robot dog dall'elenco. - Dog model
Seleziona dall’elenco il modello specifico del robot dog.
Drone
Per registrare un drone, compila i seguenti campi:
- Nome
- Descrizione
- Serial Number
Codice identificativo univoco riportato sul corpo del drone. La posizione può variare in base al modello. - Tipo
Seleziona Drone dall'elenco. - Short organization ID
Codice identificativo univoco che deve corrispondere a quello specificato sia per l’hangar sia per il drone. - Drone model
Seleziona dall’elenco il modello specifico del drone.

Hangar
Per registrare un hangar, compila i seguenti campi:
- Nome
- Descrizione
- Serial Number
Codice identificativo univoco riportato sul corpo dell’hangar. La posizione può variare in base al modello. - Tipo
Seleziona Hangar dall'elenco. - Short organization ID
Codice identificativo univoco che deve corrispondere a quello specificato sia per l’hangar sia per il drone. - Drone model
Seleziona dall’elenco il modello specifico dell’hangar.

Per completare la registrazione della Mission Unit, clicca su Salva.
Censire un Add-on
Il censimento degli Add-on è necessario solo se utilizzi una Mission Unit di tipo Robot Dog.
Per aggiungere un nuovo Add-on, apri la lista globale degli Add-on e clicca sul pulsante Nuovo oggetto.
Compila i campi richiesti:
- Nome
- Descrizione
- Modello Add-on
Seleziona dall’elenco il modello del sensore, della fotocamera o dell’accessorio da registrare.
La lista mostra i modelli compatibili con EagleArca.
Per registrare l’Add-on e renderlo disponibile nel sistema, clicca su Salva.
In assenza di Add-on esterni, è comunque necessario censire gli Add-on nativi della Mission Unit.
Per gli asset nativi, assicurati di conoscere il modello del sensore o della camera installata sulla Mission Unit, in modo da selezionare il modello corretto. Questa informazione è disponibile nella documentazione tecnica della Mission Unit.
Se non riesci ad individuare questa informazione contatta il supporto.
💡Suggerimento: Se un modello di Add-on non è presente nella lista, significa che non è compatibile con la piattaforma. Assicurati di utilizzare un modello supportato o contatta il supporto.
Creare un Profilo
I profili possono essere associati solo a Mission Unit di tipo Robot Dog.
Per creare un nuovo Profilo, apri la lista globale dei Profili e clicca sul pulsante Nuovo oggetto.
Compila i campi richiesti:
- Nome
- Descrizione
- Compliant Dog Models
Seleziona i modelli di Robot Dog compatibili con il profilo. - Add-on
Seleziona uno o più Add-on precedentemente censiti.
Per completare la creazione del Profilo, clicca su Salva.
💡Suggerimento: Puoi associare un Add-on a più profili, ma assicurati che sia compatibile con i modelli di Mission Unit selezionati.
Last update: 25 May 2026
Robot Dog – Create and start a mission
![]() English version
English version
This section describes the steps to create, configure and start a mission with a Robot Dog, from mission creation to preliminary checks and launch.
Available only if at least one Robot Dog Mission Unit is configured, a Profile is set up and access permissions to the App are granted.
Create a new mission
1. From the main page, open the project where you want to create the mission.
2. From the left-side menu, go to the Inventory section.
![]()
3. Click on the Missions Object Class to view the list of missions.
4. Click on New object.
![]()
5. A mission creation modal will open, asking you to input the following details:
-
Name
The identifying name of the mission. - Mission unit type
Select Robot Dog from the list. - Start Mode
Choose how the mission should start:
- Manual, with a specific command, or
- Scheduled, indicating the mission start date.
-
Mission Typology
Defines the operational mode of the mission. You can choose from:-
Autonomous: Robot Dog runs the mission autonomously, following the path and actions configured for the mission.
-
Discovery: An exploratory mission to acquire data without a predefined path.
-
- Mission Unit
Select the Robot Dog that will execute this mission. - Profile
Select a profile for the mission. This field will become active only after selecting the Mission Unit.
6. To create the mission, click Save.
Editing missions
You can edit and delete missions in the inventory, in the mission list.
Edit
To edit a mission that hasn't been completed yet, open the details by clicking the blue button that appears when you hover over the item.
To update the mission details, click Edit.

Some attributes can be edited, depending on the mission’s status and whether there are any waypoints.
Delete
To delete a mission:
- Open the mission details and click the Delete button in the top-right corner of the window.
- Select one or more missions from the list and click the Delete button in the top-right corner of the view.

In both cases, a confirmation window will appear for the operation.

Deletion is only allowed for missions that have not been started.
Archived missions cannot be deleted, but can only be viewed or duplicated.
Adding elements to the map
To make a mission operational, you must define a Mission Home and at least one Waypoint. You can also draw Danger Zones and Geofences.
To add them, click Go to Mission from the mission details panel.
Adding Danger Zones and Geofences
Danger Zones and Geofences are areas that limit the Robot Dog's operational area.
- Danger Zone
Represents an area that the Robot Dog cannot enter. - Geofence
Represents an area where the Robot Dog can operate safely. The robot can leave this area, but you will be notified if it does.
To add a Danger Zone or a Geofence, select the Draw tool from the toolbar and choose the corresponding Object Class.

To draw the polygon, place the vertices by left-clicking on the map.
Close the polygon by right-clicking.
Fill in the required attributes and click Save.

Set the Mission Home
The Mission Home is the Robot Dog’s starting and return point.
It is not drawn manually on the map, but is automatically detected by the system based on the robot’s location.
Before setting the Home, make sure the Robot Dog is turned on and placed on the charging station.
From the side panel, click Mark on map.

The system records the robot's current position and saves it as the Mission Home.
To change the Home, delete the existing one and click Mark on map again.
You can set the Home within a Danger Zone, but this will be considered a fatal error during verification.
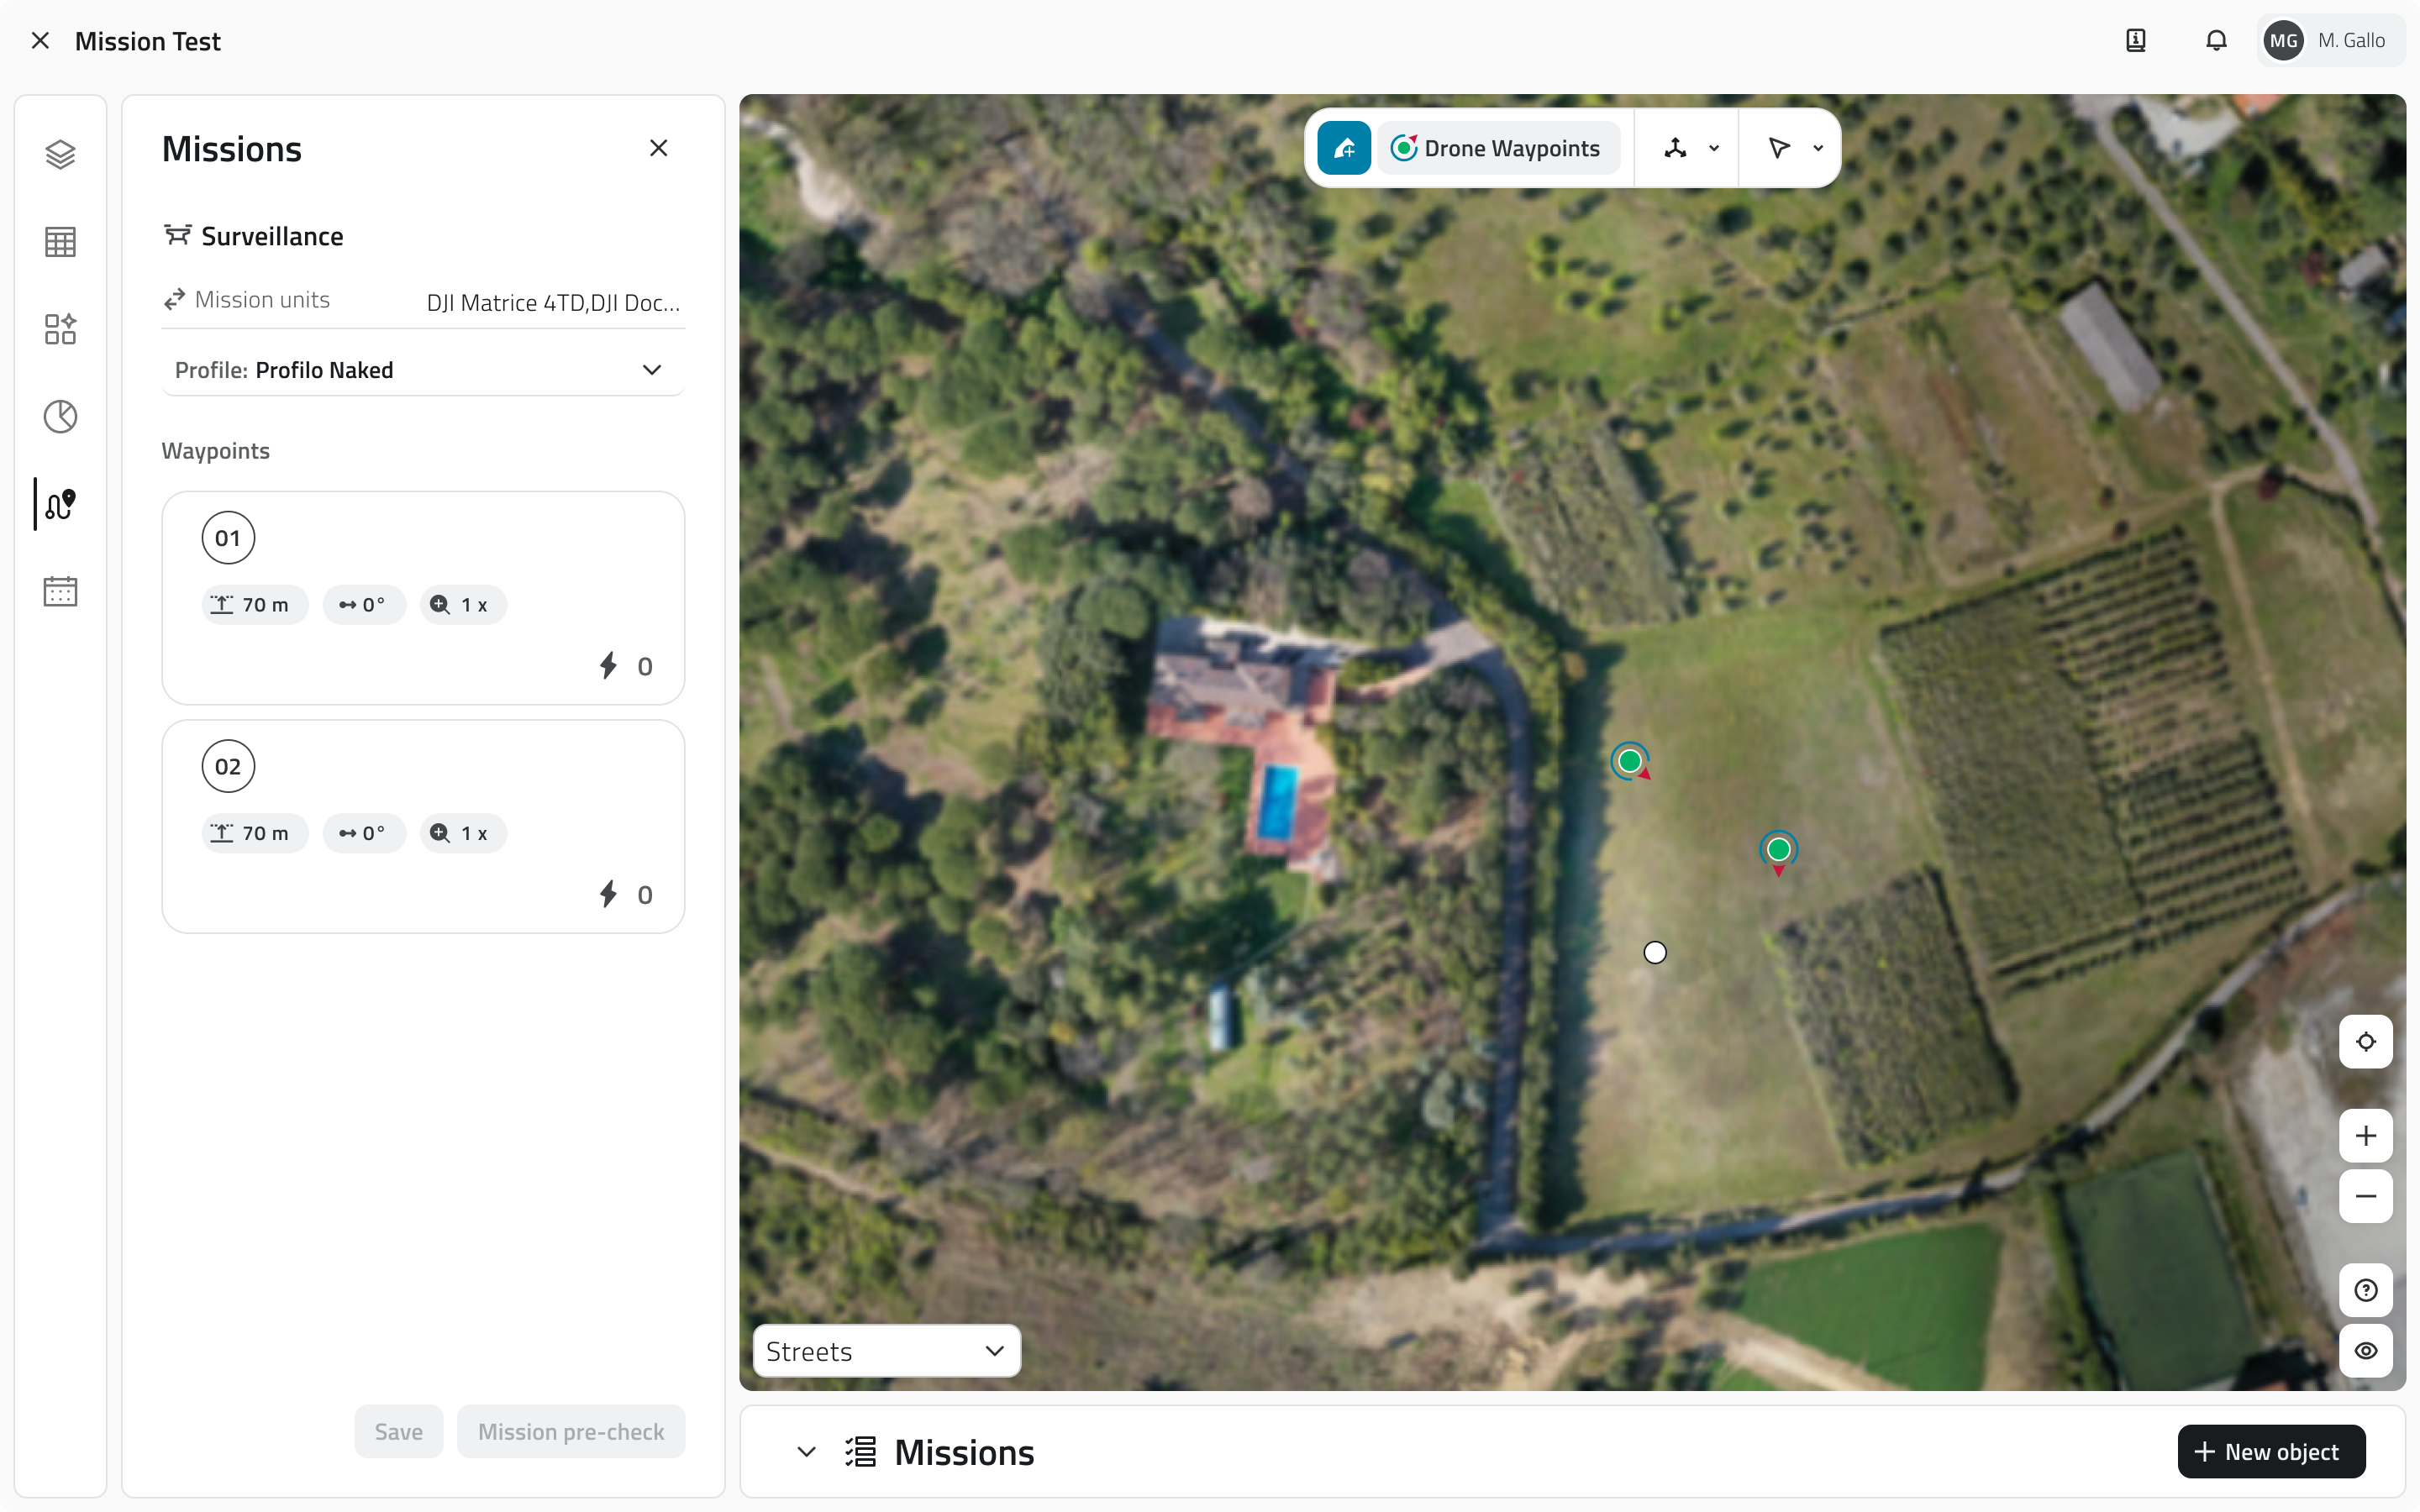
Add Waypoints to the Map
Waypoints define the operational path that the Robot Dog will follow during the mission.
1. To add a Waypoint, select the Draw tool from the toolbar and choose the corresponding Object Class.
2. Place the waypoint by left-clicking on the map.
3. To set the waypoint’s orientation, move the mouse.
4. Confirm the entry by right-clicking.

You can place waypoints within a danger zone, but they will be excluded from the robot's path during verification.
Waypoints are visible both on the map and in the list in the side panel. Each Waypoint is automatically numbered based on the order in which it was created. The order of the Waypoints also determines the order in which the Robot Dog will reach them.
To change the orientation, select a waypoint on the map and click Rotate from the toolbar.

To delete waypoints, select them on the map and click Delete on the toolbar, or click Delete when you hover over the item in the list.

To change the order of the waypoints, drag them in the sidebar list.
If you change the order or settings of the waypoints after saving them, a warning about unsaved changes will be displayed. Remember to click Save at the bottom of the panel.
Set actions on Waypoint
For each Waypoint, it is possible to configure one or more actions that the Robot Dog will perform after reaching the point.
The actions define what operation the robot should perform, using a specific Add-on or for a defined duration.
To add an action to a Waypoint, hover over one of the action cards on the left-hand panel and click the +Action button.

The available actions on the platform are:
- Wait
Keeps the robot waiting for a period of time, which you can define in the next field. - Body height
Allows adjusting the robot’s height by lowering or raising it within a range. - Tilt
Allows adjusting the robot's body tilt by rocking it forward and backward within a range. - Take photo
Takes a photo using a specific Add-on that you can define in the next field. - Start video recording
Starts recording a video using a specific Add-on, which you can define in the next field. - Stop video recording
Stops the video recording of a specific Add-on, which you can define in the next field.
The list of available actions may vary based on the Add-on in use. For example, if the profile used does not have a camera, the action Take photo will not be available.
For photo acquisition actions, you can associate one or more AI models, which will be executed automatically after collecting the content.

At the end of the mission, the following are displayed:
- Original media
- Processed media from the selected AI models
For each waypoint, you can add multiple actions, but it is also possible to save without setting any actions.
The actions are executed in sequence, in the order in which they were created and are visible in the list.
To save the waypoint configuration and actions, click the Save button at the bottom.
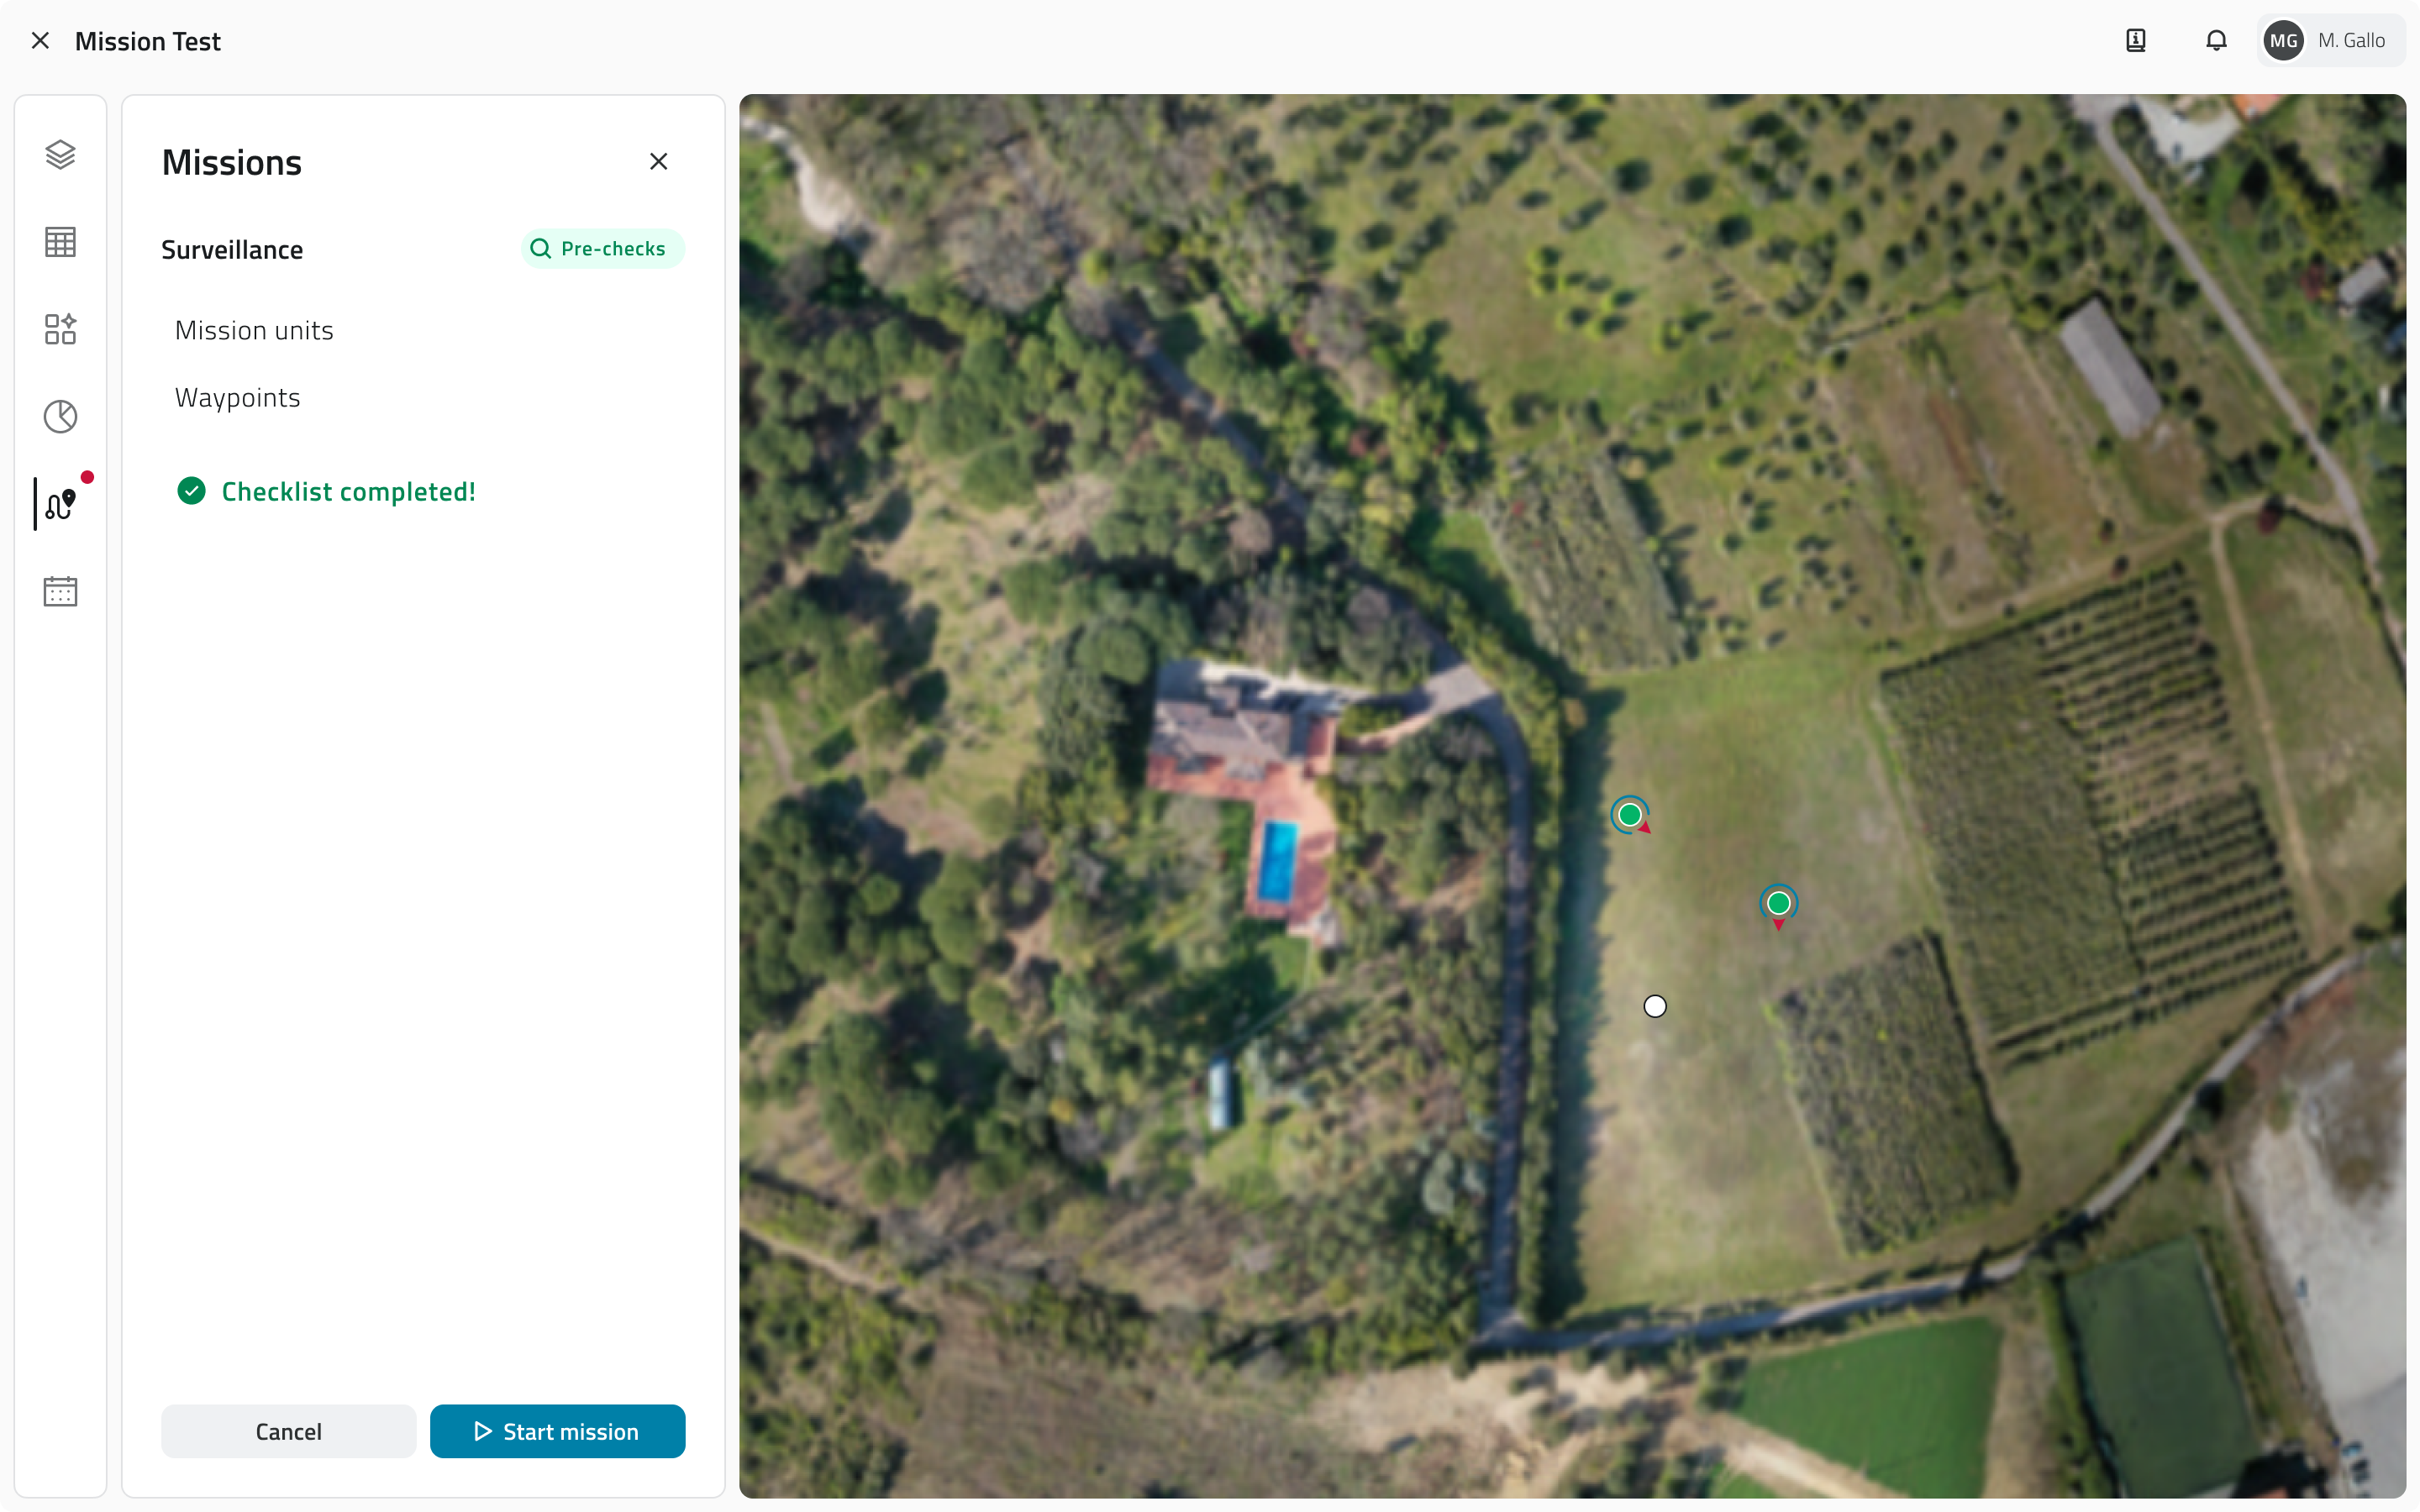
Mission pre-check
Before starting the mission, a pre-check must be performed.
Clicking on Mission pre-check, the system will verify the connection status of the Robot Dog and the position of the Home and Waypoints.
The system may detect the following types of errors:
Blocking errors
Related to the Mission Unit or Home.
In this case, the mission cannot be started until the issue is resolved.
Non-blocking errors
Related to the Add-on or individual Waypoint.
In this case, the mission can still be started, but the system requires you to sign a waiver before proceeding.

Every time you reopen the mission, the Robot Dog’s connection status will be automatically checked. In addition, the Home point must be reset each time, and the Mission pre-check must be performed again.
Mission start
If the check did not present any blocking errors, you can start the mission by clicking the Start mission button.

Upon start, the Robot Dog autonomously begins to execute the path and actions configured for the mission.
From this moment, it is possible to monitor the mission in real-time and intervene using the available controls.
Links
![]() Italian version
Italian version
Questa sezione descrive i passaggi per creare, configurare e avviare una missione con un Robot Dog, dalla creazione della missione fino al controllo preliminare e all’avvio.
Disponibile solo con almeno una Mission Unit Robot Dog configurata, un Profilo configurato e permessi di accesso all'App.
Creare una nuova missione
1. Dalla pagina principale dei progetti, apri il progetto in cui vuoi creare la missione.
![]()
3. Clicca sulla Classe Oggetto Missions per visualizzare l'elenco delle missioni.
4. Clicca su Nuovo oggetto.
![]()
5. Si aprirà il modale di creazione missione, che richiede l'inserimento dei seguenti dati:
-
Nome
Il nome identificativo della missione. - Mission unit type
Seleziona Robot Dog dall'elenco. - Start Mode
Scegli se la missione deve partire:- Manualmente, con un comando specifico.
- In modalità programmata, indicando la data di inizio della missione.
- Manualmente, con un comando specifico.
-
Mission Typology
Definisce la modalità operativa della missione. Puoi scegliere tra:-
Autonomous: Il Robot Dog esegue la missione autonomamente, seguendo il percorso e le azioni che verranno configurati nei passaggi successivi.
-
Discovery: Missione esplorativa utilizzata per acquisire dati senza un percorso predefinito.
-
- Mission Unit
Seleziona il Robot Dog che dovrà eseguire questa missione. - Profile
Seleziona il profilo per la missione. Questo campo diventa attivo solo dopo aver selezionato la Mission Unit.
6. Per creare la missione, clicca Salva
Modifica delle missioni
Puoi modificare ed eliminare le missioni nell'inventory, nella lista delle missioni.
Modifica
Per modificare una missione non ancora eseguita, apri il dettaglio cliccando sul pulsante blu, visibile al passaggio del mouse sull'elemento.
Per aggiornare i dati della missione, clicca Modifica.
Alcuni attributi possono essere modificati, a seconda dello stato della missione e della presenza di Waypoint.
Eliminazione
Per eliminare una missione:
- Apri il dettaglio della missione e clicca sul pulsante Elimina in alto a destra della finestra.
- Seleziona una o più missioni dalla lista e clicca sul pulsante Elimina in alto a destra della vista.
In entrambi i casi, apparirà una finestra di conferma per l'operazione.
L’eliminazione è consentita solo per le missioni non avviate.
Le missioni archiviate non possono essere eliminate, ma solo consultate o duplicate.
Inserire elementi in mappa
Per rendere una missione operativa, è necessario definire una Mission Home e almeno un Waypoint. È anche possibile disegnare aree di Danger Zone e Geofence.
Per inserirli clicca Go to Mission dal pannello di dettaglio della missione.
Aggiungere Danger Zones e Geofence
Le Danger Zones e i Geofences sono zone che limitano l'area operativa del Robot Dog.
- Danger Zone
Rappresenta un'area nella quale il Robot Dog non può entrare. - Geofence
Rappresenta un'area nella quale il Robot Dog può operare in modo sicuro. Il robot può uscire da quest'area, ma verrai notificato se lo farà.
Per aggiungere una Danger Zone o un Geofence, seleziona lo strumento Disegna dalla toolbar e scegli la Classe Oggetto corrispondente.
Per disegnare il poligono, posiziona i vertici cliccando il tasto sinistro del mouse sulla mappa.
Chiudi il poligono cliccando il tasto destro del mouse.
Compila gli attributi richiesti e clicca su Salva.
Impostare la Mission Home
La Mission Home rappresenta il punto di partenza e di rientro del Robot Dog.
Non viene disegnata manualmente sulla mappa, ma viene rilevata automaticamente dal sistema in base alla posizione del robot.
Prima di impostare la Home, assicurati che il Robot Dog sia acceso e posizionato sulla stazione di ricarica.
Dal pannello laterale, clicca Segna posizione.
Il sistema registra la posizione corrente del robot e la salva come Mission Home.
Per modificare la Home, elimina quella esistente e clicca nuovamente Segna posizione.
Puoi posizionare la Home all'interno di una Danger Zone, ma in fase di verifica sarà considerato un errore bloccante.
Aggiungere Waypoint in mappa
I Waypoint definiscono il percorso operativo che il Robot Dog seguirà durante la missione.
1. Per aggiungere un Waypoint seleziona lo strumento Disegna dalla toolbar e scegli la Classe Oggetto corrispondente.
2. Posiziona il punto cliccando con il tasto sinistro del mouse sulla mappa.
3. Per definire l’orientamento del Waypoint, muovi il mouse.
4. Conferma l’inserimento cliccando con il tasto destro del mouse.
Puoi posizionare i Waypoint all'interno di una Danger Zone, ma in fase di verifica saranno scartati dalla traiettoria del robot.
I Waypoint sono visibili sia in mappa che nell'elenco nel pannello laterale. Ogni Waypoint viene numerato automaticamente, in base all'ordine di creazione. L'ordine dei Waypoint indica anche l'ordine in cui il Robot Dog li raggiungerà.
Per modificare l’orientamento seleziona un Waypoint in mappa e clicca Ruota dalla toolbar.
Per eliminare i Waypoint selezionali in mappa e clicca Elimina dalla toolbar, o clicca su Elimina che appare andando in hover sull'elemento dell'elenco.
Per cambiare l'ordine dei Waypoint, trascinali nell'elenco del pannello laterale.
Se modifichi l’ordine o le impostazioni dei waypoint dopo averli salvati, verrà visualizzato un avviso relativo a modifiche non salvate. Ricordati di premere Salva nella parte inferiore del pannello.
Impostare azioni sui Waypoint
Per ogni Waypoint è possibile configurare una o più azioni, che il Robot Dog esegue dopo aver raggiunto il punto.
Le azioni definiscono quale operazione deve eseguire il robot, utilizzando uno specifico Add-on oppure per una durata definita.
Per aggiungere un’azione a un Waypoint, porta il cursore sopra una delle card azione nel pannello laterale sinistro e clicca sul pulsante +Action.
Le azioni disponibili in piattaforma sono:
- Aspetta
Mantiene il robot in attesa per un intervallo di tempo che puoi definire nel campo successivo. - Body height
Consente di modificare l'altezza del robot facendolo abbassare ed alzare entro un range. - Tilt
Consente di modificare l'inclinazione del corpo del robot facendolo oscillare avanti e indietro entro un range. - Scatta foto
Acquisisce un'immagine utilizzando uno specifico Add-on che puoi definire nel campo successivo. - Inizia registrazione Video
Inizia a registrare un video utilizzando uno specifico Add-on che puoi definire nel campo successivo. - Termina registrazione Video
Interrompe la registrazione di un video di uno specifico Add-on che puoi definire nel campo successivo.
La lista delle azioni disponibili può variare in base agli Add-on in uso. Ad esempio se nel profilo utilizzato non sono presenti fotocamere, non sarà possibile selezionare Scatta foto come azione.
Per le azioni di acquisizione foto è possibile associare uno o più modelli AI, che vengono eseguiti automaticamente dopo la raccolta del contenuto.
Al termine della missione vengono visualizzati:
-
Media originale
-
Media elaborato dai modelli AI selezionati
Per ogni waypoint è possibile aggiungere più azioni, ma è anche possibile salvare senza aver impostato alcuna azione.
Le azioni vengono eseguite in sequenza, nell’ordine in cui sono state create e in cui sono visibili nella lista.
Per salvare la configurazione dei waypoint e delle azioni, clicca sul pulsante Salva, in basso.
Controlli pre-missione
Prima di avviare la missione è necessario effettuare un pre-check.
Cliccando su Controlli pre-missione il sistema effettuerà una verifica sullo stato di connessione del Robot dog e sulla posizione della Home e dei Waypoints.
Il sistema potrebbe rilevare le seguenti tipologie di errori:
Errori bloccanti
Riguardano Mission Unit o Home.
In questo caso non sarà possibile avviare la missione finché il problema non viene risolto.
Errori non bloccanti
Riguardano Add-on o singoli Waypoint.
In questo caso è comunque possibile avviare la missione, ma il sistema richiede uno scarico di responsabilità prima di procedere.
Ogni volta che riaprirai la missione, verrà eseguito un controllo automatico sullo stato di connessione del Robot Dog. Inoltre, ogni volta la Home dovrà essere reimpostata e il Controllo pre-missione dovrà essere nuovamente effettuato.
Avvio della missione
Se la verifica non ha presentato errori bloccanti, puoi avviare la missione cliccando il pulsante Inizia la missione.
All’avvio il Robot Dog parte in autonomia e inizia ad eseguire il percorso e le azioni configurate per la missione.
Da questo momento è possibile monitorare la missione in tempo reale e intervenire tramite i controlli disponibili.
Collegamenti
Last update: 13 May 2026
Drone – Create and start a mission
![]() English version
English version
This section describes the steps to create, configure and start a mission with a drone, from mission creation to preliminary checks and launch.
Available only if at least one Drone Mission Unit is configured and access permissions to the App are granted.
Create a new mission
1. From the main page, open the project where you want to create the mission.
2. From the left-side menu, go to the Inventory section.
![]()
3. Click on the Missions Object Class to view the list of missions.
4. Click on New object.
![]()
5. A mission creation modal will open, asking you to input the following details:
- Name
The identifying name of the mission. - Mission unit type
Select Drone from the list. - Take off security height
The safety altitude the drone will reach at takeoff before proceeding to the first Waypoint. - Take off speed
The vertical climb speed during takeoff. - Global height
The default cruising altitude the drone will maintain during the mission. - Global speed
The default travel speed between Waypoints. - Mission Units
Select the drone that will execute this mission and the hangar. - Profiles
Select a profile for the mission. This field will become active only after selecting the Mission Unit.
6. To create the mission, click Save.
Editing missions
You can edit and delete missions in the inventory, in the mission list.
Edit
To edit a mission that hasn't been completed yet, open the details by clicking the blue button that appears when you hover over the item.
To update the mission details, click Edit.

Some attributes can be edited, depending on the mission's status and whether there are any waypoints.
Delete
To delete a mission:
- Open the mission details and click the Delete button in the top-right corner of the window.
- Select one or more missions from the list and click the Delete button in the top-right corner of the view.

In both cases, a confirmation window will appear for the operation.
Deletion is only allowed for missions that have not been started.
Archived missions cannot be deleted, but can only be viewed or duplicated.
Adding elements to the map
To make a mission operational, you must define the Hangar and at least two Drone Waypoints.
To add them, click Go to Mission from the mission details panel.
Set the Hangar
The Hangar represents the drone's takeoff and landing point. It is placed manually on the map as an unoriented point, positioned as close as possible to the actual physical location of the hangar.
For each mission, the Hangar must be re-added.
To add the Hangar, select the Draw tool from the toolbar and choose the corresponding Object Class.

To place the point, left-click on the map.
After placing it, fill in the required attributes:
- Mission Select the current mission you want to associate the Hangar with.
- Mission Unit Select the specific hangar that will be used.
Click Save to confirm.
To change the Hangar, delete the existing one and add it again.
Add Drone Waypoints to the Map
Drone Waypoints define the operational path and altitude the drone will follow during the mission.
1. To add a Drone Waypoint, select the Draw tool from the toolbar and choose the corresponding Object Class.
2. Place the waypoint by left-clicking on the map.
3. To set the waypoint’s orientation, move the mouse.
4. Confirm the entry by right-clicking.
Drone Waypoints are visible both on the map and in the list in the side panel. Each Waypoint is automatically numbered based on the order in which it was created. The order of the Waypoints also determines the order in which the drone will reach them.
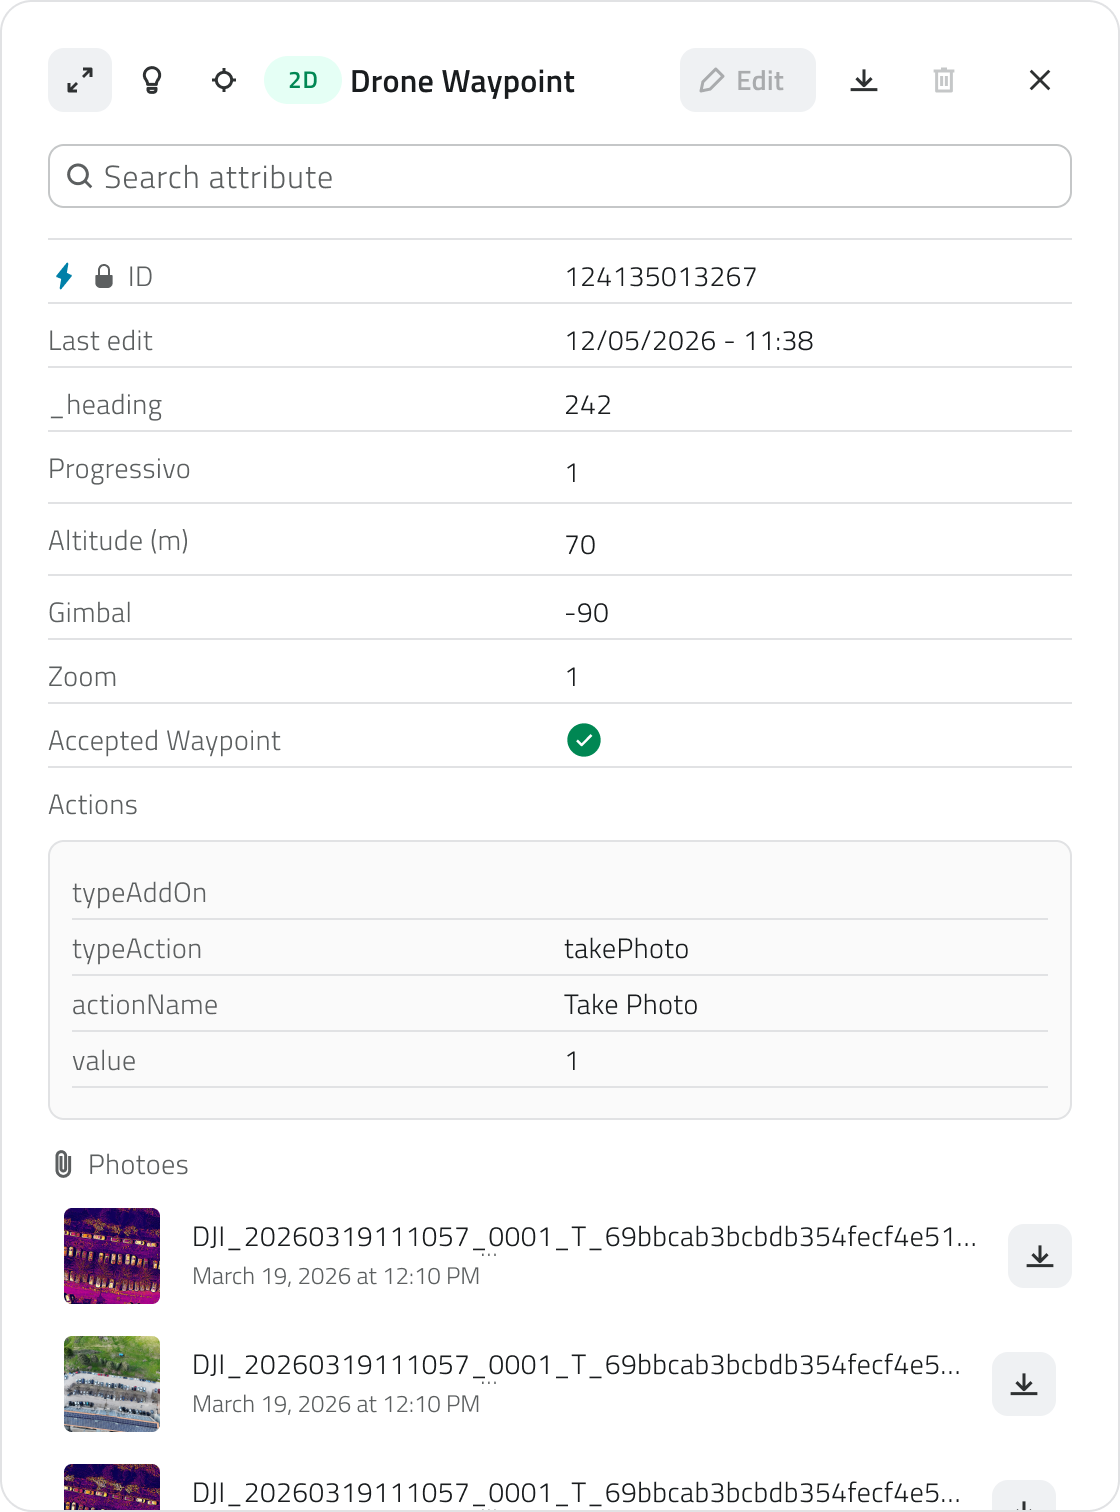
In each Waypoint card in the side panel, the main settings are displayed, including the global flight altitude, the gimbal and the camera zoom.
To change the orientation, select a Waypoint on the map and click Rotate from the toolbar.
To delete waypoints, select them on the map and click Delete on the toolbar, or click Delete when you hover over the item in the list.

To change the order of the Waypoints, drag them in the sidebar list.
To edit the settings of a Waypoint, click on its card in the side panel to open it. From there you can:
- update the altitude for that specific Waypoint, overriding the mission's Global Height
- adjust the gimbal, i.e. the camera tilt angle
- adjust the camera zoom
- add or modify the actions associated with the Waypoint

If you change the order or settings of the waypoints after saving them, a warning about unsaved changes will be displayed. Remember to click Save at the bottom of the panel.
Set actions on Waypoints
For each Waypoint, it is possible to configure one or more actions that the drone will perform after reaching the point.
To add an action to a Waypoint, hover over one of the action cards on the left-hand panel and click the +Action button.

The available actions on the platform are:
- Take photo Captures an image using the drone's camera.
For each waypoint it is possible to add multiple actions, but it is also possible to save without setting any actions. The actions are executed in sequence, in the order in which they were created and are visible in the list.
To save the waypoint configuration and actions, click the Save button at the bottom.
Mission pre-check
Before starting the mission, a pre-check must be performed.
Clicking on Mission pre-check, the system will verify the connection status of the drone and the hangar and the correctness of the Drone Waypoint sequence.
The system may detect the following types of errors:
Blocking errors
Related to the connection with the drone or the hangar.
In this case, the mission cannot be started until the issue is resolved.
Non-blocking errors
Related to individual Waypoints.
In this case, the mission can still be started, but the system requires you to sign a waiver before proceeding.
Every time you reopen the mission, the connection status will be automatically checked. In addition, the Mission pre-check must be performed again.
Mission start
If the check did not present any blocking errors, you can start the mission by clicking the Start mission button.
Upon start, the drone takes off and begins to execute the path and actions configured for the mission.
From this moment, it is possible to monitor the mission in real-time.
Links
![]() Italian version
Italian version
Questa sezione descrive i passaggi per creare, configurare e avviare una missione con un drone, dalla creazione della missione fino al controllo preliminare e all'avvio.
Disponibile solo con almeno una Mission Unit Drone configurata e permessi di accesso all'App.
Creare una nuova missione
1. Dalla pagina principale dei progetti, apri il progetto in cui vuoi creare la missione.
![]()
3. Clicca sulla Classe Oggetto Missions per visualizzare l'elenco delle missioni.
4. Clicca su Nuovo oggetto.
![]()
5. Si aprirà il modale di creazione missione, che richiede l'inserimento dei seguenti dati:
-
Nome
Il nome identificativo della missione. -
Mission unit type
Seleziona Drone dall'elenco. -
Take off security height
La quota di sicurezza che il drone raggiungerà al decollo prima di procedere verso il primo Waypoint. - Take off speed
La velocità di salita verticale durante il decollo. - Global height
L'altezza di crociera predefinita che il drone manterrà durante la missione. - Global speed
La velocità di spostamento predefinita tra i Waypoint. - Mission Units
Seleziona il drone che dovrà eseguire questa missione e l'hangar. - Profiles
Seleziona il profilo per la missione. Questo campo diventa attivo solo dopo aver selezionato la Mission Unit.
6. Per creare la missione, clicca Salva.
Modifica delle missioni
Puoi modificare ed eliminare le missioni nell'inventory, nella lista delle missioni.
Modifica
Per modificare una missione non ancora eseguita, apri il dettaglio cliccando sul pulsante blu, visibile al passaggio del mouse sull'elemento.
Per aggiornare i dati della missione, clicca Modifica.
Alcuni attributi possono essere modificati, a seconda dello stato della missione e della presenza di Waypoint.
Eliminazione
Per eliminare una missione:
- Apri il dettaglio della missione e clicca sul pulsante Elimina in alto a destra della finestra.
- Seleziona una o più missioni dalla lista e clicca sul pulsante Elimina in alto a destra della vista.
In entrambi i casi, apparirà una finestra di conferma per l'operazione.
L'eliminazione è consentita solo per le missioni non avviate.
Le missioni archiviate non possono essere eliminate, ma solo consultate o duplicate.
Inserire elementi in mappa
Per rendere una missione operativa, è necessario definire l'Hangar e almeno due Drone Waypoint.
Per inserirli, clicca Go to Mission dal pannello di dettaglio della missione.
Impostare l'Hangar
L'Hangar rappresenta il punto di decollo e atterraggio del drone. Viene posizionato manualmente sulla mappa come un punto non orientato, da collocare quanto più vicino possibile alla posizione reale dell'hangar.
Per ogni missione, l'Hangar deve essere reinserito.
Per aggiungere l'Hangar, seleziona lo strumento Disegna dalla toolbar e scegli la Classe Oggetto corrispondente.
Per posizionare il punto, clicca con il tasto sinistro del mouse sulla mappa.
Dopo il posizionamento, compila gli attributi richiesti:
- Mission Seleziona la missione attuale a cui vuoi associare l'Hangar.
- Mission Unit Seleziona l'hangar specifico che verrà utilizzato.
Clicca Salva per confermare.
Per modificare l'Hangar, elimina quello esistente e reinseriscilo.
Aggiungere Drone Waypoint in mappa
I Drone Waypoint definiscono il percorso operativo e la quota che il drone seguirà durante la missione.
1. Per aggiungere un Drone Waypoint, seleziona lo strumento Disegna dalla toolbar e scegli la Classe Oggetto corrispondente.
2. Per posizionare il punto, clicca con il tasto sinistro del mouse sulla mappa.
3. Per definire l'orientamento del Waypoint, muovi il mouse.
4. Per confermare l'inserimento, clicca con il tasto destro del mouse.
I Drone Waypoint sono visibili sia in mappa che nell'elenco nel pannello laterale. Ogni Waypoint viene numerato automaticamente, in base all'ordine di creazione. L'ordine dei Waypoint indica anche l'ordine in cui il drone li raggiungerà.
Nella card di ciascun Waypoint nel pannello laterale sono visibili le impostazioni principali, tra cui l'altezza globale di volo, il gimbal e lo zoom della camera.
Per modificare l'orientamento, seleziona un Waypoint in mappa e clicca Ruota dalla toolbar.
Per eliminare i Waypoint selezionali in mappa e clicca Elimina dalla toolbar, o clicca su Elimina che appare andando in hover sull'elemento dell'elenco.
Per cambiare l'ordine dei Waypoint, trascinali nell'elenco del pannello laterale.
Per modificare le impostazioni di un Waypoint, clicca sulla sua card nel pannello laterale per aprirlo. Da lì è possibile:
- aggiornare l'altezza di volo specifica per quel Waypoint, sovrascrivendo la Global Height della missione
- regolare il gimbal, ovvero l'inclinazione della camera
- regolare lo zoom della camera
- aggiungere o modificare le azioni associate al Waypoint
Se modifichi l’ordine o le impostazioni dei waypoint dopo averli salvati, verrà visualizzato un avviso relativo a modifiche non salvate. Ricordati di premere Salva nella parte inferiore del pannello.
Impostare azioni sui Waypoint
Per ogni Waypoint è possibile configurare una o più azioni, che il drone esegue dopo aver raggiunto il punto.
Per aggiungere un'azione a un Waypoint, porta il cursore sopra una delle card azione nel pannello laterale sinistro e clicca sul pulsante +Action.
Le azioni disponibili in piattaforma sono:
- Scatta foto
Acquisisce un'immagine con la camera del drone.
Per ogni waypoint è possibile aggiungere più azioni, ma è anche possibile salvare senza aver impostato alcuna azione. Le azioni vengono eseguite in sequenza, nell'ordine in cui sono state create e in cui sono visibili nella lista.
Per salvare la configurazione del waypoint e delle azioni, clicca sul pulsante Salva, in basso.
Controlli pre-missione
Prima di avviare la missione è necessario effettuare un pre-check.
Cliccando su Controlli pre-missione, il sistema effettuerà una verifica sullo stato di connessione del drone e dell'hangar e sulla correttezza della sequenza dei Drone Waypoint.
Il sistema potrebbe rilevare le seguenti tipologie di errori:
Errori bloccanti
Riguardano la connessione con il drone o con l'hangar.
In questo caso non sarà possibile avviare la missione finché il problema non viene risolto.
Errori non bloccanti
Riguardano singoli Waypoint.
In questo caso è comunque possibile avviare la missione, ma il sistema richiede uno scarico di responsabilità prima di procedere.
Ogni volta che riaprirai la missione, verrà eseguito un controllo automatico sullo stato di connessione. Inoltre, il Controllo pre-missione dovrà essere nuovamente effettuato.
Avvio della missione
Se la verifica non ha presentato errori bloccanti, puoi avviare la missione cliccando il pulsante Inizia la missione.
All'avvio il drone decolla e inizia ad eseguire il percorso e le azioni configurate per la missione.
Da questo momento è possibile monitorare la missione in tempo reale.
Collegamenti
Last update: 14 May 2026
Robot Dog - Tracking a live mission
![]() English version
English version
After the mission is started, it enters live mode and you'll be able to see the Robot Dog's location on the map.
The Robot's location and orientation are updated automatically.
From this moment, it is possible to monitor the mission status in real time and interact through the controls available in the Missions panel.
Available with access to the App and a successfully completed mission pre-check.
Mission control modes
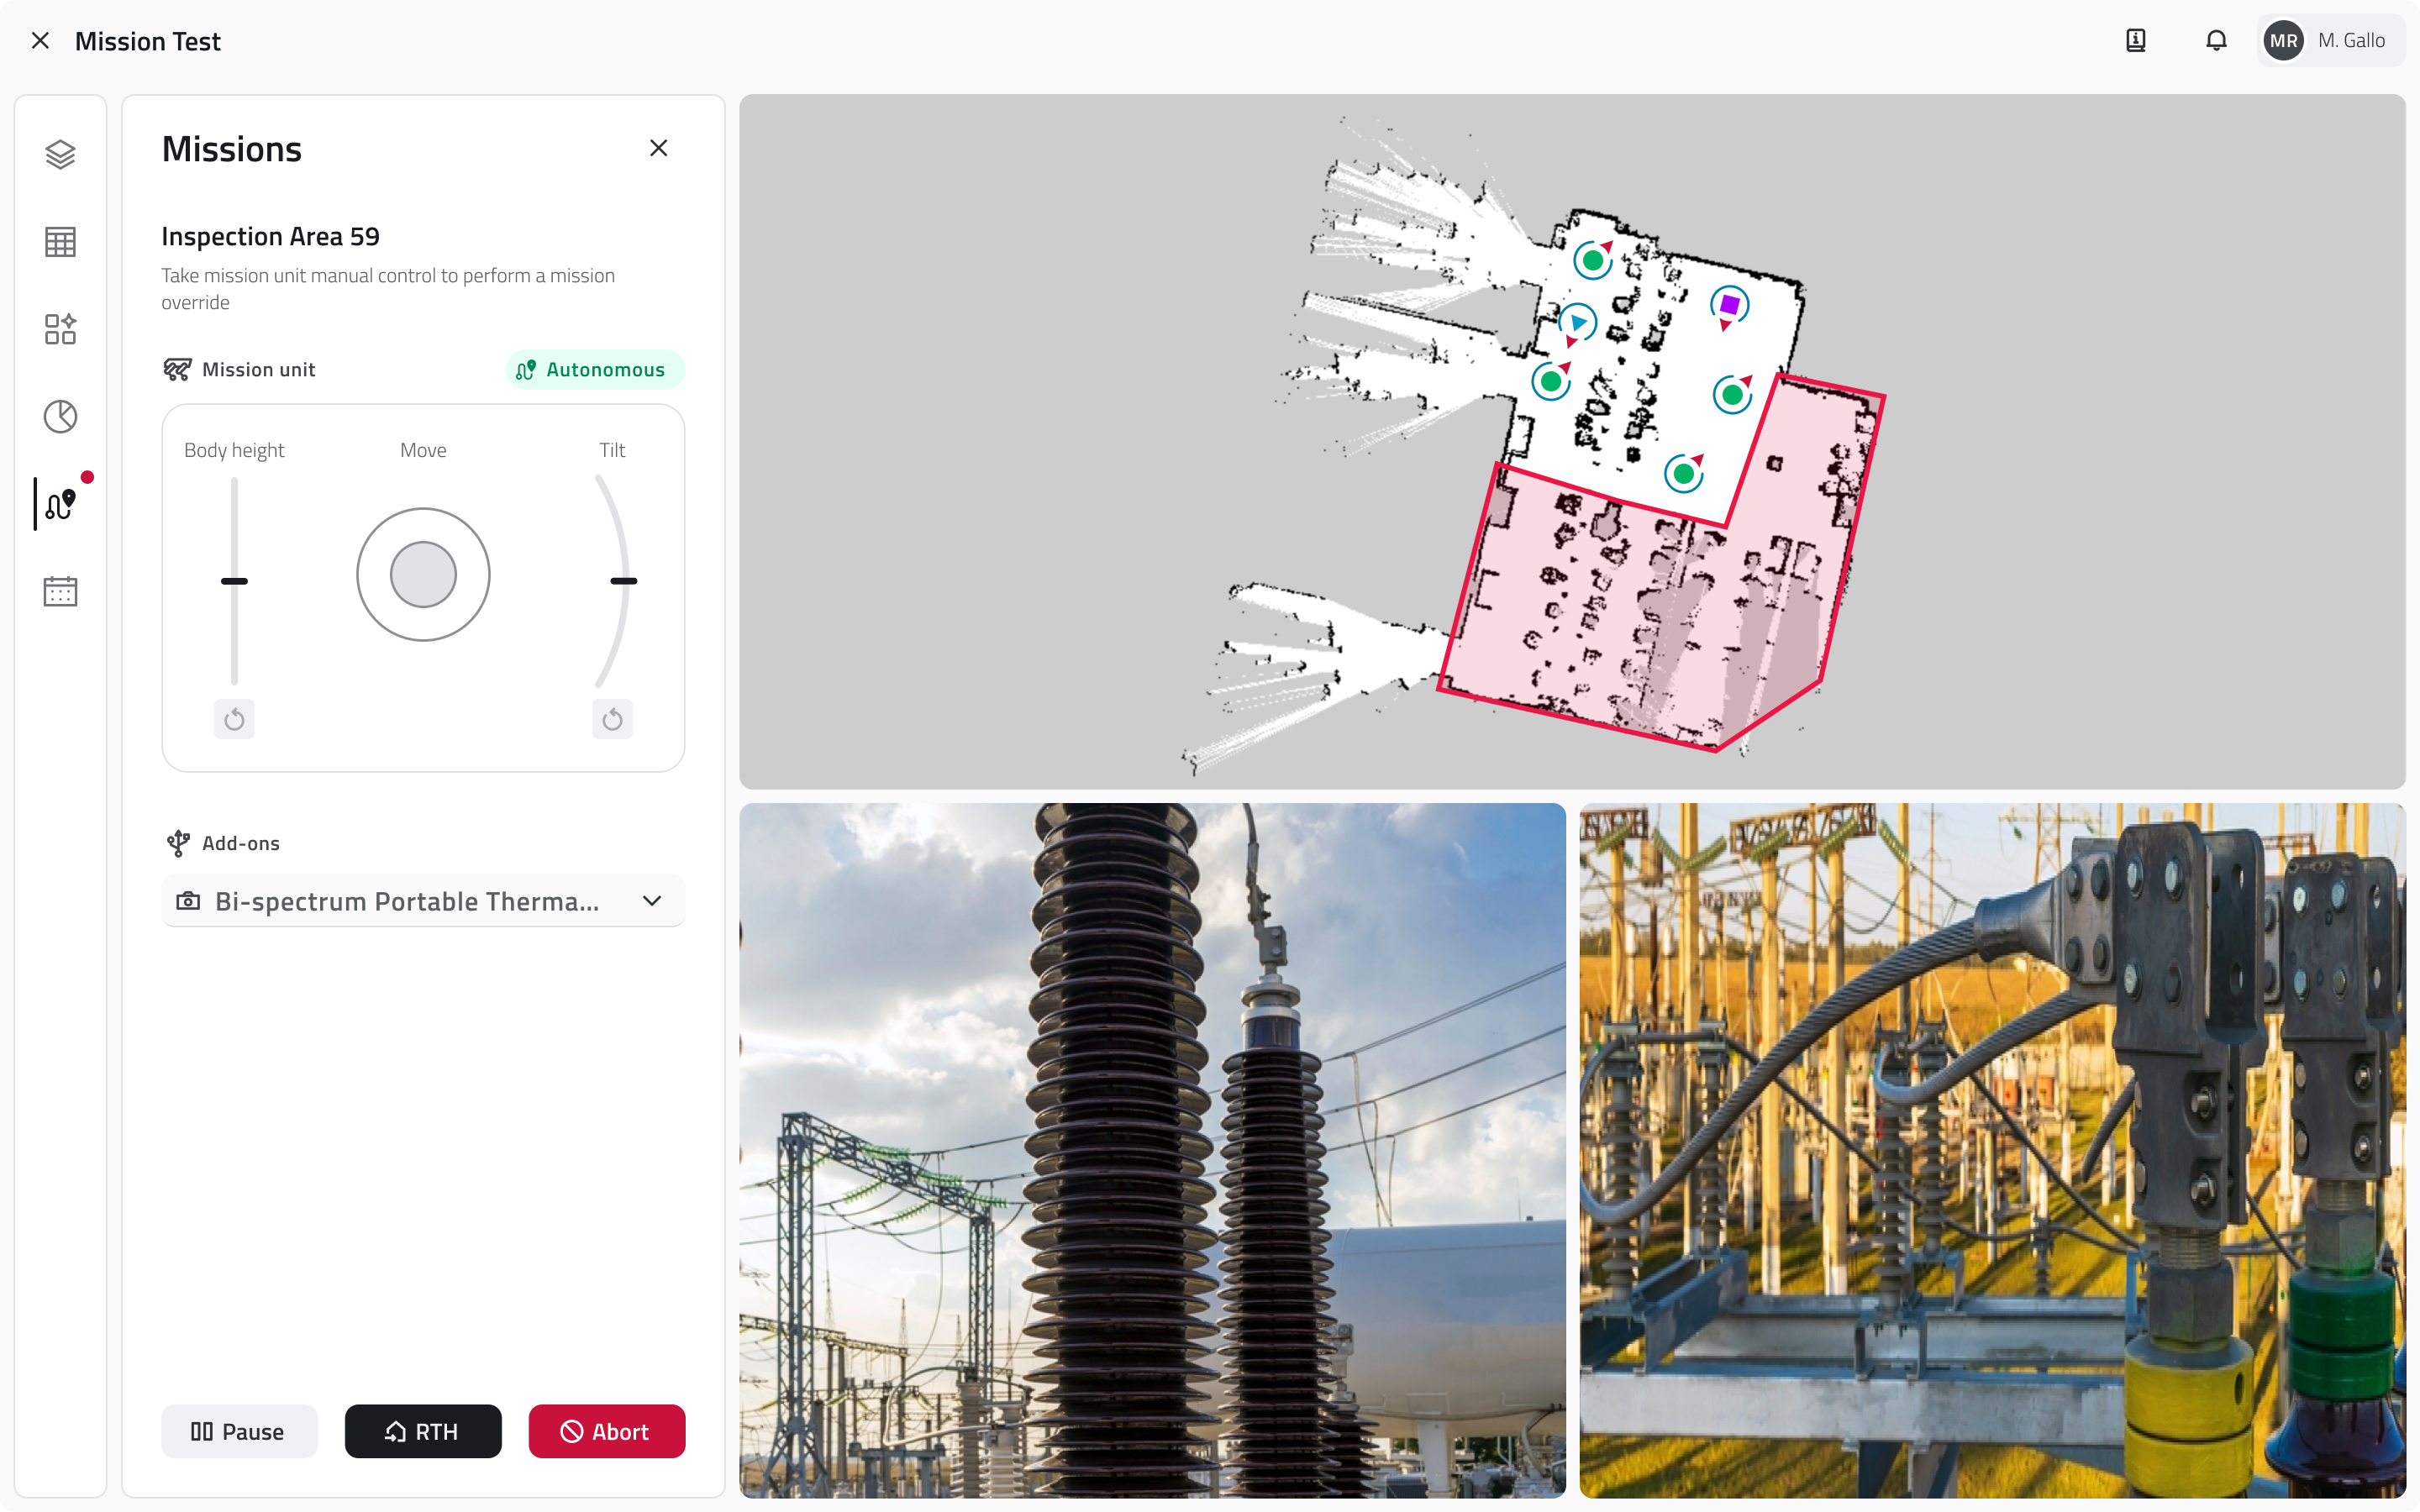
During execution, the current mission status is always displayed. It is possible to follow the mission in autonomous mode or manage it in manual control mode.
Autonomous mode
In autonomous mode, the Robot Dog executes the mission automatically, following the sequence of waypoints and actions configured during planning.
Manual control mode
There are two ways to switch to manual control mode:
- Click the Pause button, located at the bottom of the side panel.
- Directly use the manual controls at the top of the side panel.
The platform displays a notification signalling the mode change. Autonomous execution is suspended and the Mission Unit responds exclusively to commands issued in real time.
The available movement controls are:
- Dog Movement
Directs the Robot Dog's movement. - Body height
Adjusts the height of the robot's body. - Tilt
Adjusts the forward-backward tilt of the body.
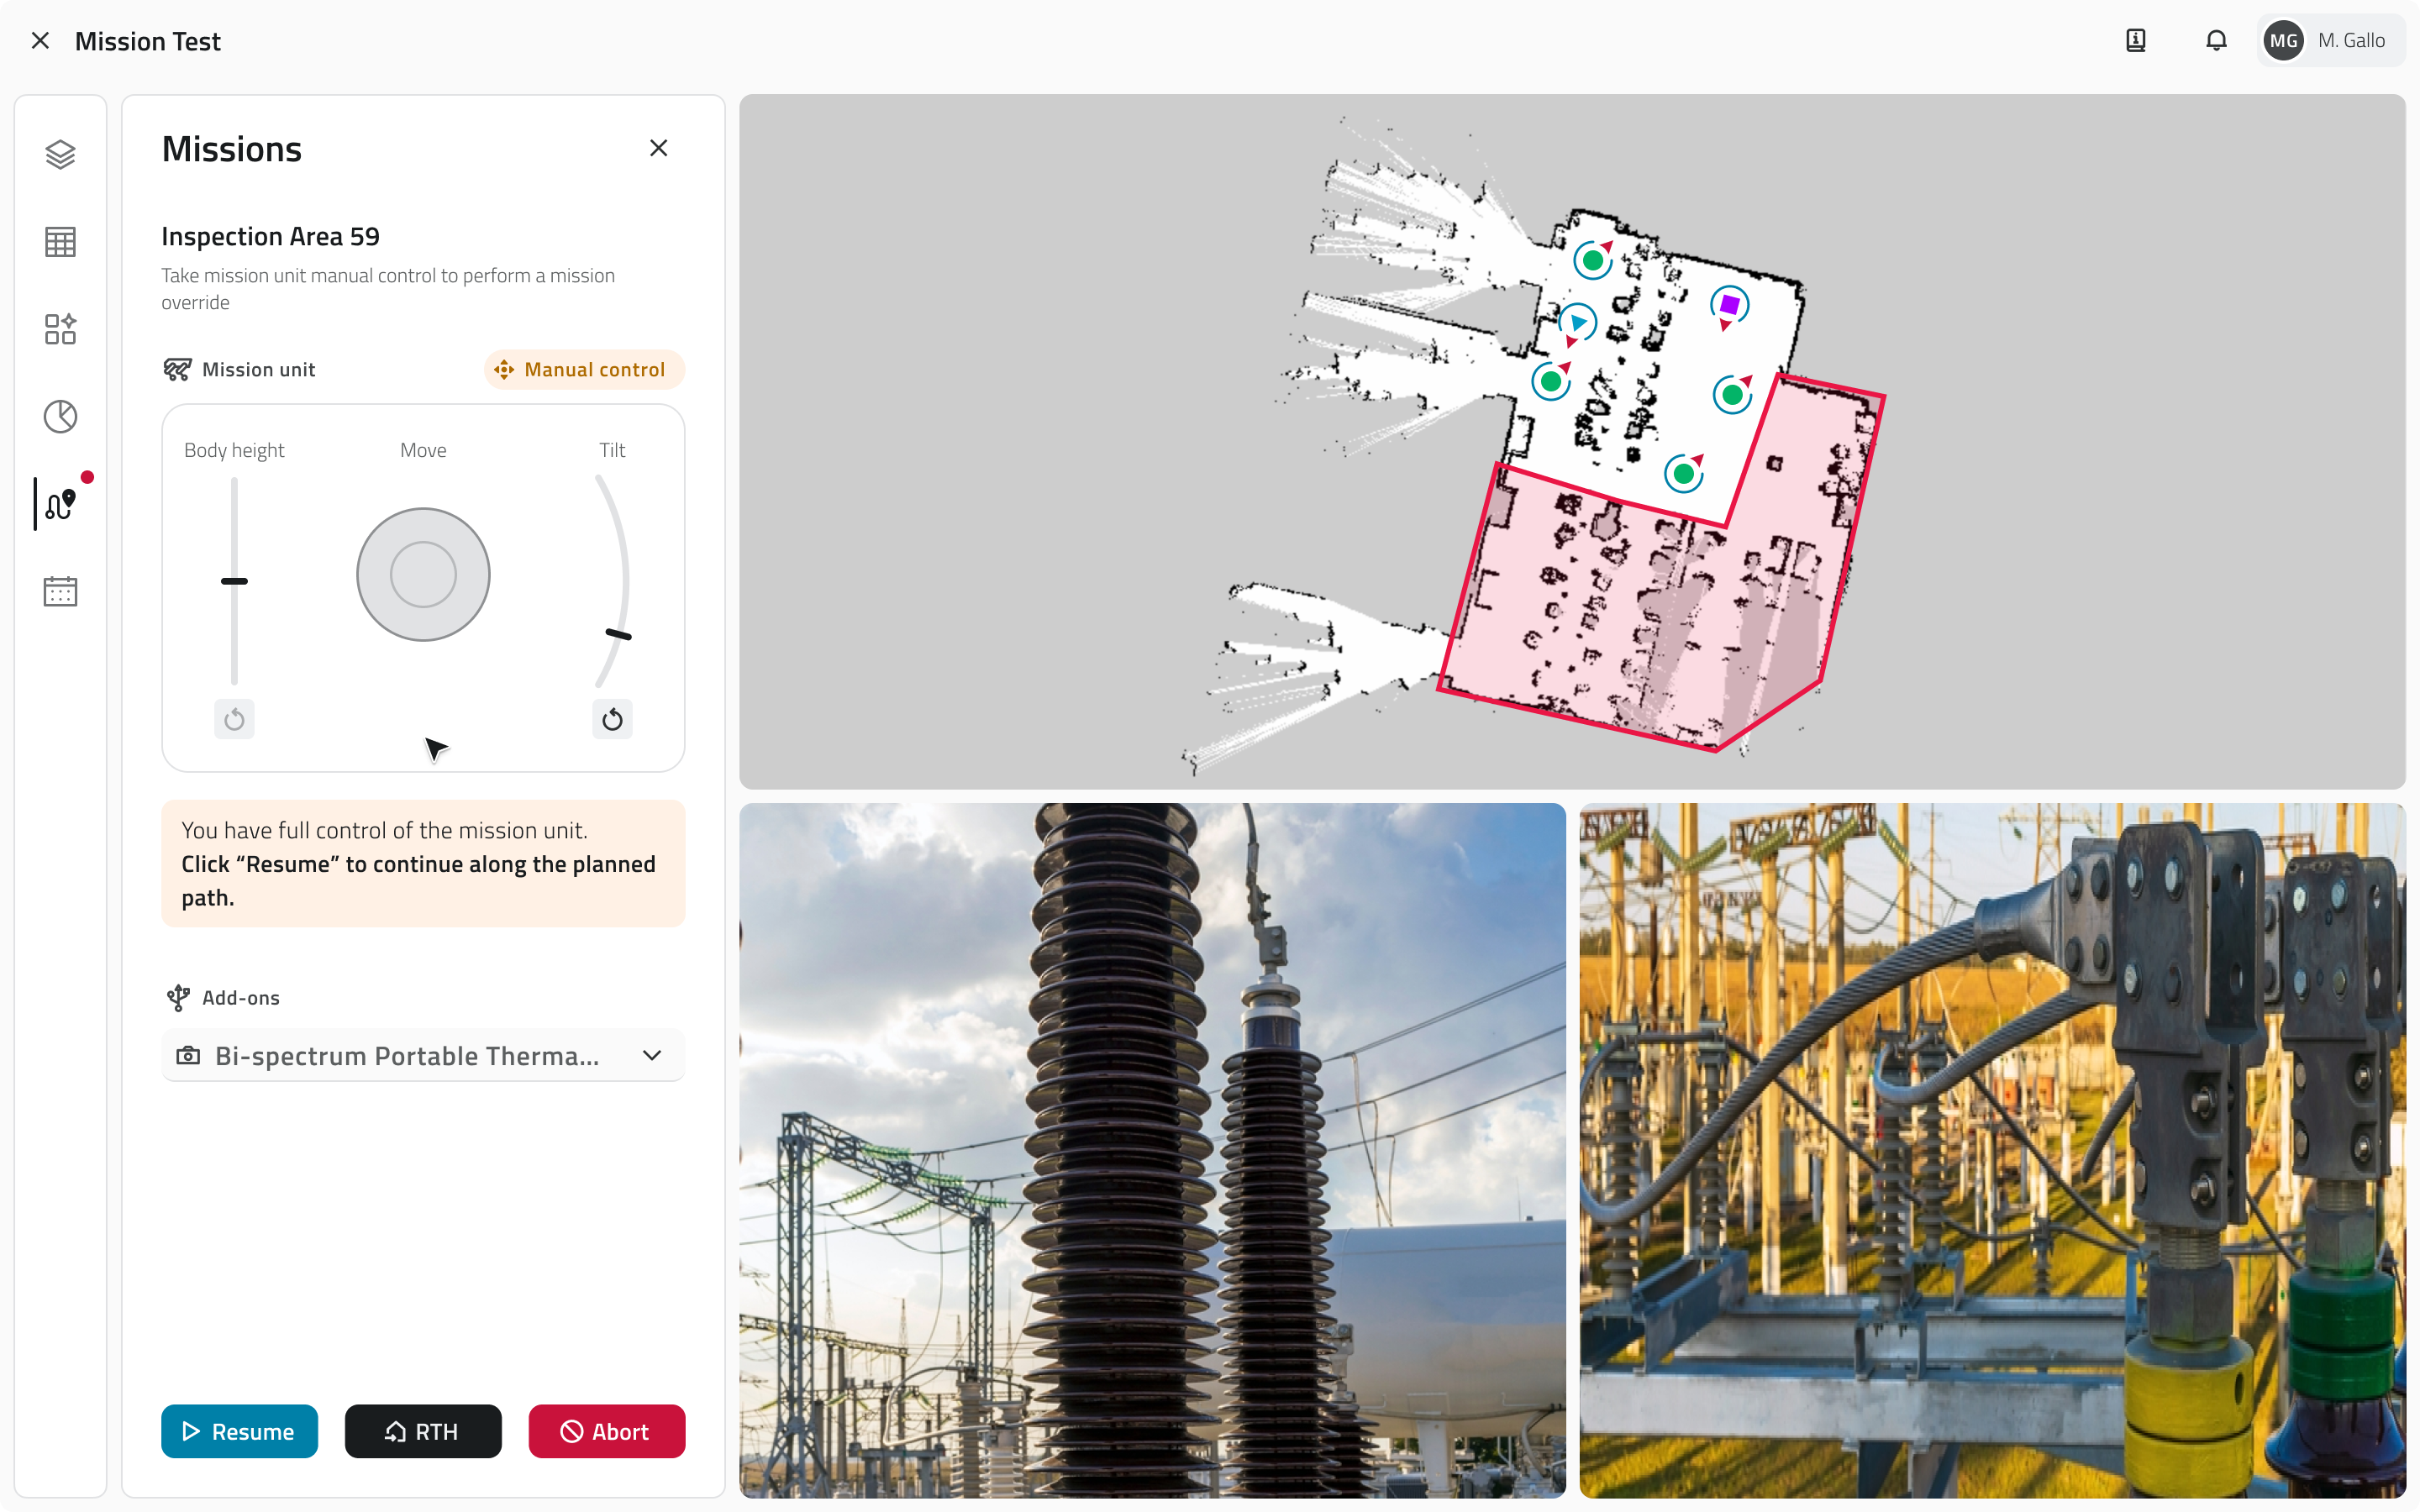
Adjusting the Tilt disables the movement control. It is still possible to modify the Body height, but the Robot Dog cannot move until the Tilt is reset to its default value.
To return to autonomous mode, click the Resume button, which replaces the Pause button at the bottom of the side panel.
In both modes, next to the Pause/Resume button, two essential commands are always available:
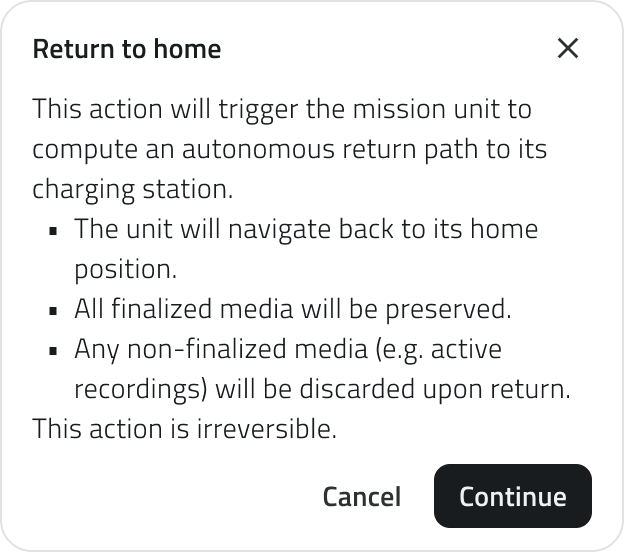
- RTH (Return to Home)
Concludes the mission and automatically brings the Robot Dog back to the Mission Home.
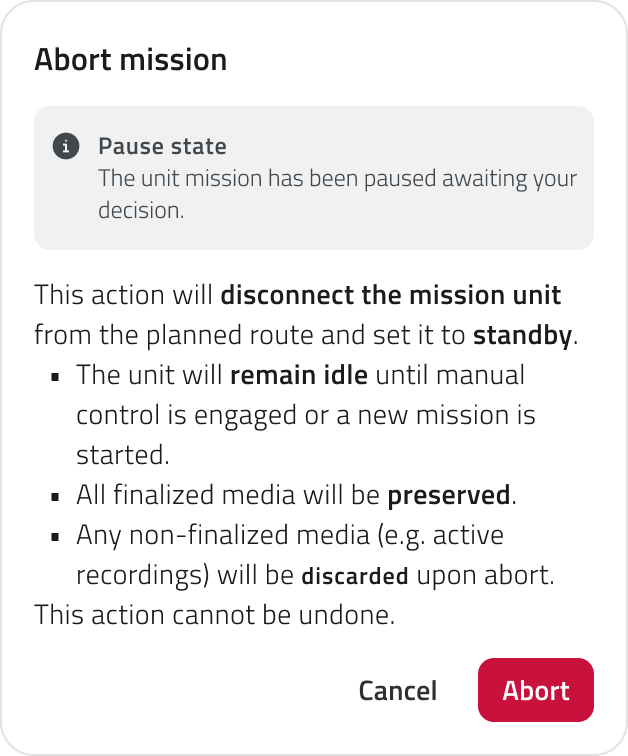
- Abort
Interrupts the mission, leaving the robot in its current position.
PTZ camera controls and standalone actions
If the PTZ camera is installed, during the live mission it is possible to manually control it on three axes:
- Pan
Horizontal rotation of the camera. - Tilt
Vertical tilt. - Zoom
Image magnification or reduction.
To access the PTZ controls, select the desired add-on from the side panel. The dedicated component will be displayed automatically.

Using the directional arrows you can orient the camera in the desired direction. The Reset button, visible only after a change from the initial position, restores the camera to its default values:
- Pan/Tilt: 0°
- Zoom: 1x
The current Pan, Tilt and Zoom values can be viewed on hover over the camera view.

PTZ controls are available in both autonomous mode and manual control mode.
During mission execution it is also possible to perform independent camera actions from those configured on the Waypoints. To execute an action, hover over the camera view. A contextual toolbar will appear at the top of the page with the available actions:
- Photo
Captures an image. - Video
Starts or stops a video recording.
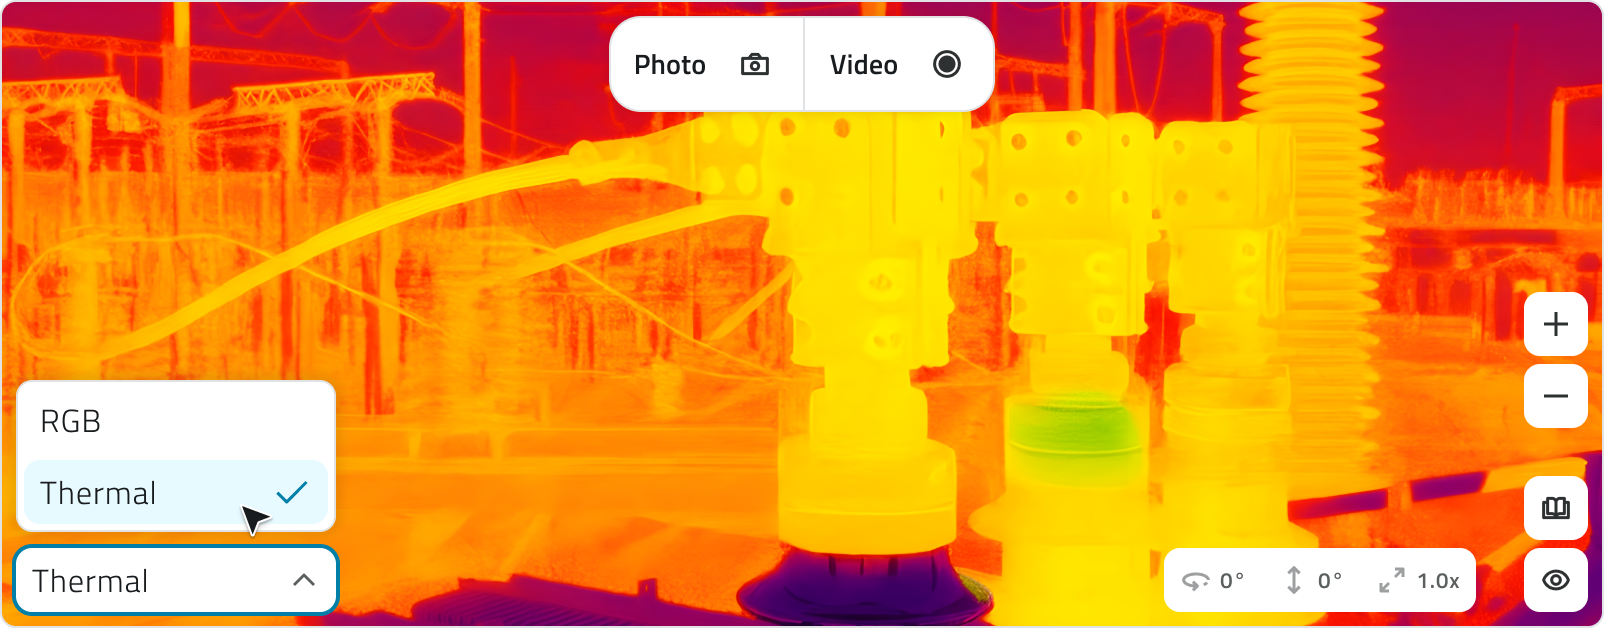
Standalone camera actions do not modify the mission configuration and do not affect the planned Waypoints.
Media management
During live execution, all acquired media is saved automatically.
Media captured during the execution of a Waypoint can be found in the corresponding Waypoint (Archived) after the mission ends.
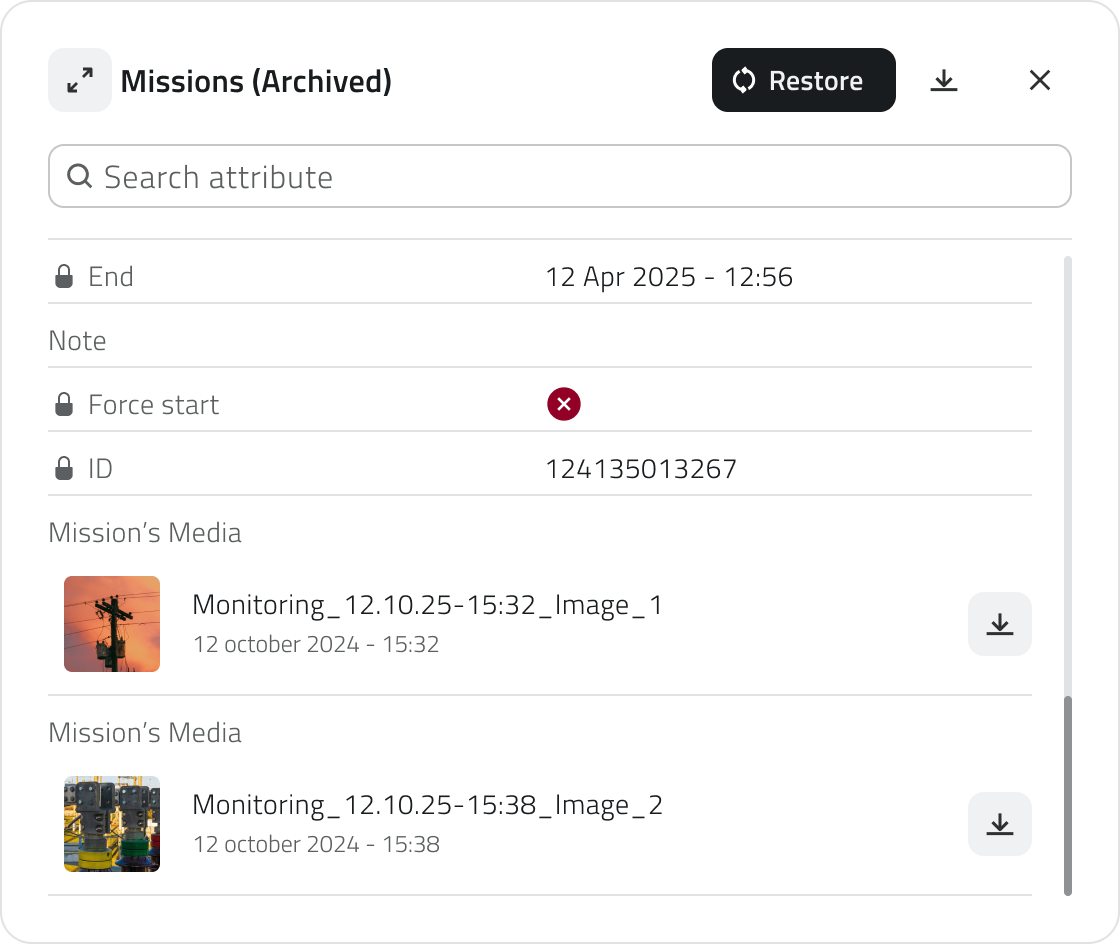
Media captured outside of Waypoints, via standalone camera actions (photo or video), is saved in the Mission (Archived) section.
Links
![]() Italian version
Italian version
Dopo l'avvio, la missione entra in modalità live e sarai in grado di vedere la posizione del Robot Dog in mappa.
La posizione e l'orientamento del Robot si aggiornano automaticamente.
Da questo momento è possibile monitorare lo stato della missione in tempo reale e intervenire tramite i controlli disponibili nel pannello Missions.
Disponibile solo con permessi di accesso all'App e il pre-check della missione completato con esito positivo.
Modalità di controllo della missione
Durante l'esecuzione viene sempre mostrato lo stato corrente della missione.
È possibile seguire la missione in modalità autonoma o gestirla in modalità controllo manuale.
Modalità autonoma
In modalità autonoma il Robot Dog esegue la missione automaticamente, seguendo la sequenza di waypoint e azioni configurate durante la pianificazione.
Modalità controllo manuale
Per passare alla modalità di controllo manuale sono disponibili due opzioni:
- Cliccare il pulsante Pausa, situato nella parte bassa del pannello laterale.
- Utilizzare direttamente i comandi manuali nella parte alta del pannello laterale.
La piattaforma mostra un avviso che segnala il cambio di modalità. L'esecuzione autonoma viene sospesa e la Mission Unit risponde esclusivamente ai comandi impartiti in tempo reale.
I controlli di movimento disponibili sono:
- Dog Movement
Direziona lo spostamento del Robot Dog. - Body height
Regola l'altezza del corpo del robot. - Tilt
Regola l’inclinazione anteriore-posteriore del corpo.
Modificando il Tilt, il controllo di movimento si disabilita. È ancora possibile modificare la Body height, ma il Robot Dog non può spostarsi finché il Tilt non viene riportato al valore di default.
Per tornare alla modalità autonoma, clicca il pulsante Riprendi, che sostituisce il pulsante Pausa nella parte bassa del pannello laterale.
In entrambe le modalità, accanto al pulsante Pausa/Riprendi, sono sempre disponibili due comandi essenziali:
- RTH (Return to Home)
Conclude la missione e fa rientrare automaticamente il Robot Dog alla Mission Home.
- Abort
Interrompe la missione lasciando il robot nella posizione in cui si trova.
Controlli camera PTZ e azioni standalone
Se la camera PTZ è installata, durante la missione live è possibile controllarla manualmente sui tre assi:
- Pan
Rotazione orizzontale della camera. - Tilt
Inclinazione verticale. - Zoom
Ingrandimento o riduzione dell'immagine.
Per accedere ai controlli PTZ, seleziona l'add-on desiderato dal pannello laterale. Il componente dedicato verrà visualizzato automaticamente.
Utilizzando le frecce direzionali puoi orientare la camera nella direzione desiderata. Il pulsante Reset, visibile solo dopo una modifica rispetto alla posizione iniziale, riporta la camera ai valori di default:
- Pan/Tilt: 0°
- Zoom: 1x
I valori correnti di Pan, Tilt e Zoom sono visualizzabili in hover sulla vista della camera.
I controlli PTZ sono disponibili sia in modalità autonoma sia in modalità controllo manuale.
Durante l'esecuzione della missione è inoltre possibile eseguire azioni camera indipendenti da quelle configurate sui Waypoint.
Per eseguire un'azione, porta il cursore sopra la vista della camera. In alto nella pagina compare una toolbar contestuale con le azioni disponibili:
- Photo
Acquisisce un'immagine. - Video
Avvia o interrompe una registrazione video.
Le azioni camera standalone non modificano la configurazione della missione e non influiscono sui Waypoint pianificati.
Gestione dei media
Durante l’esecuzione live, tutti i media acquisiti vengono salvati automaticamente.
I media acquisiti durante l'esecuzione di un Waypoint sono consultabili nel corrispondente Waypoint (Archiviato) al termine della missione.
I media acquisiti al di fuori dei Waypoint, tramite azioni camera standalone (foto o video), vengono salvati nella sezione Mission (Archived).
Collegamenti
Last update: 15 May 2026
Drone - Tracking a live mission
![]() English version
English version
After the mission is started, it enters live mode.
From this moment, it is possible to monitor the mission status in real time.
Available with access to the App and a successfully completed mission pre-check.
Autonomous mode
The drone executes the mission in autonomous mode, following the sequence of Drone Waypoints and actions configured during planning.
To follow the drone's video feed during the mission, the view must be enabled from the Layers section.
Media management
During live execution, all acquired media is saved automatically.
Photos captured during the mission are saved directly on the mission's Waypoints, and can be accessed by opening the attribute details of the corresponding Waypoint from the map or from the Inventory.
If you want to plan a new session or modify the mission, simply act on the original mission, updating the Waypoints and settings as needed.
Deleting a Waypoint from a completed mission will permanently delete all media associated with it.
Before proceeding with the deletion, make sure you have downloaded or archived any files you wish to keep.
Links
![]() Italian version
Italian version
Dopo l'avvio, la missione entra in modalità live.
Da questo momento è possibile monitorare lo stato della missione in tempo reale.
Disponibile con permessi di accesso all'App e il pre-check della missione completato con esito positivo.
Modalità autonoma
Il drone esegue la missione in modalità autonoma, seguendo la sequenza di Drone Waypoint e azioni configurate durante la pianificazione.
Per seguire il feed video del drone durante la missione, è necessario attivare la vista dalla sezione Layers.
Gestione dei media
Durante l'esecuzione live, tutti i media acquisiti vengono salvati automaticamente.
Le foto scattate durante la missione vengono salvate direttamente sui Waypoint della missione, e sono accessibili aprendo il dettaglio attributi del Waypoint corrispondente dalla mappa o dall'Inventory.
Se si vuole pianificare una nuova sessione o modificare la missione, è sufficiente agire sulla missione originale, aggiornando i Waypoint e le impostazioni secondo necessità.
Eliminando un Waypoint di una missione conclusa si perdono definitivamente anche tutti i media ad esso associati.
Prima di procedere con l'eliminazione, assicurati di aver scaricato o archiviato i file che intendi conservare.
Collegamenti
Last update: 15 May 2026
Archived Missions
![]() English version
English version
Archived Missions allow you to review previously executed missions and, if needed, reuse their configuration to create a new mission.
This feature makes it possible to resume already established operational workflows, avoiding the need to manually reconfigure Mission Home, Waypoints and actions.
Available only for missions executed with the Robot Dog.
View an archived mission
To review a previously completed mission, open the Inventory section from the left-side menu.
![]()
Then, from the list of object classes, select Mission Archived.
The list of all completed missions will be displayed.
Open the mission details by clicking the blue button that appears when hovering over an item. From here you can view:
- The Mission Unit used
- Associated Profiles
- Mission Home and Waypoints
- The Path followed by the dog
- Standalone media captured during the mission
- Other mission information
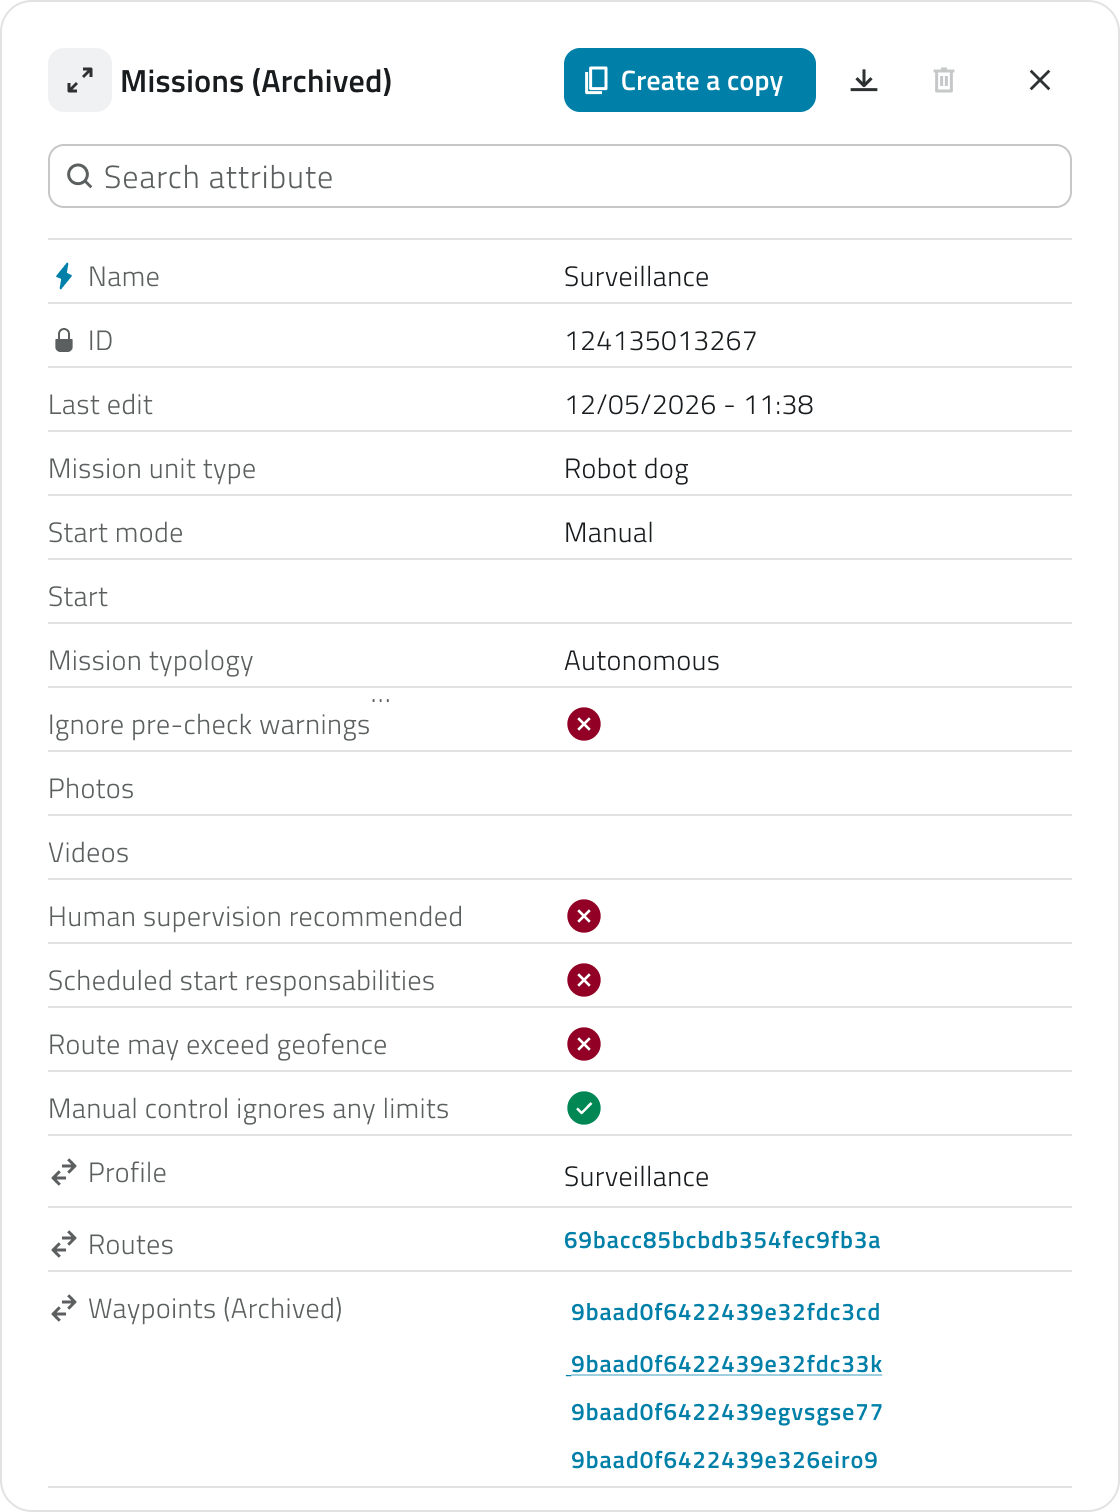
Archived missions are read-only and cannot be edited.
To reuse their configuration, you must create a new mission through duplication.
Restore an archived mission
Restoring allows you to create a new mission based on the configuration of an archived one.
To restore a mission, click the Create a copy button at the top of the mission details.
![]()
The system creates a new mission with the same configuration as the archived mission, including:
- Mission Home
- Waypoints
- Configured actions
- Operational settings
Once the operation is complete, the duplicated mission is added to the Mission object class list. From there it can be edited, verified and started following the standard planning workflow.
Restoring does not alter the original archived mission, which remains available for consultation only.
Links
![]() Italian version
Italian version
Le Missioni Archiviate consentono di consultare le missioni eseguite in precedenza e, se necessario, riutilizzarne la configurazione per creare una nuova missione.
Questa funzionalità permette di riprendere flussi operativi già utilizzati, evitando di riconfigurare manualmente Mission Home, Waypoint e azioni.
Disponibile solo per Missioni effettuate con Robot Dog.
Visualizzare una missione archiviata
Per consultare una missione svolta in precedenza, dal menu laterale sinistro apri la sezione Inventory.
![]()
In seguito, dall’elenco delle classi oggetto, seleziona Mission Archived
Viene mostrato l’elenco di tutte le missioni concluse.
Apri il dettaglio della missione cliccando il bottone blu, visibile passando con il mouse sopra un elemento. Da qui è possibile consultare:
-
Mission Unit utilizzata
-
Profili associati
-
Mission Home e Waypoint
- Il Percorso che ha seguito il cane
-
I media standalone acquisiti durante il tragitto
-
Altre informazioni della missione
Le missioni archiviate sono consultabili ma non modificabili.
Per utilizzarne la configurazione è necessario creare una nuova missione tramite duplicazione.
Ripristinare una missione archiviata
Il ripristino consente di creare una nuova missione partendo dalla configurazione di una missione archiviata.
Per ripristinare una missione clicca il bottone Crea una copia, in alto nei dettagli della missione.
![]()
Il sistema crea una nuova missione con la stessa configurazione della missione archiviata, includendo:
-
Mission Home
-
Waypoint
-
Azioni configurate
-
Impostazioni operative
Al termine dell’operazione, la missione duplicata viene aggiunta all’elenco della classe oggetto Mission. Da qui può essere modificata, verificata e avviata seguendo il normale flusso di pianificazione.
Il ripristino non altera la missione archiviata originale, che rimane disponibile esclusivamente in consultazione.
Collegamenti
Last update: 15 May 2026