
Create and manage Users
 English
  Italiano
 AutomationsThe allowReport section of the platformBackoffice allows you to respondselect automaticallyand configure report templates that will then be used in projects or from the Home to incominggenerate events,downloadable executingreports. oneEach ortemplate more actions in sequence, from sending notifications to users to creating or updating objects ondefines the platform.structure, parameters and formats available for generation.
Available only to users with backoffice-adminbackoffice permission.
Create a new automationReport
1. Log in toAccess the Backoffice and openclick Report in the Automations section from the left-side menu.


2. Click the New Automationreport button in the upper-top-right corner.

3. Enter thea unique report name of the automation in the pageReport header. ThisName field is(required, required.maximum 40 characters).
4. SelectIf the report needs to collect data from all projects in the organisation, enable the groupsGlobal Report switch.
Global reports are managed from the Home and not from individual projects.

5. Fill in the fields in the two sections.
Template section
In this section, fields unlock progressively. First select the category and then the type of report: these two fields help you identify the most suitable template.
You can then select the base template and choose one or more output formats.
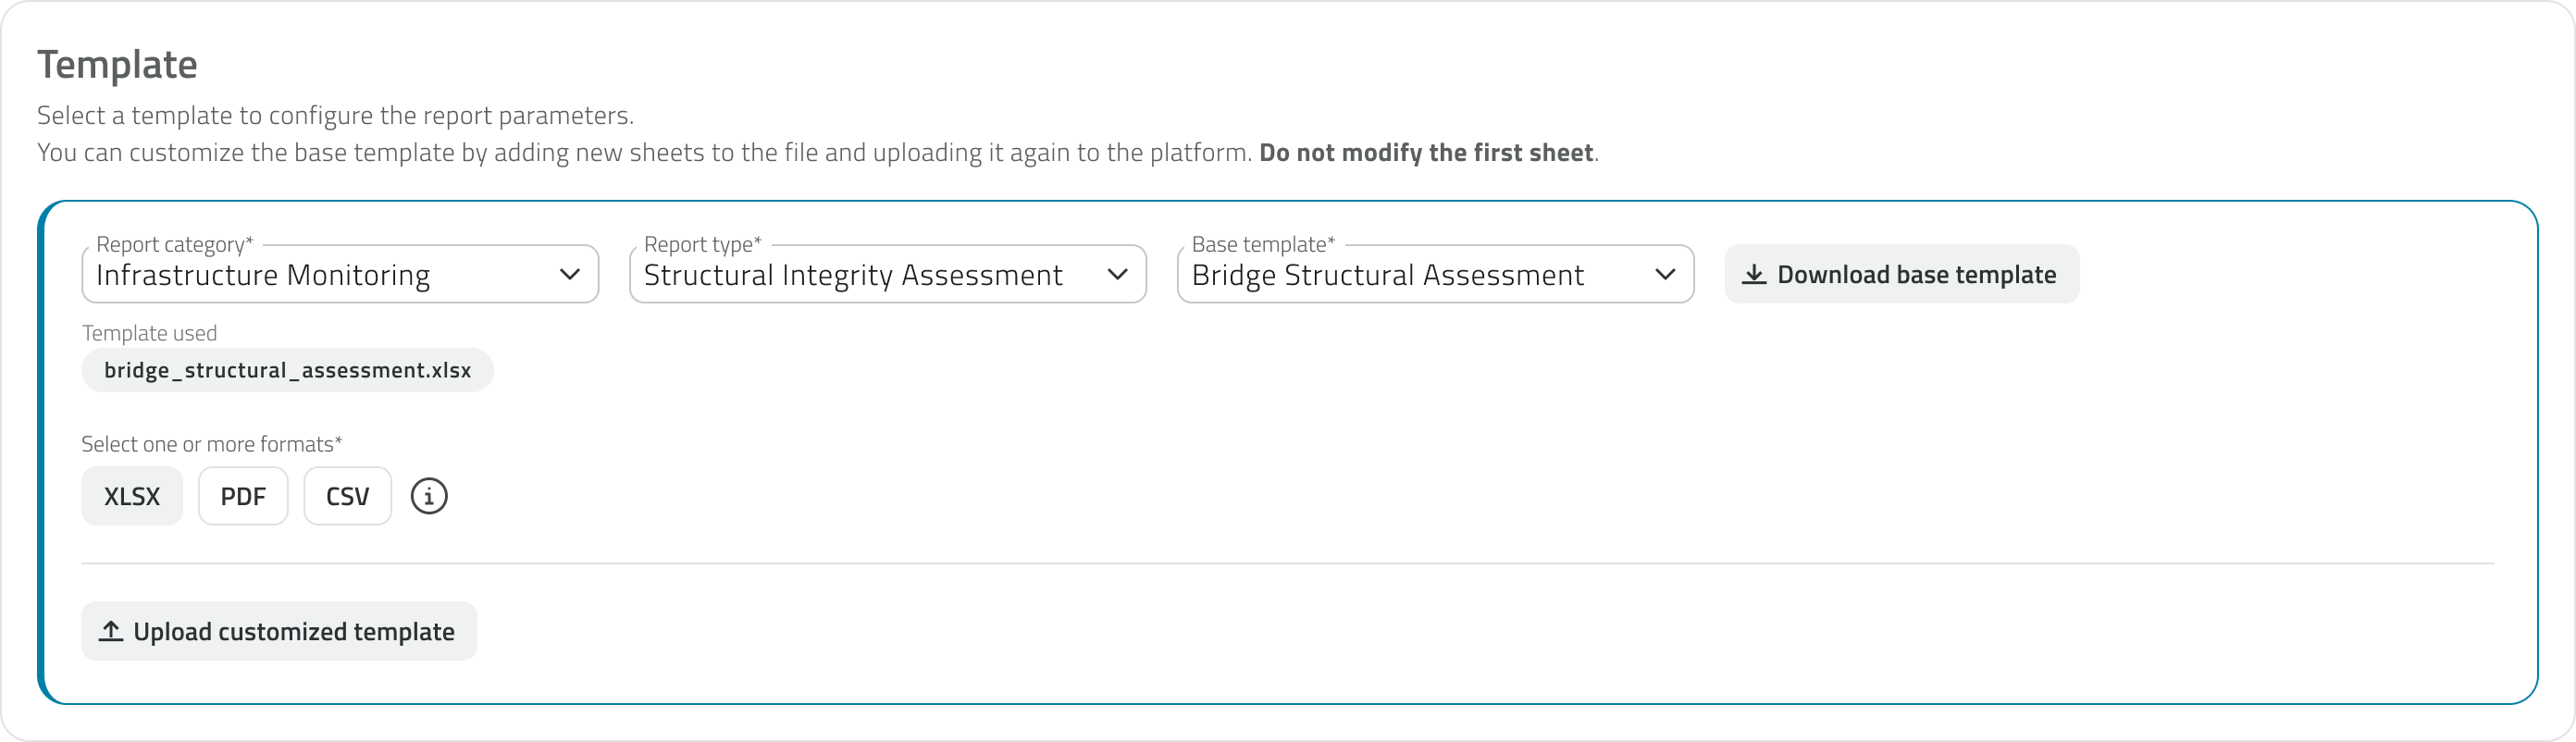
Once the template has been chosen, you can download it using the Download base template button and customise it by adding new sheets to associatethe XLSX file.
To use the customised template, re-upload it using the Upload customised template button. The uploaded file is shown with its name, upload date and time, and can be downloaded or removed. Removing it will automatically revert to the base template.
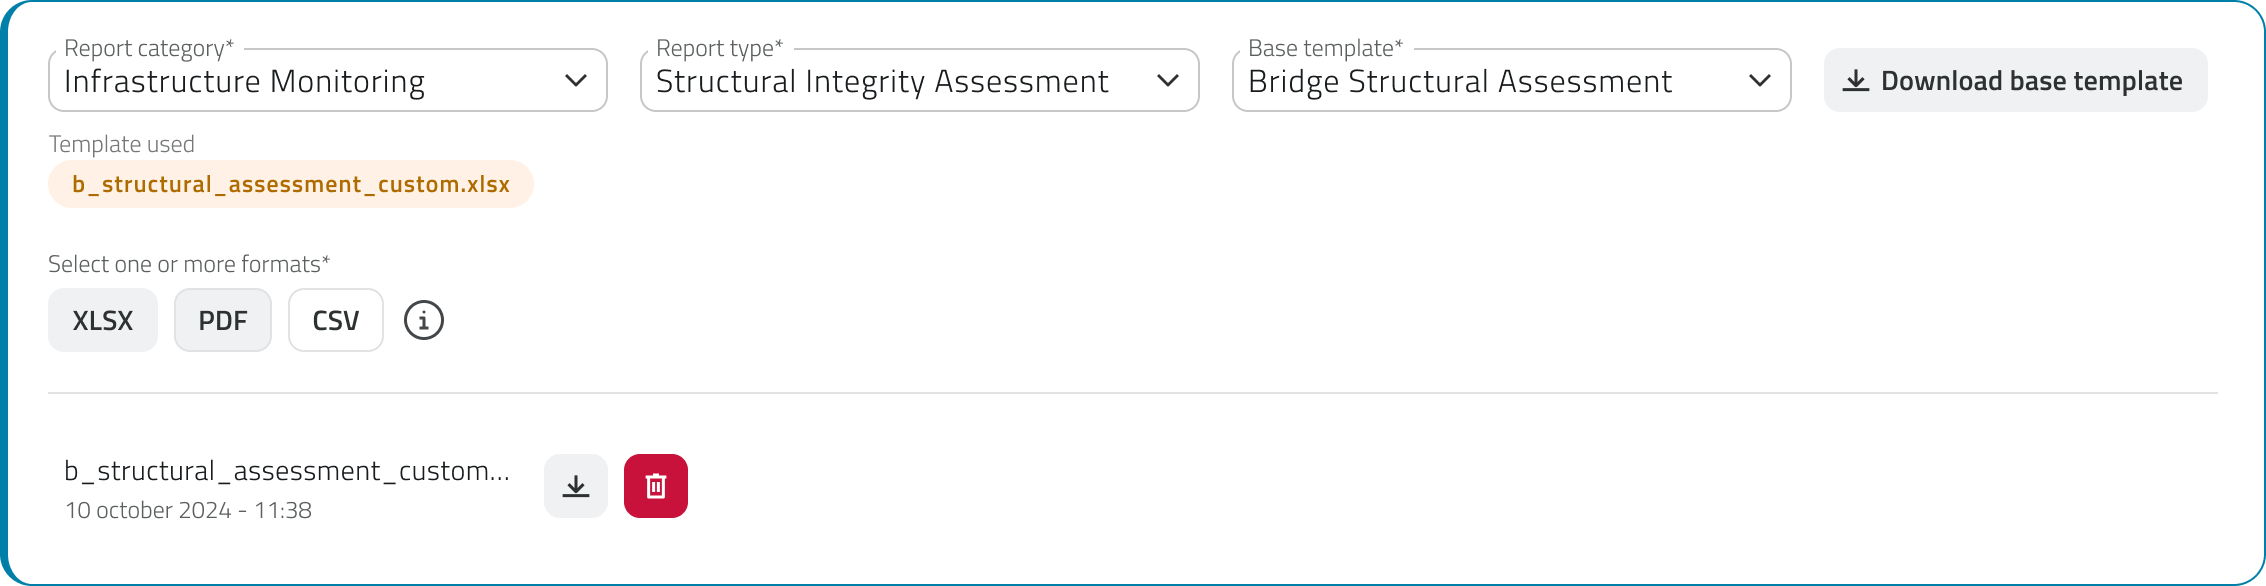
Do not modify the first sheet of the XLSX file: it contains the data structure used by the platform to populate the report.
Parameters section
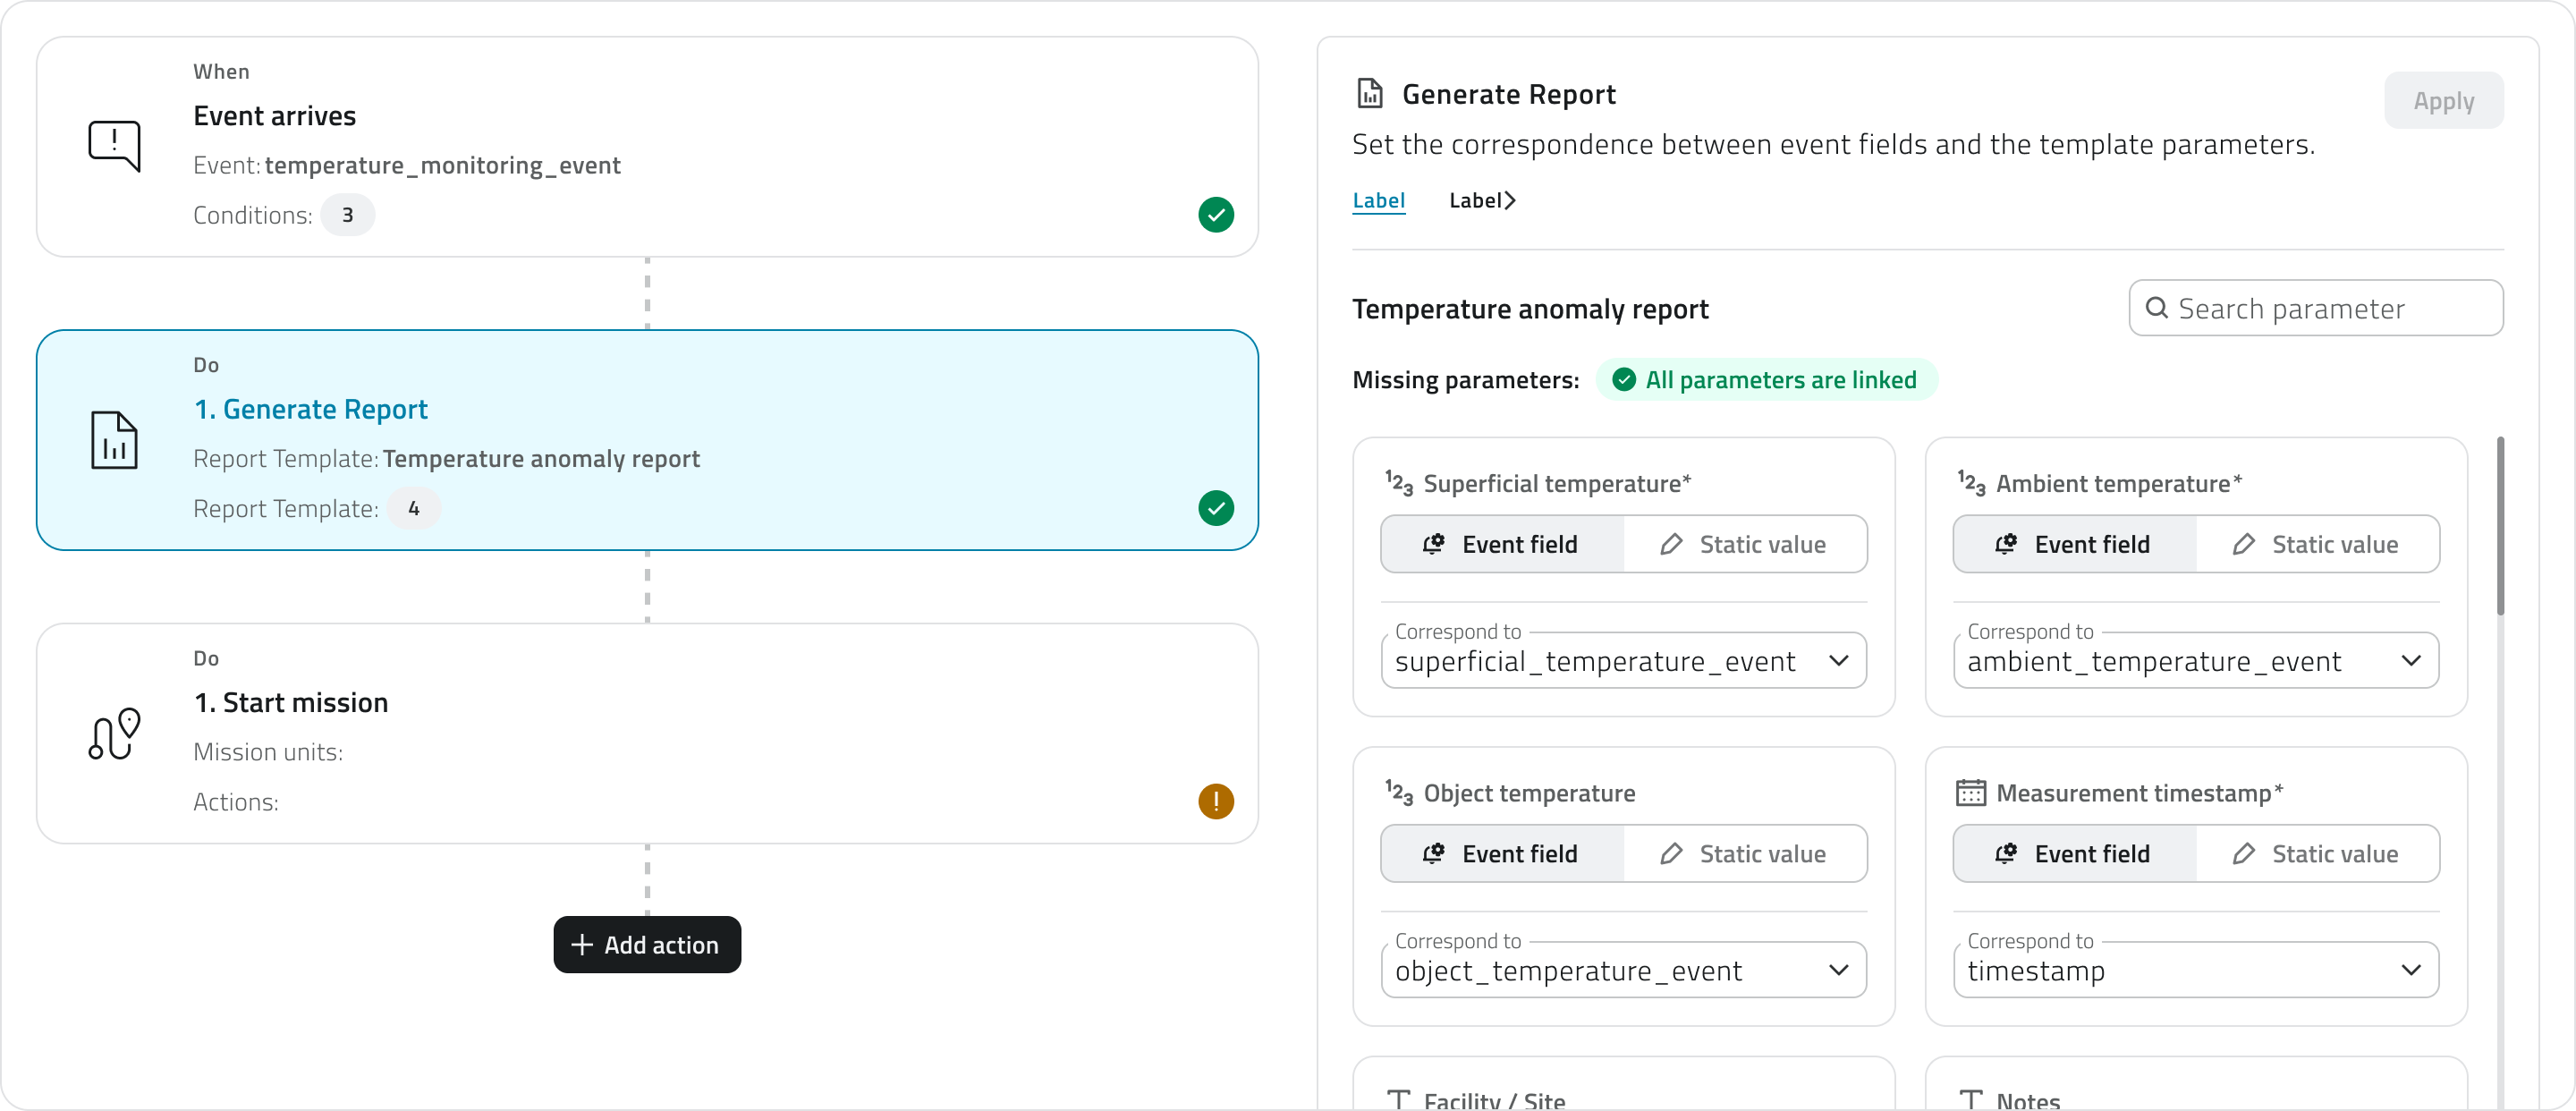
Once the template has been selected, the Parameters section populates with the automationparameters usingto configure, which vary depending on the multi-searchchosen field.template. Groups define the visibility of the automation in the app.
5. Set the automation status using the switch at the top. By default, it is enabled.If the status is disabled, the configuration sectionsParameters are locked.
New automations are active by default.

The page is divided into two areas:groups, Inputs and Filters, defined by the template itself:
OnInputs are configured here in theleftBackoffice by indicating where the system should retrieve the data from. They may be mandatory.- Filters are not configurable: they are shown here so you are aware of their presence, and are filled in by the user in the app at the time of generation to refine the report content. For each filter you can optionally set a display name, which is shown to the
flowusersummary,in the app to help them fill in the field; if left empty, the system name is used. Filters that are mandatory for the user are marked with thetriggerRequiredcardinand the cards for any added actions On the rightAppis the configuration panel for the selected sectionlabel.
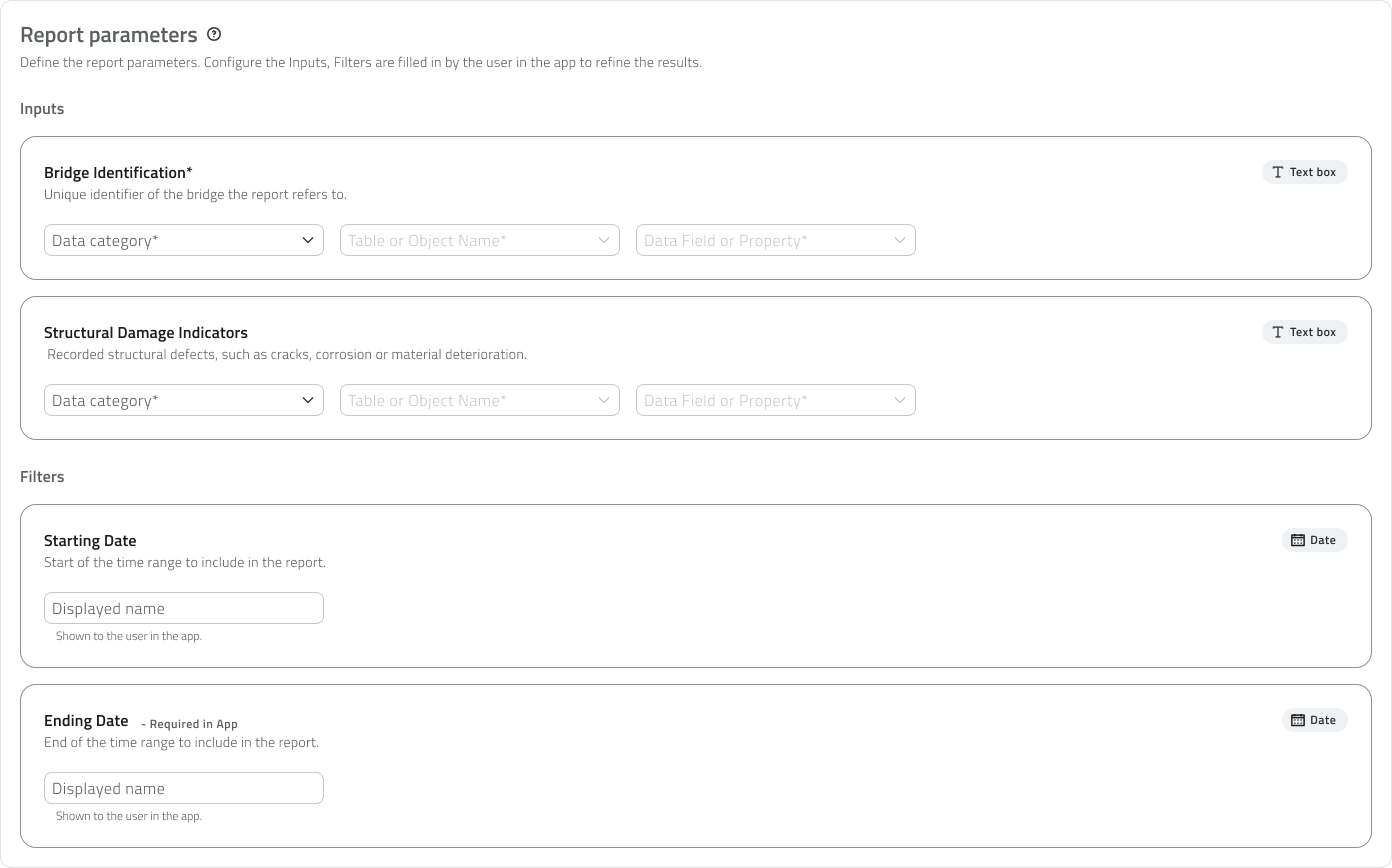
For each Input, the following fields unlock in sequence to indicate where the system should retrieve the data from:
- Data category
The data category to draw from - Table or Object Name
The specific table or object class - Data Field or Property
The specific field or property to use
Parameters can be of different types, such as text, numbers, true/false, date and date and time.
The triggerparameter and action cards display their status via an icon: an exclamation mark on a yellow background (Pending) indicates a configuration thattype is incomplete or not yet confirmed, while a checkmark on a green background (Completed) indicates a complete and confirmed configuration.
The page has two distinct save levels. The Apply button confirms the configuration of the individual section and updates the card status. The Save buttonindicative in the upper-rightBackoffice cornerand saveshelps guide the entireconfiguration. automationFor definitively.
6.it Configuredetermines the triggertype ↓of to define whenfield the automation should run.
7. Add and configure actions ↓ to choose what the platform should do when the trigger fires.
8. Save the automation by clicking Save in the upper-right corner of the page.
💡 Tip: Before saving, make sure all cards are in the Completed state, so that the automation is saved with a complete and consistent configuration.
Configure the trigger
The trigger defines when the automation should run.
It is the first section to complete: until the trigger is configured and confirmed, the button to add actions is not available.
1. Select the linked event from the dropdown menu. The list shows all events configured for the organization.Events already associated with another automation are not available.
2. If you want the automation to activate only when specific conditions are met click on Add condition.In this case, for each condition youuser will need to fill in threeat requiredthe fields:time of generation in the app.
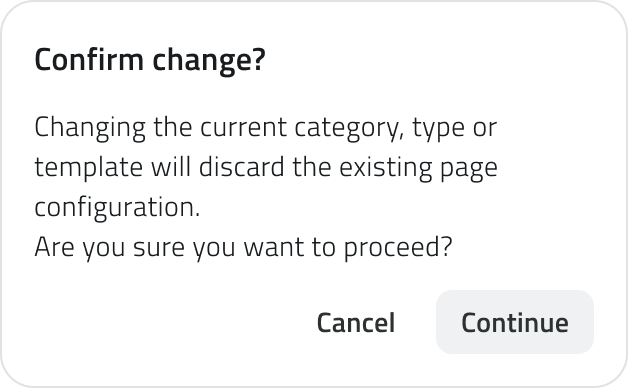
- the category, type or base template after having configured the parameters will
Field
reset the entire parameter configurationSelect.oneThe system will display a confirmation window before proceeding.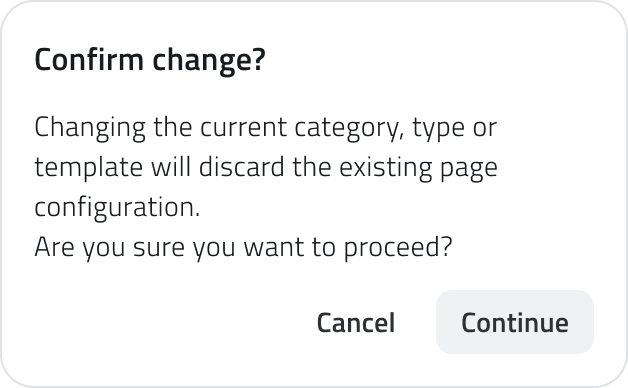
Save the Report
Click Save in the top-right corner to complete the creation. On first save, a window opens to set the default permission to assign to the template for all existing roles. This setting can be modified later from the Roles page of the
fields mapped in the event. Each field is accompanied by an icon indicating the data type (text, number, date, boolean). ConditionSelect the condition, for example equal to, greater than, less than, etc. The list of conditions depends on the data type.ValueEnter the comparison value
Changing
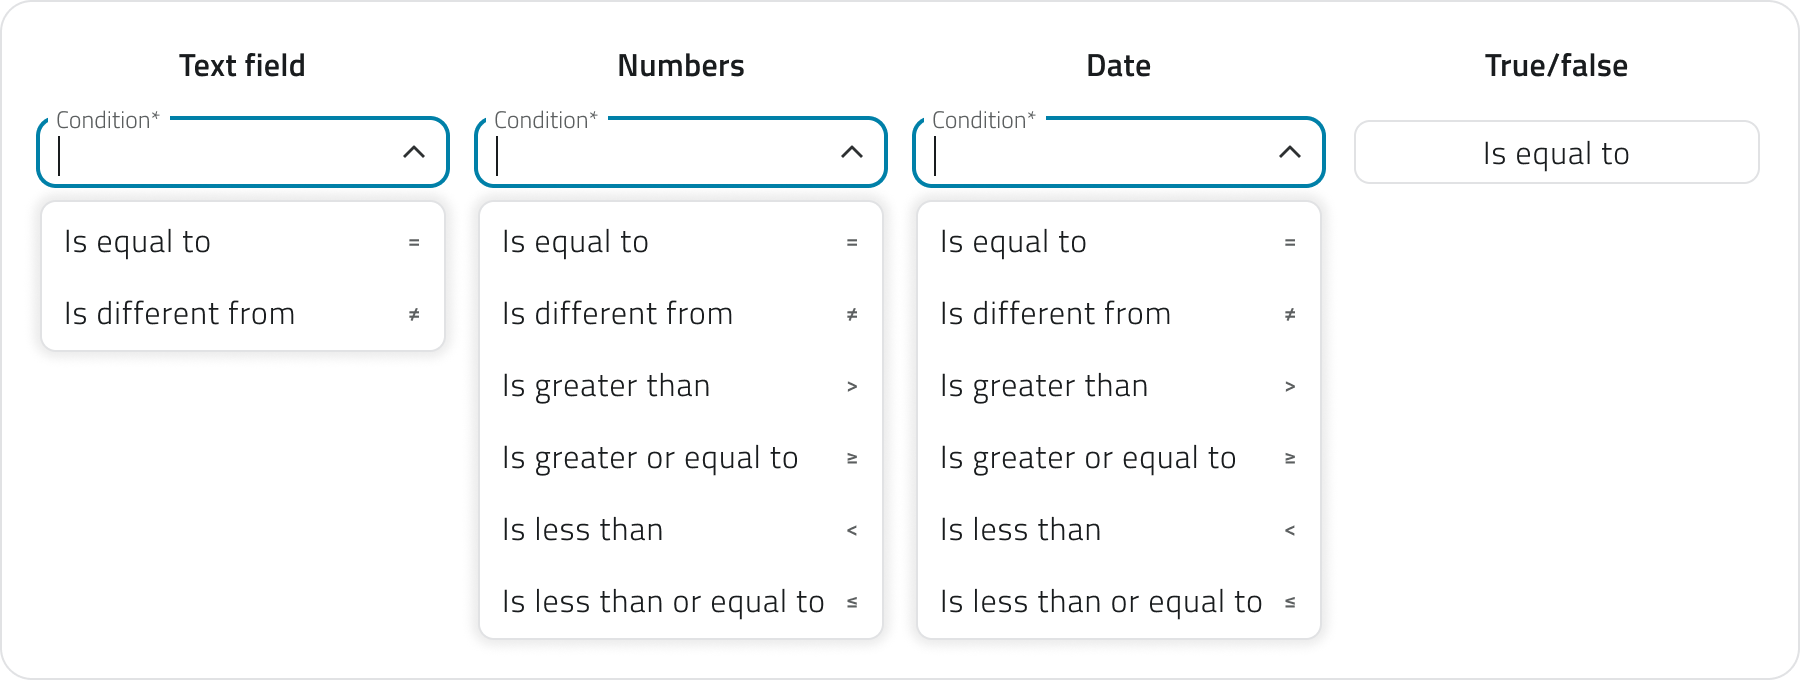
You can add more conditions using the Add condition button.If multiple conditions are present, all of them must be satisfied simultaneously to activate the trigger.
If you don't add any conditions, the automation fires every time the event is received.
3. Click Apply to confirm the trigger. The card will move to the Completed state and the button to add actions will become available.
If you later change the linked event, all already configured conditions will be reset. You can undo the change via Discard changes to restore the previous configuration.
Add and configure actions
Once the trigger is confirmed, click Add action to choose the type of action to execute. The available actions depend on the entity the event selected in the trigger is linked to.
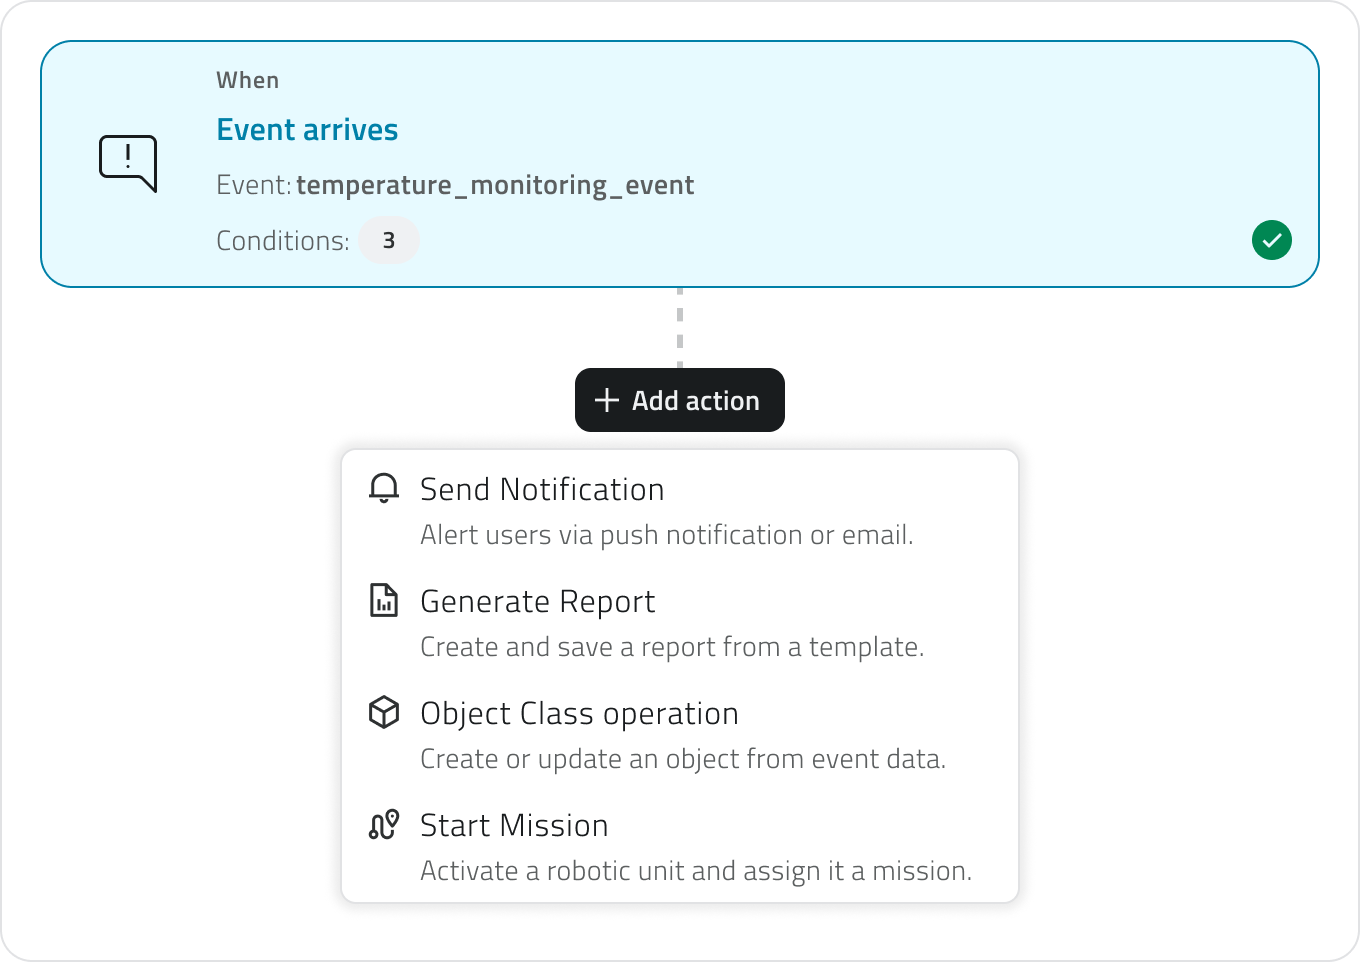
If the event is linked to a project, an object, or a sensor, all action types are available.If the event is linked to an organization or a device, only send notification is available.
The available action types are:
Send notification ↓Sends an email or push notification to the selected recipients.Object class operation ↓Creates or updates an instance of an existing object class.
Once the type is selected, the configuration panel opens on the right. The configuration is structured in progressive steps: each step unlocks only after the previous one has been completed and confirmed via the Continue button.
When you have finished configuring the action, click Apply to add it to the flow. The action card will appear in the left column with a summary of the main settings.
For each action you must also define the error behavior, choosing whether the system should continue with the next action or stop the entire automation.
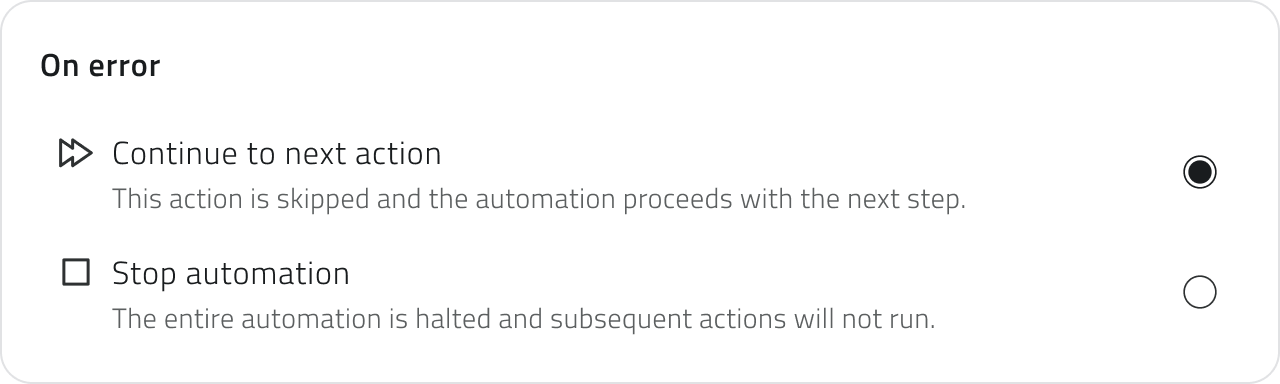
You can add an unlimited number of actions.To change the execution order, drag the cards up or down in the left column. The order in which the cards appear corresponds to the actual execution order.
💡 Tips:
If the actions are independent of each other, choose to continue with the next action to prevent a single issue from blocking the entire flowIf the actions are chained and depend on one another, choose to stop the automation to avoid inconsistent partial executions
Send notification
Configure the automatic sending of an email or push notification.
1. Select the notification type: Email or Push. Each action handles a single channel. To send both email and push, add two separate actions.
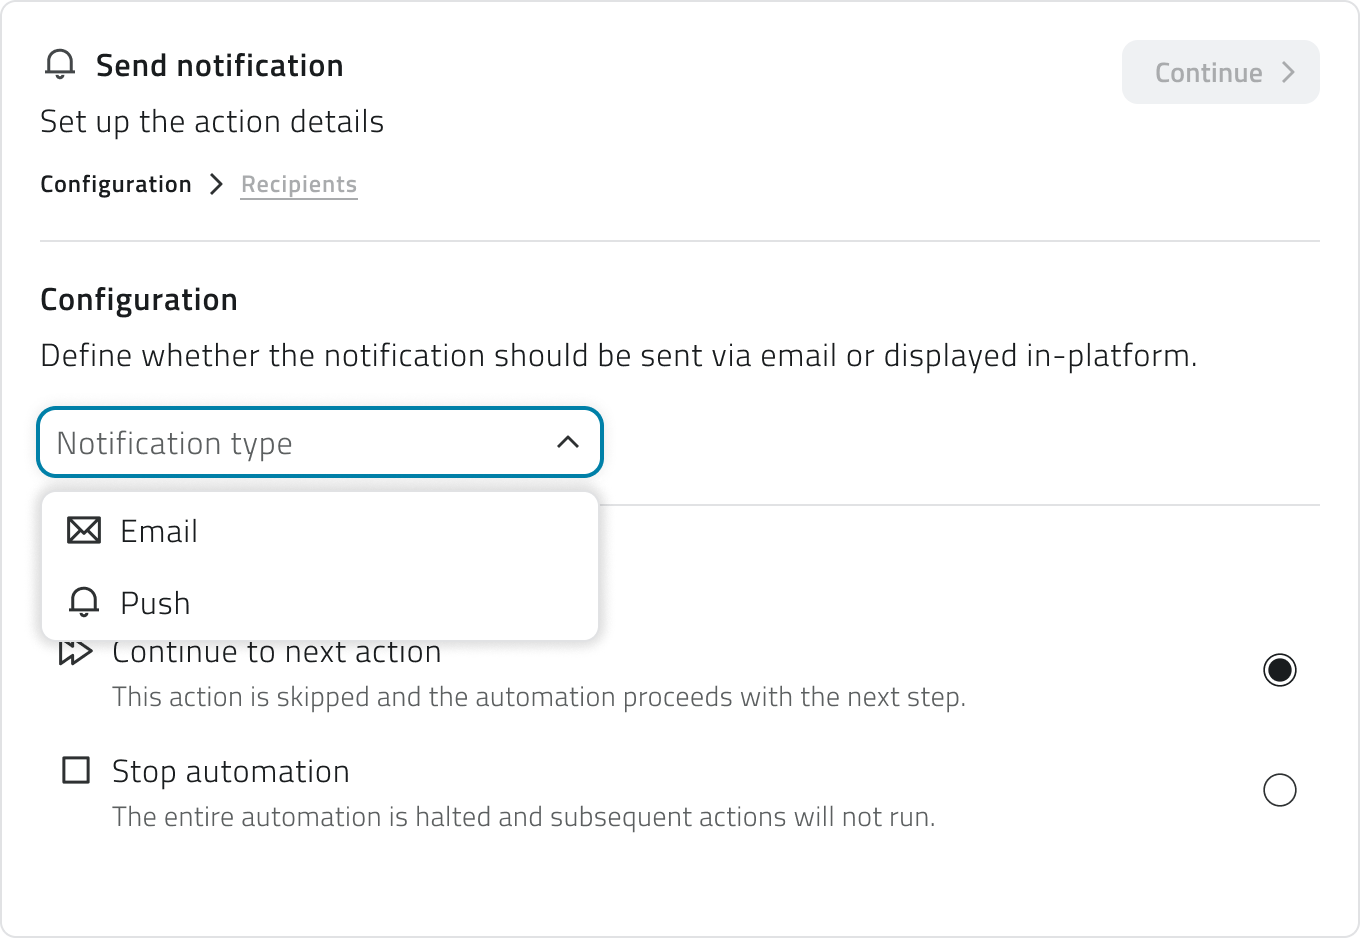
2. Click Continue to access the Recipients section.
3. You can add optional conditions to limit delivery to specific occurrences of the event, filtering by severity level (info, warning, success, error) or by specific event name.
4. Add the recipients by selecting users or groups. For email notifications you can also add external email addresses.
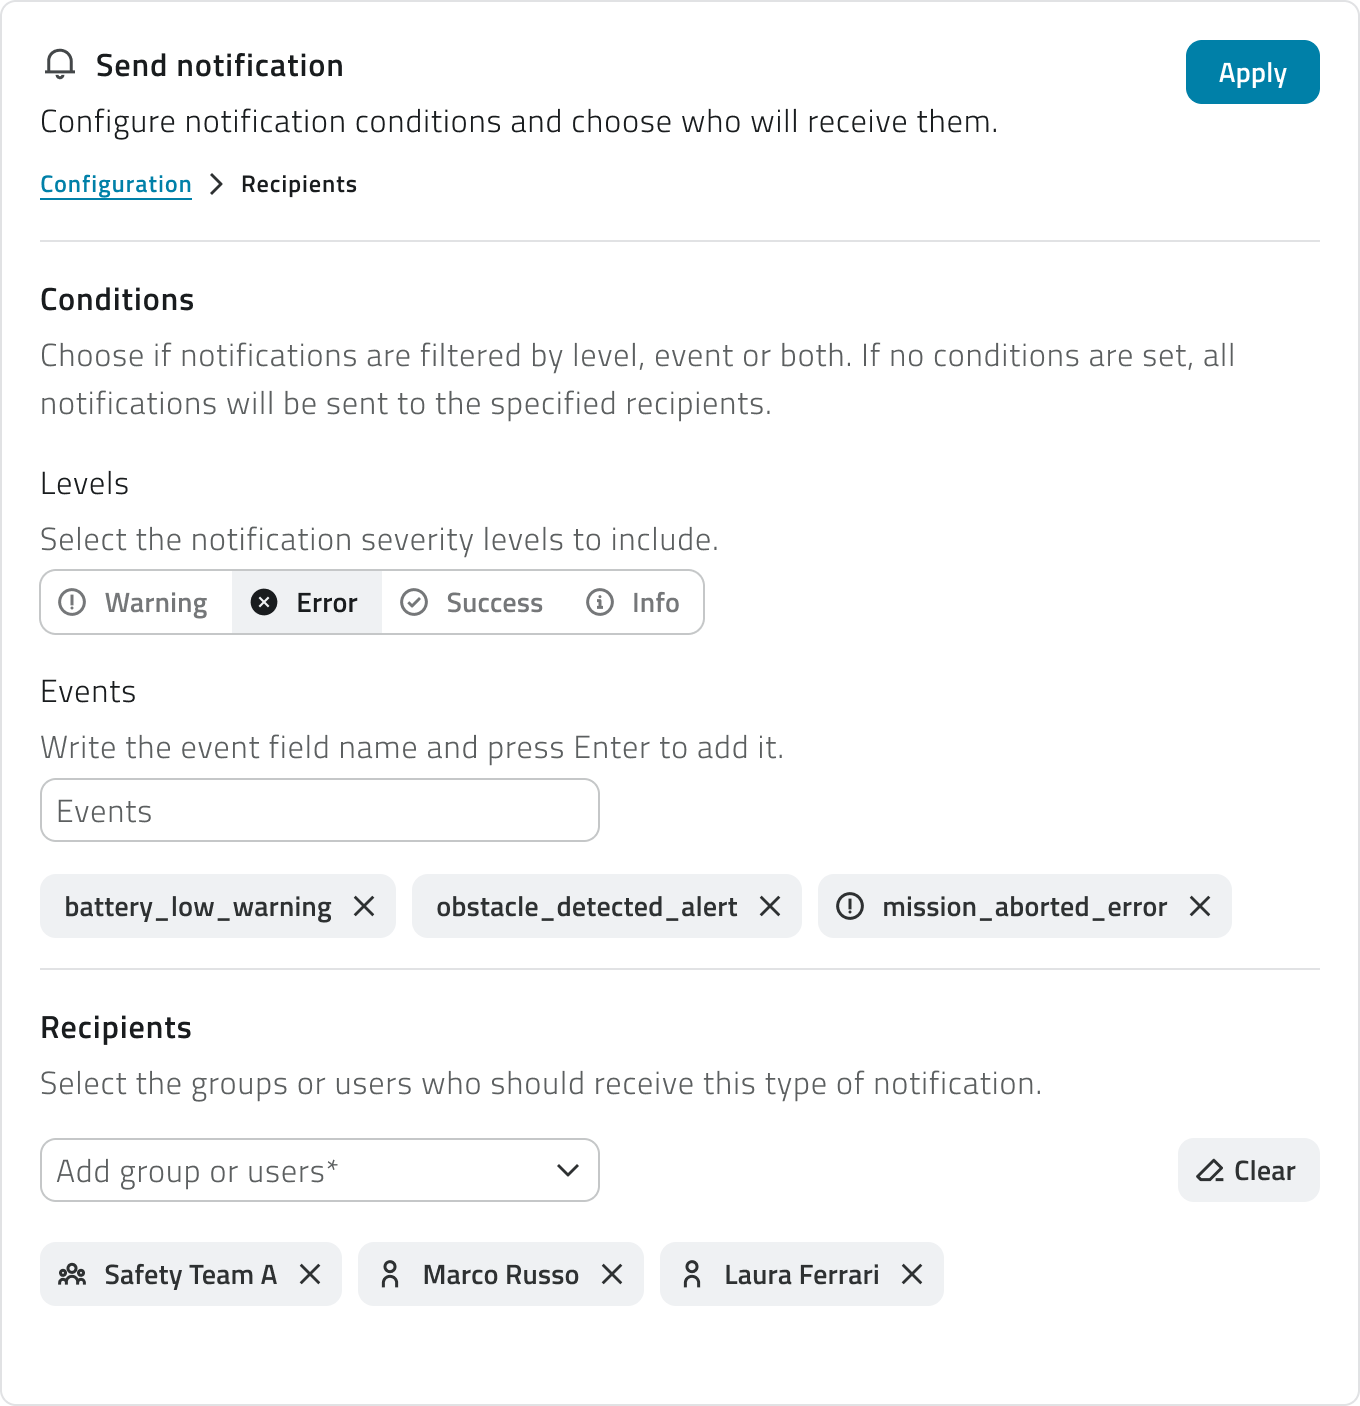
5. Click Apply to confirm.
Object class operation
Configure the automatic creation or update of an object class instance.
1. Select the object class from the dropdown menu.
2. Select the operation to perform:
Create objectCreates a new instance of the class. Available for classes oftype Point and Form.Modify objectUpdates an existing instance. Available for all class types.
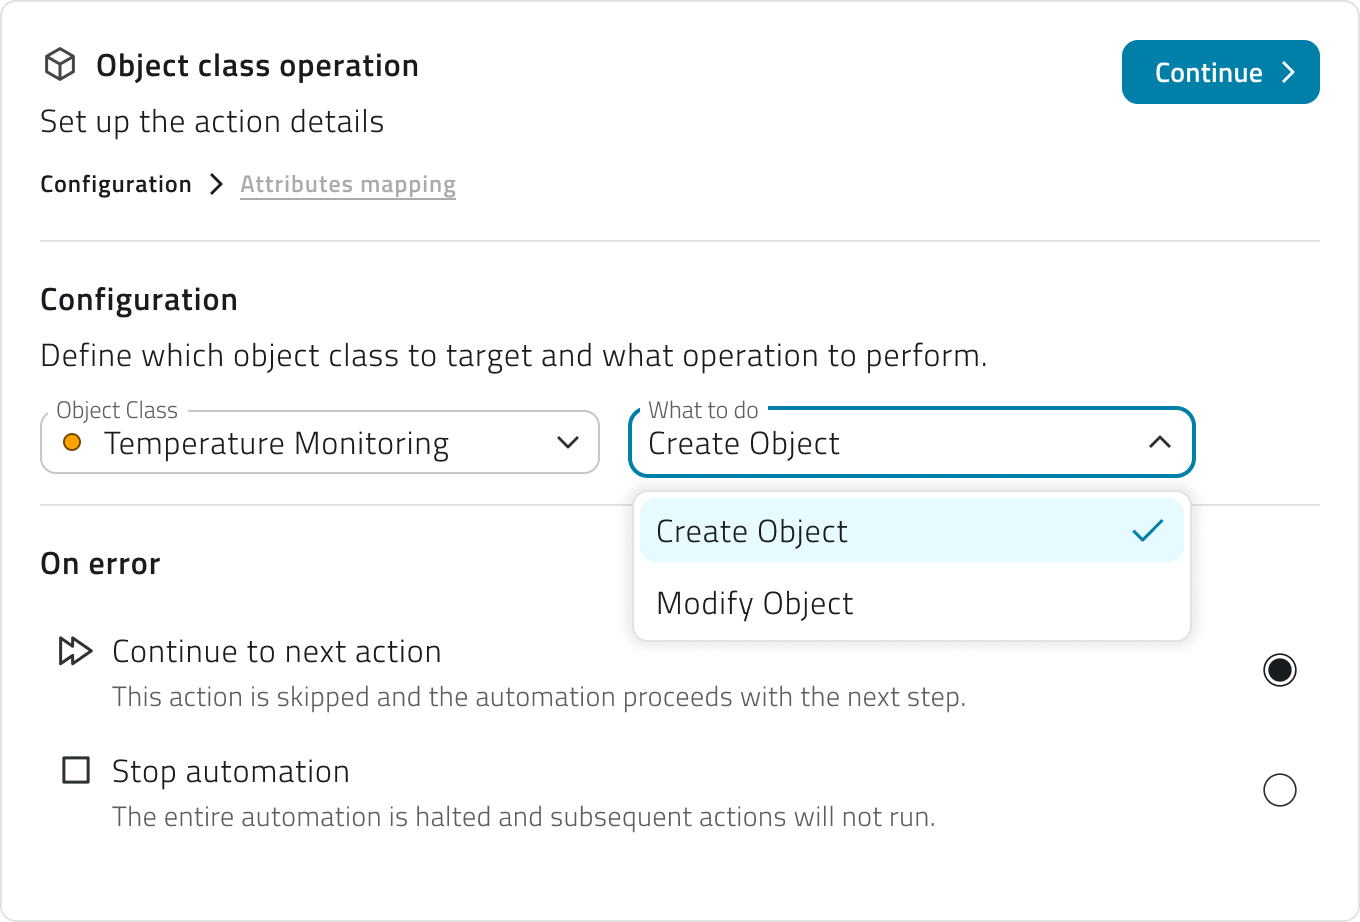
The Point creation action is only available if the linked event has a coordinates field correctly configured.
3. Click Continue to access the Attributes mapping section.
4. Choose how to populate each class attribute: with the event field, where the value is read from a field of the received event that you will select from a dropdown menu, or with a static value, by entering a fixed value manually.
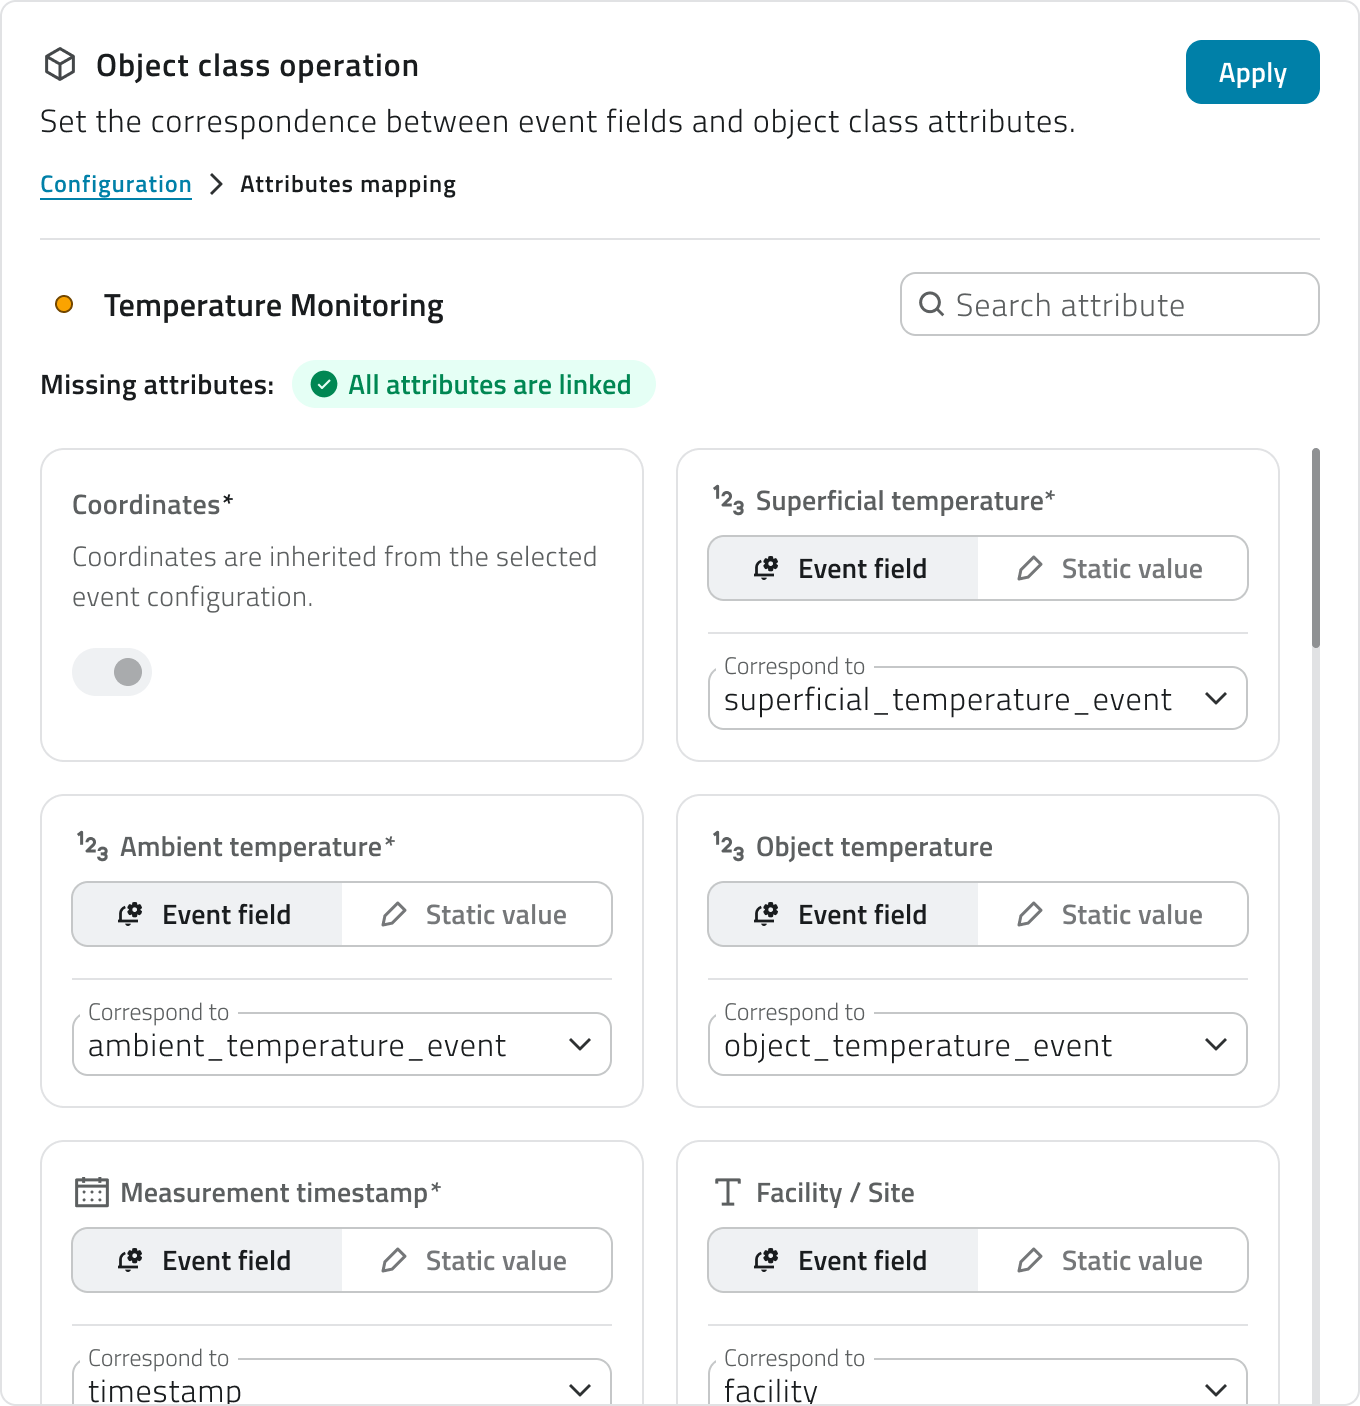
Required attributes are marked with an asterisk and must all be populated. A counter updated in real time showing the missing attributes is displayed at the top. A search bar allows you to filter the attribute list.
For classes of type Point, the Coordinates field is managed automatically: during creation it is populated from the coordinates field configured in the event and cannot be edited manually. During a modification it is optional.
For the Modify object operation, the Unique identifier field is required to indicate which instance to update. It can be mapped from an event field or entered as a static value.
5. Click Apply to confirm.
If you change the object class, the attribute mapping will be reset and the selected operation will be invalidated.Backoffice.
View and manageedit automationsReports
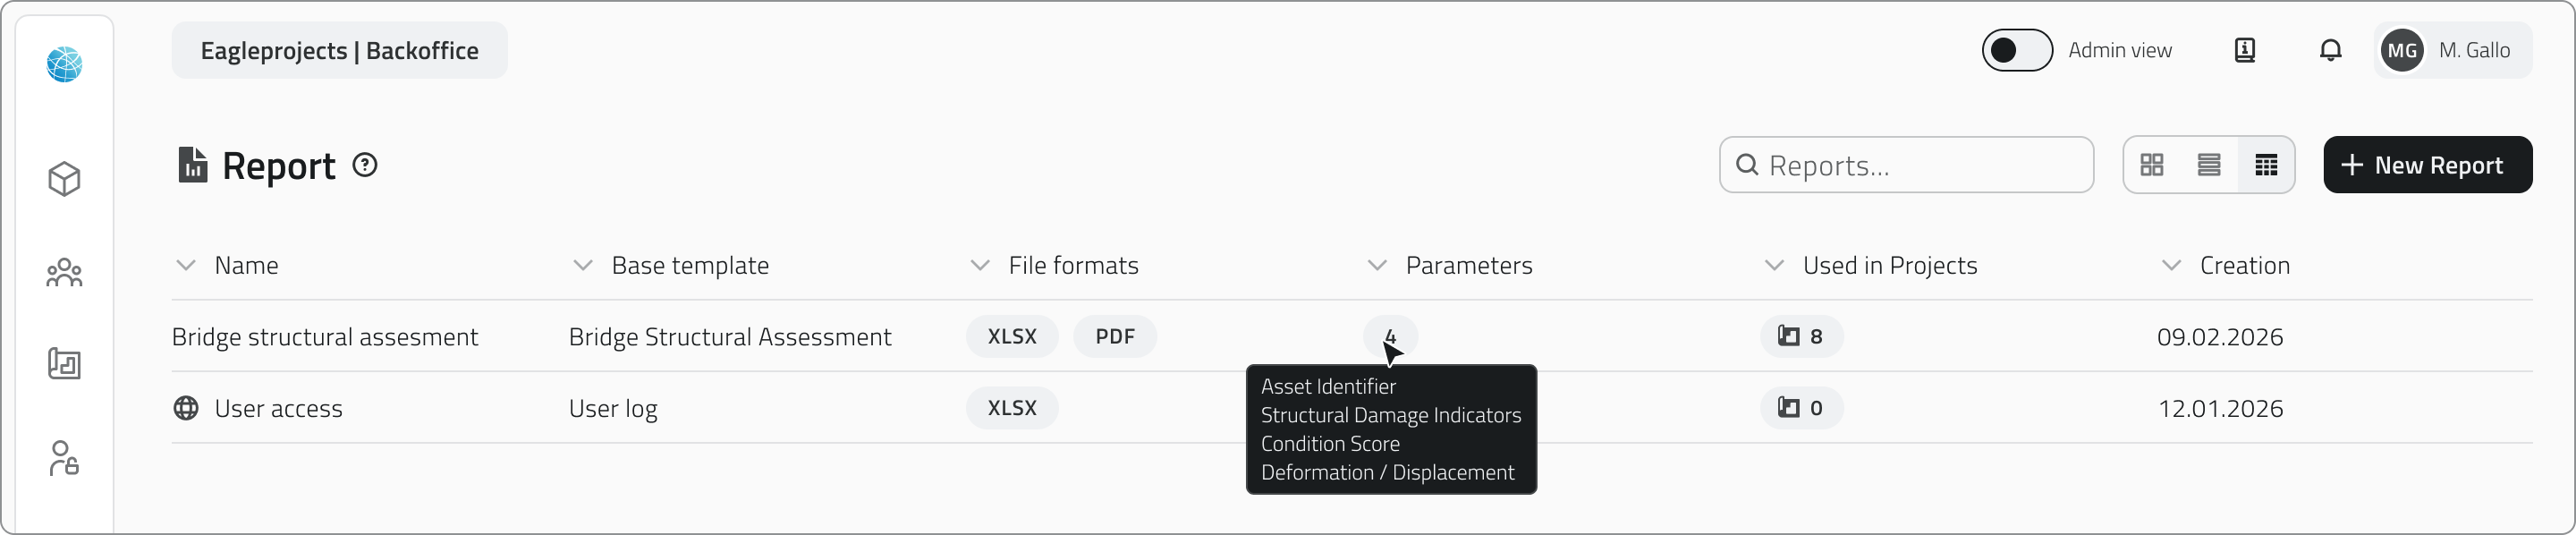
The report list shows all configured automations with the following information:information for each element:
- Name
of the automation StatusBase template
Theactiveselectedorbaseinactive, shown via icontemplate.ActionsFormats- Parameters
Hovering over the numberofshowsconfiguredallactions;parametershoveringavailable for that template. - Projects
Hovering over the number shows the list of projects inexecutionwhichorderthe template has been added; global reports show 0 because they are managed from the Home. - Creation date
TheGlobal listreports canare berecognisable viewed in table, grid, or list mode.
Two warning states may appear inby the list:
Warningglobe icon next tothetheirnameThe automation is saved but has no actions configured yet.Alert icon next to the nameThe event linked to the trigger has been deleted. The automation is automatically deactivated and cannot run until a new valid event is selected.
Edit
To edit ana automation,report, click the blue button with the arrow icon that appears when hovering over the item.element.
Duplicate
WhenTo you editduplicate a section,report, select an element from the related card returnslist to display the PendingDuplicate state.button You can confirmin the changestop-right viacorner Apply or discard them via Discard changes, which restoresof the last saved configuration.page.
Delete
IfTo you editdelete a fieldreport, that affects subsequent configurations, such as the unit type in a mission or the object class in an operation, the dependent steps are automatically reset and must be reconfigured.
You can also change the action order by dragging the cards, and add or remove individual actions.
Changes are not final until the automation is saved.
Delete an automation
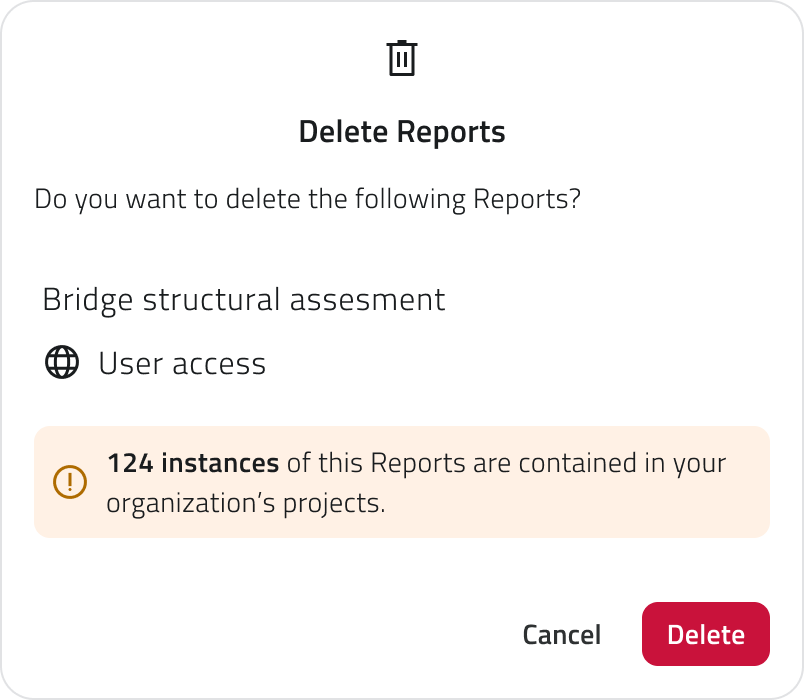
From the main list, select one or more automationselements and click the Delete button.button The system shows a confirmation dialog within the namestop-right corner of the selected automations and a warning that all actions configured within them will stop running.page. Hold CTRL and click to add automationsreports to the selection or remove them from it.
Deleting ana automationreport permanentlytemplate removescauses the trigger,deletion of all conditions,instances generated from that template in projects and allfrom actionsthe configuredHome. withinThe it.system Thisshows actionthe cannotnumber beof undone.instances involved before proceeding with the confirmation.
Links
- Create and manage
EventsProjects CreateManagingandreportsmanageinReportsthe Create and manage Object ClassesMission Planner - Initial Setupproject
CreaCreare e gestiscigestire lei automazionireport
LeLa automazionisezione consentonoReport alladel piattaformaBackoffice consente di risponderescegliere automaticamentee allaconfigurare ricezionei template di unreport evento,che eseguendoverranno unapoi utilizzati nei progetti o piùdalla azioniHome inper sequenza,generare dall'invioreport discaricabili. notificheOgni aglitemplate utentidefinisce allala creazionestruttura, oi all'aggiornamentoparametri die oggettii sullaformati piattaforma.disponibili per la generazione.
Disponibile solo per utenti con permesso backoffice-adminbackoffice.
Creare unaun nuovanuovo automazioneReport
1. Accedi al Backoffice e apriclicca la sezionesu AutomazioniReport dalnel menu laterale.laterale sinistro.
2. Clicca susul pulsante NuovaNuovo automazionereport in alto a destra.
3. Inserisci ilun nome dell'automazioneunivoco nell'intestazionedel dellareport pagina. Ilnel campo èNome obbligatorio.Report (obbligatorio, massimo 40 caratteri).
4. SelezionaSe il report deve raccogliere dati da tutti i progetti dell'organizzazione, attiva lo switch gruppiGlobal Report a cui associare l'automazione tramite il campo di ricerca multipla. .
I gruppireport definisconoglobali lavengono visibilitàgestiti dell'automazionedalla nell'app.Home e non dai singoli progetti.
5. ImpostaCompila loi campi delle due sezioni.
Sezione Template
In questa sezione i campi si sbloccano progressivamente. Seleziona prima la statocategoria dell'automazionee tramitepoi l'interruttorela intipologia alto.del Direport: defaultquesti èdue attivo.Secampi loti statoaiutano èa disattivo,individuare leil sezionitemplate più adatto.
A questo punto puoi selezionare il template base e scegliere uno o più formati di configurazione risultano bloccate.output.
LaUna paginavolta scelto il template, è divisapossibile scaricarlo tramite il pulsante Scarica template base e personalizzarlo aggiungendo nuovi fogli al file XLSX.
Per utilizzare il template personalizzato, ricaricalo tramite il pulsante Carica template personalizzato. Il file caricato viene mostrato con nome, data e ora di caricamento e può essere scaricato o rimosso. Rimuovendolo si tornerà automaticamente al template base.
Non modificare il primo foglio del file XLSX: contiene la struttura dati utilizzata dalla piattaforma per popolare il report.
Sezione Parametri
Una volta selezionato il template, la sezione Parametri si popola con i parametri da configurare, che variano in base al template scelto. I parametri si dividono in due aree:gruppi, Input e Filtri, definiti dal template stesso:
- Gli Input vengono configurati qui nel Backoffice indicando da dove il sistema deve recuperare il dato. Possono essere obbligatori.
- I Filtri non sono configurabili: vengono mostrati qui per darti consapevolezza della loro presenza e vengono compilati dall'utente in app al momento della generazione per affinare il contenuto del report. Per ogni filtro puoi facoltativamente impostare un nome in visualizzazione, che viene mostrato all'utente in app per aiutarlo nella compilazione del campo; se lasciato vuoto, viene usato il nome di sistema. I filtri obbligatori per l'utente sono contrassegnati dall'etichetta Required in App.
Per ogni Input, i seguenti campi si sbloccano a cascata per indicare da dove il sistema deve recuperare il dato:
A sinistrasi trova il riepilogoCategoria delflusso,dato
Laconcategorialadischedadatideldatriggercuie le schede delle azioni aggiunteattingereATabelladestrao Nome oggetto
Lasitabellatrovaoillapannelloclassedioggettoconfigurazionespecifica- Campo
sezionedelselezionatadato o Proprietà
Il campo o la proprietà specifica da utilizzare
LeIl schedetipo deldi triggerparametro è indicativo nel Backoffice e delleaiuta azionia mostranoindirizzare la configurazione. Per i Filtri, determina il lorotipo statodi tramitecampo un'icona:che l'utente dovrà compilare al momento della generazione in app.
Modificare la categoria, la tipologia o il puntotemplate esclamativobase sudopo sfondoaver gialloconfigurato (Ini attesa) rappresenta una configurazioneparametri incompletaresetterà o non ancora confermata, mentre la spunta su sfondo verde (Completato) rappresenta una configurazione completa e confermata.
All'interno della pagina sono presenti due livelli di salvataggio distinti. Il pulsante Applica confermatutta la configurazione della singola sezione edei aggiorna lo stato della scheda.parametri. Il pulsantesistema mostrerà una finestra di conferma prima di procedere.
Salvare il Report
Clicca Salva in alto a destra salva l'intera automazione in modo definitivo.
6. Configura il trigger ↓ per stabilire quando l'automazione dovrà essere eseguita.
7. Aggiungi e configura le azioni ↓ per scegliere cosacompletare la piattaformacreazione. dovràAl fare a seguito del trigger.
8. Salva l'automazione cliccando Salva in alto a destra della pagina.
💡 Suggerimento: Prima di salvare, verifica che tutte le schede siano nello stato Completato. Una scheda in stato In attesa impedisce ilprimo salvataggio dell'automazione.
Configurare il trigger
Il trigger definisce quando l'automazione deve essere eseguita.
È la prima sezione da completare: finché il trigger non è configurato e confermato, il pulsante per aggiungere azioni non è disponibile.
1. Seleziona l'evento collegato dal menu a tendina. La lista mostra tutti gli eventi configurati per l'organizzazione.Gli eventi già associati a un'altra automazione non sono disponibili.
2. Se vuoi che l'automazione si attivi solo al verificarsi di condizioni specifiche clicca su Aggiungi condizione.In questo caso, per ogni condizione, dovrai compilare tre campi obbligatori:
CampoSeleziona uno dei campi mappati nell'evento. Ogni campo è accompagnato da un'icona che indica il tipo di dato (testo, numero, data, booleano).CondizioneSeleziona la condizione, per esempio uguale, maggiore, minore, ecc. La lista delle condizioni dipende dal tipo di dato.ValoreInserisci il valore di confronto
Puoi aggiungere più condizioni tramite il pulsante Aggiungi condizione.Se sono presenti più condizioni, per attivare il trigger devono essere tutte soddisfatte contemporaneamente.
Se non aggiungi condizioni, l'automazione si avvia ogni volta che l'evento viene ricevuto.
3. Clicca Applica per confermare il trigger. La scheda passerà allo stato Completato e si abiliterà il pulsante per aggiungere azioni.
Se in seguito modifichi l'evento collegato, tutte le condizioni già configurate vengono azzerate. Puoi annullare la modifica tramite Scarta modifiche per ripristinare la configurazione precedente.
Aggiungere e configurare le azioni
Dopo aver confermato il trigger, clicca su Aggiungi azione per scegliere il tipo di azione da eseguire. Le azioni disponibili dipendono dall'entità a cui è collegato l'evento selezionato nel trigger.
Se l'evento è collegato a un progetto, un oggetto o un sensore, sono disponibili tutti i tipi di azione.Se l'evento è collegato a un'organizzazione o a un dispositivo, è disponibile solo l'invio di notifiche.
I tipi di azione disponibili sono:
Invia notifica ↓Invia una notifica email o push ai destinatari selezionati.Operazione su classe oggetto ↓Crea o modifica un'istanza di una classe oggetto esistente.
Una volta selezionato il tipo, il pannello di configurazione si apre auna destra. La configurazione è strutturata in step progressivi: ogni step successivo si sblocca solo dopo aver completato e confermato il precedente tramite il pulsante Continua.
Quando hai terminato la configurazione dell'azione, clicca Applicafinestra per aggiungerla al flusso.La scheda dell'azione apparirà nella colonna di sinistra con un riepilogo delle impostazioni principali.
Per ogni azione devi anche definireimpostare il comportamento in casopermesso di errore, scegliendo se il sistema deve continuare con l'azione successiva oppure interrompere l'intera automazione.
Puoi aggiungere un numero illimitato di azioni.Per cambiare l'ordine di esecuzione, trascina le schede verso l'alto o verso il basso nella colonna di sinistra. L'ordine in cui le schede compaiono corrisponde all'ordine effettivo di esecuzione.
💡 Suggerimenti:
Se le azioni sono indipendenti tra loro, scegli di continuare con l'azione successiva per evitare che un singolo problema blocchi l'intero flussoSe le azioni sono concatenate e dipendono l'una dall'altra, scegli di interrompere l'automazione per evitare esecuzioni parziali incoerenti
Invia notifica
Configura l'invio automatico di una notifica email o push.
1. Seleziona il tipo di notifica: Email o Push. Ogni azione gestisce un solo canale. Per inviare sia email che push, aggiungi due azioni separate.
2. Clicca Continua per accedere alla sezione Destinatari.
3. Puoi aggiungere condizioni opzionali per limitare l'invio solo ad alcune occorrenze dell'evento, filtrandole per livello di severità (info, avviso, successo, errore) o per nome evento specifico.
4. Aggiungi i destinatari selezionando utenti o gruppi. Per le notifiche email puoi aggiungere anche indirizzi email esterni.
5. Clicca Applica per confermare.
Operazione su classe oggetto
Configura la creazione o la modifica automatica di un'istanza di una classe oggetto.
1. Seleziona la classe oggetto interessata dal menu a tendina.
2. Seleziona l'operazionedefault da eseguireassegnare tra:
Crea oggettoCrea una nuova istanza della classe. Disponibile per classi ditipo Punto e Form.Modifica oggettoAggiorna un'istanza esistente. Disponibiletemplate per tutti itipiruolidiesistenti.classe.Questa
L'azione di creazione di un Punto è disponibile solo se l'evento collegato ha un campo coordinate correttamente configurato.
3. Clicca Continua per accedere alla sezione Mappatura attributi.
4. Scegli come popolare ogni attributo della classe, se con il campo dell'evento, il valore viene letto da un campo dell'evento ricevuto che dovrai selezionare da un menu a tendina, oppure con un valore statico, inserendo manualmente un valore fisso.
Gli attributi obbligatori sono contrassegnati da un asterisco e devonopuò essere tutti popolati. In alto viene mostrato un contatore aggiornatomodificata in temposeguito realedalla conpagina gliRuoli attributidel mancanti. Una barra di ricerca consente di filtrare la lista degli attributi.
Per le classi di tipo Punto, il campo Coordinate è gestito automaticamente: in fase di creazione viene popolato a partire dal campo coordinate configurato nell'evento e non è modificabile manualmente. In fase di modifica è opzionale.
Per l'operazione Modifica oggetto è obbligatorio configurare il campo Identificatore univoco, che indica quale istanza aggiornare. Può essere mappato da un campo evento o inserito come valore statico.
5. Clicca Applica per confermare.
Se modifichi la classe oggetto, la mappatura degli attributi viene azzerata e l'operazione selezionata viene invalidata.Backoffice.
Visualizzare e modificare lei automazioniReport
LaNella lista mostradei tuttereport lesono automazioni configurate convisibili le seguenti informazioni:informazioni per ogni elemento:
- Nome
dell'automazione StatoTemplate base
Ilattivotemplateobasedisattivo, mostrato tramite iconaselezionatoAzioniFormati- Parametri
Passando il mouse sulnumero,numero vengono mostrati tutti i parametri disponibili per quel template. - Progetti
Passando il mouse sul numero vienemostratomostratal'elencola lista dei progetti inordinecuidiilesecuzionetemplate è stato aggiunto; i report globali mostrano 0 perché sono gestiti dalla Home - Data di creazione
LaI listareport puòglobali esseresono visualizzatariconoscibili indall'icona modalitàdel tabella, griglia o elenco.
Nella lista possono comparire due stati di attenzione:
Icona di avvisoglobo accanto alnomenome.L'automazione è salvata ma non ha ancora azioni configurate.Icona di allerta accanto al nomeL'evento collegato al trigger è stato eliminato. L'automazione viene automaticamente disattivata e non può essere eseguita finché non viene selezionato un nuovo evento valido.
Modifica
Per modificare un'automazione,un report, clicca sul pulsante blu con l'icona freccia che appare al passaggio del mouse sull'elemento.
Quando modifichi una sezione, la relativa scheda torna allo stato In attesa. Puoi confermare le modifiche tramite Applica oppure annullarle tramite Scarta modifiche, che ripristina l'ultima configurazione salvata.
Duplicazione
Se vuoi modifichiduplicare un campo che ha impatto su configurazioni successivereport, adseleziona esempioun elemento dalla lista per visualizzare il tipopulsante diDuplica unità in unaalto missionea odestra ladella classe oggetto in un'operazione, gli step dipendenti vengono automaticamente azzerati e devono essere riconfigurati.pagina.
Puoi anche modificare l'ordine delle azioni trascinando le schede, e aggiungere o rimuovere azioni singole.
Eliminazione
LeSe modifichevuoi noneliminare sonoun definitivereport finopuoi alselezionare salvataggio dell'automazione.
Eliminare un'automazione
Dalla lista principale, seleziona unauno o più automazionielementi e cliccacliccare sul pulsante Elimina .in Ilalto sistemaa mostradestra unadella finestra di conferma con il nome delle automazioni selezionate e un avviso che tutte le azioni configurate al loro interno cesseranno di essere eseguite.pagina. Tieni premuto CTRL e clicca per aggiungere automazionireport alla selezione o toglierle.toglierli.
EliminandoEliminare un'automazioneun vengonotemplate rimossidi definitivamentereport anchecomporta ill'eliminazione trigger,di tutte le condizioniistanze generate da quel template nei progetti e tuttedalla leHome. azioniIl configuratesistema almostra suoil interno.numero L'operazionedi èistanze irreversibile.coinvolte prima di procedere con la conferma.
Collegamenti
- Creare e gestire
gliiEventiProgetti Creare e gestireGestire iReportreport nel progettoCreare e gestire le Classi OggettoMission Planner - Setup iniziale
Last update: 1711 AugJune 2026