
Create and manage Events
 English
  Italiano
 AnA Eventgroup brings together users with the same role and permissions, allowing them to work on the same projects using a consistent set of operations.
Creating a group allows the platformyou to receivegroup users and interpretassign informationthem a (typicallyrole, JSON)simplifying frompermission externalmanagement providers, linking it toin a platformscalable entity such as organizations, projects, objects, sensors, and devices.
To use events for sending notifications, you can configure the outputs from the Automations section.way.
Available only to users with backoffice permission.permissions. To create ana event,group, the role to which the entitiesgroup it mustwill be linked to must already exist in the system: project, object, sensor, or device.
system.
Create a new EventSteps
1. Log in toAccess the Backoffice and click BackofficeGroups and open the Events section fromin the left-side menu.menu.
The list shows the name, thecreation date, associated projects, added users and linked entity, the linked automation, the creation date,and a button to copy the event URL.role.


2. Click Clickthe New eventGroup button in the top-right corner.
3. EnterFill in the Eventrequired fields (name and select the Linked to entity, both fields are required.
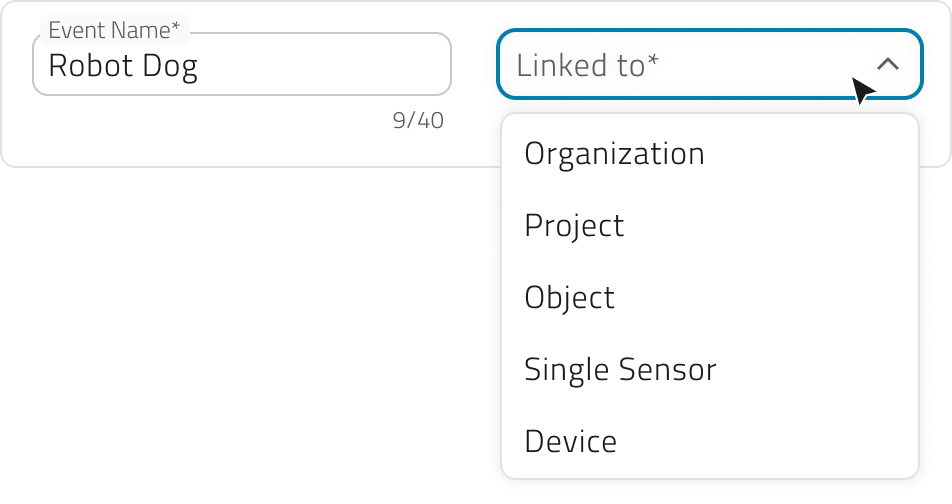
The available options are:role):
OrganizationFor general events.ProjectFor events specific toEnter asingleuniqueproject.ObjectFor events linked to a class and a single instance.Single sensorFor events coming from a single sensor.DeviceFor events generated by a set of sensors.
4. In the Mapping section, define how the incoming data should be interpreted.
If needed, load the sample payload: paste or upload a JSON filename in the textGroup boxName andfield.
click
Loading the JSON is not required, you can also fill in the fields manually.
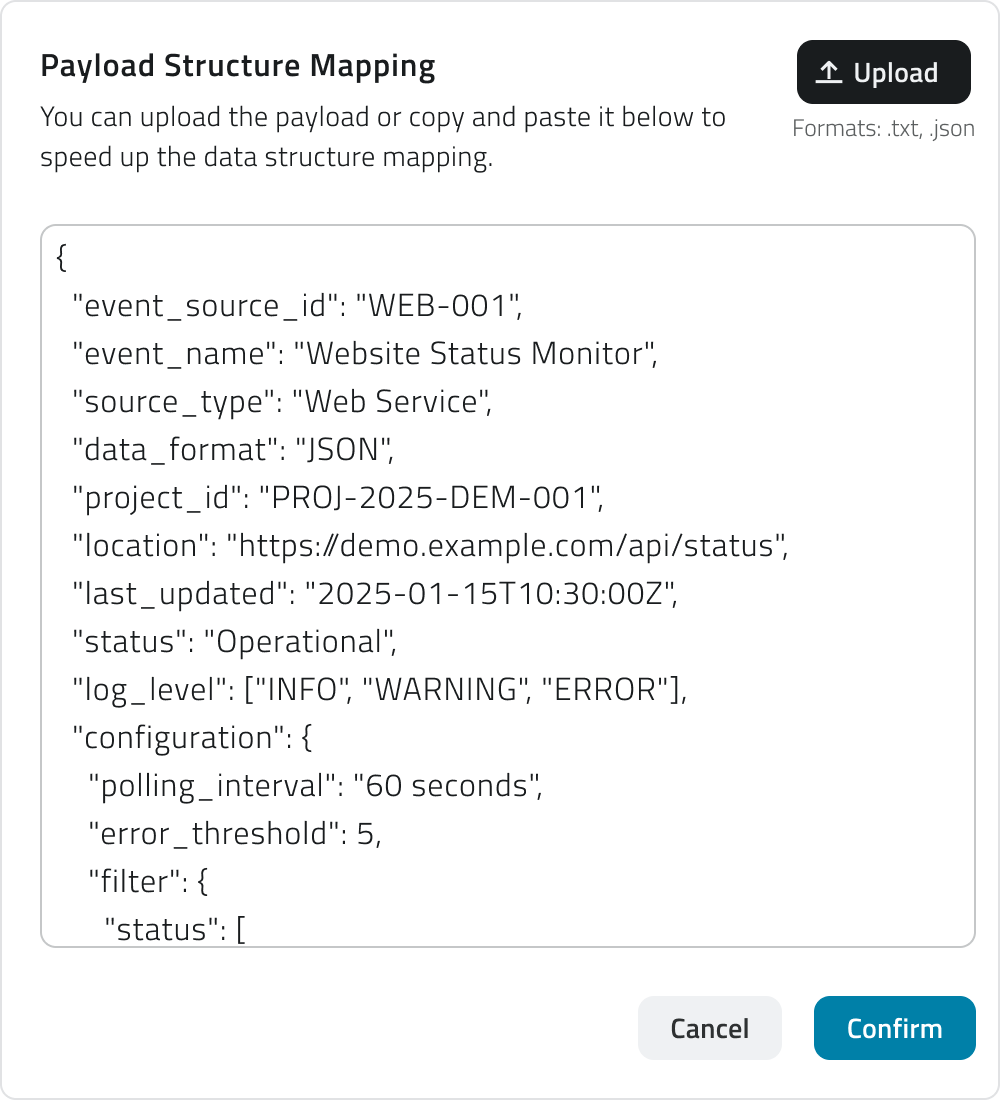
Then map the keys, associating the provider's keys with the fields required by the platform:
Name(required)The name of the event. Example:event_nameornotification_name.Event ID(required)Uniquely identifies the type of event. Example:event_idortype_code.Time(required)Indicates when the event occurs. Example:timestamporevent_time.Levels(required)Defines the type or severity of the event (info,warning,success,error). Each level can have aDisplayed name, shown when hovering over the level icon. Example: a key likeseverityorstatusmapped to "warning".Description(required)Briefly explains the content or purpose of the event. Example:messageordetails.Additional info(optional)Adds supplementary data, each with an optionalDisplayed name. Example:temperature,battery_status,signal_strength.menu.

DependingName and Role are required to save.
4. Add or remove users.
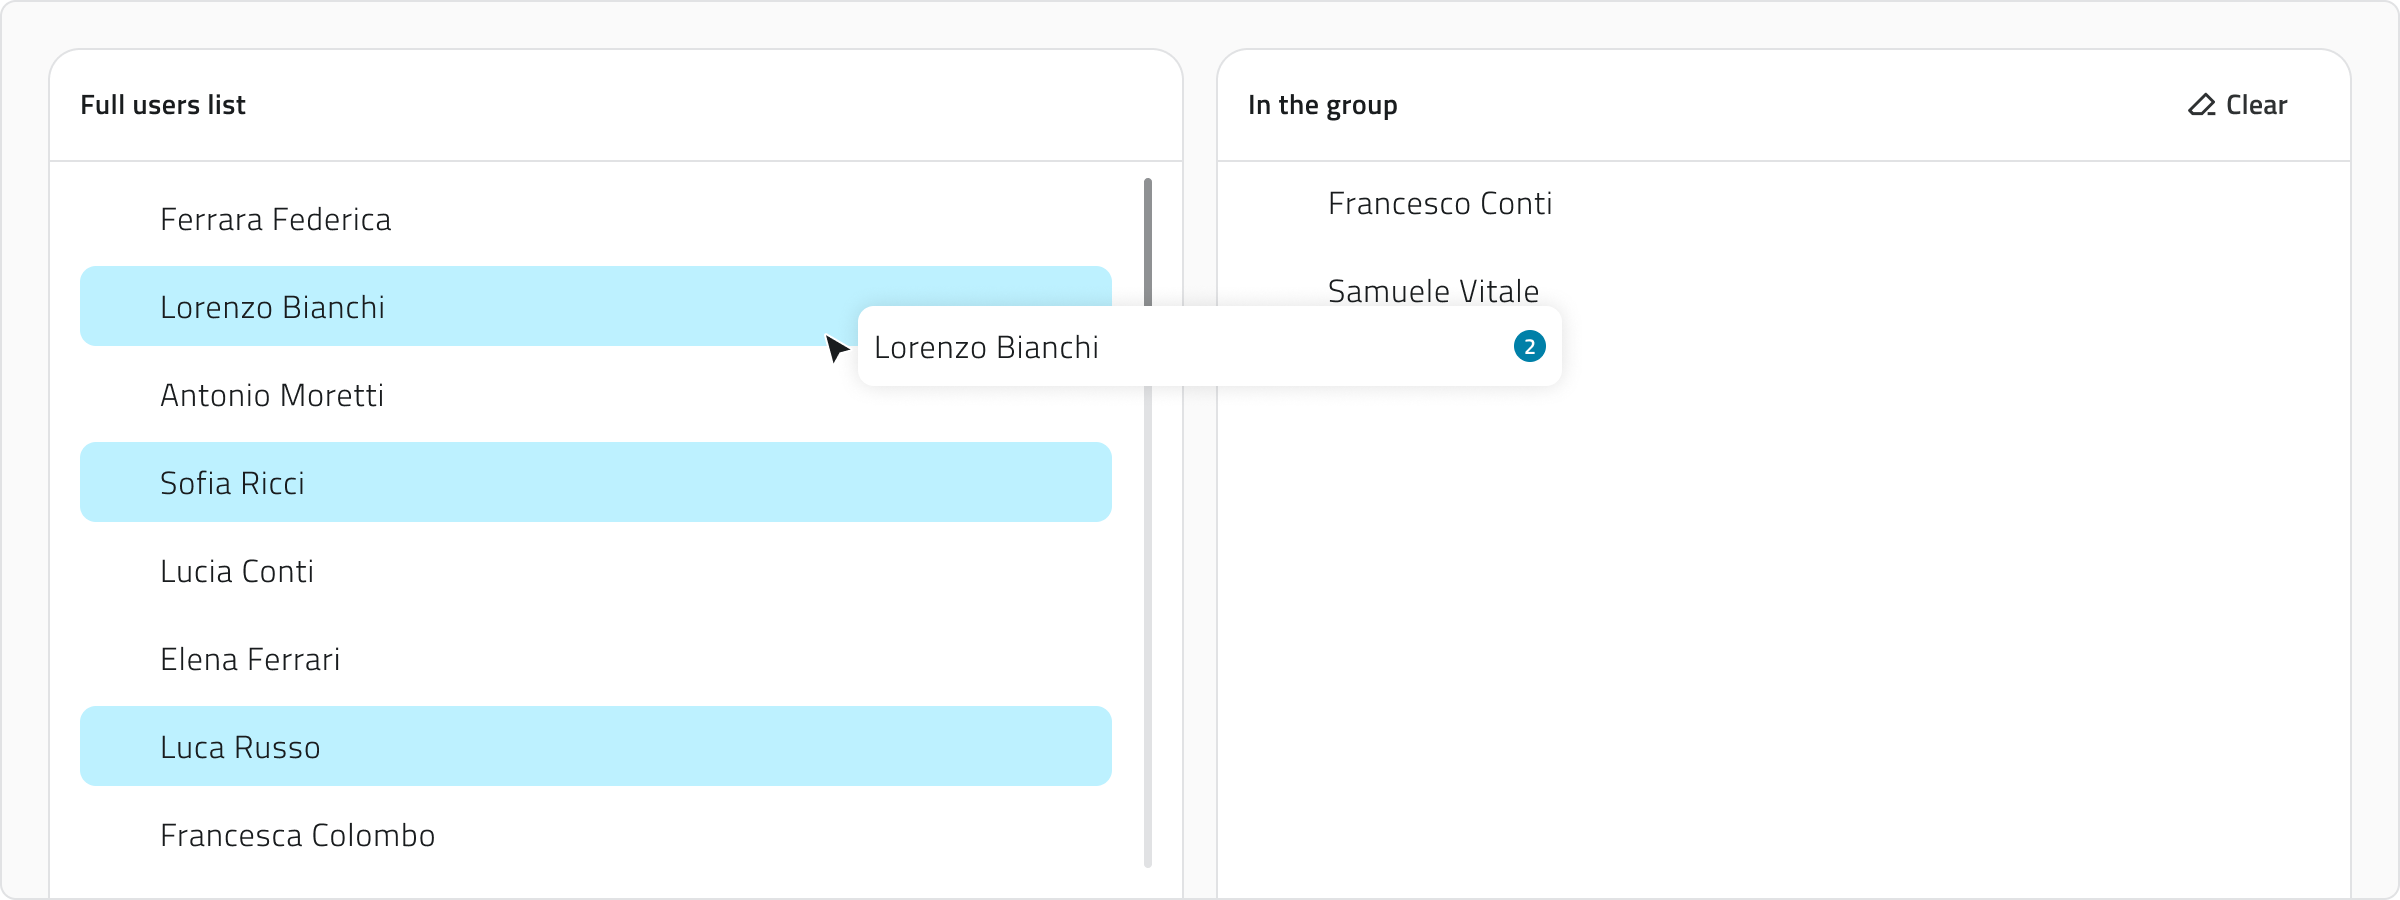
The group configuration shows two lists: on the linked entityleft selectedare earlier,all additionalusers required fields may appear:
Project IDLinksin theeventorganization,towhilea project. Example:project_id.Object IDLinks the event to an object;on theobject classrightmust be selected first. Example:object_idorentity_ref.Single Sensor IDIdentifiesare thesensorusers already added to theeventgroup.comesTo
from.addExample:userssensor_idorsensor_name.Device IDIdentifiesto thedevicegroup,groupingselect one or moresensors.namesExample:from the list on the left usingdevice_idControlcontroller_nameShift.
Formultiple eachselection, mappedthen keydrag them to the area on the right. Hold Control and click a name that is already selected to remove it isfrom alsothe possibleselection.
To remove users from the group, select the names from the list on the right and drag them to assignthe alist type, which defines howon the platformleft. shouldTo interpretremove thatall value.Theadded availableusers, typesclick are:
Text fieldClear: for text values.Date: selectable as date only or date and time.Number: selectable as integer or decimal number.True/false: for boolean values.
The type assigned to each field influences the conditions available in the Automations section.
5. IfSave the payloadnew includes geographic datagroup, it is possible to map the coordinates as well. Enable the switch to configure how the platform should read the incoming coordinates.
Once enabled, you can choose the format in which the coordinates are transmitted by the provider:
Single fieldThe coordinates are contained in a single field of the payload. Enter the field name inCorresponds to.Double fieldLatitude and longitude are transmitted in separate fields. Enter the respective names in theLatitude corresponds toandLongitude corresponds tofields.
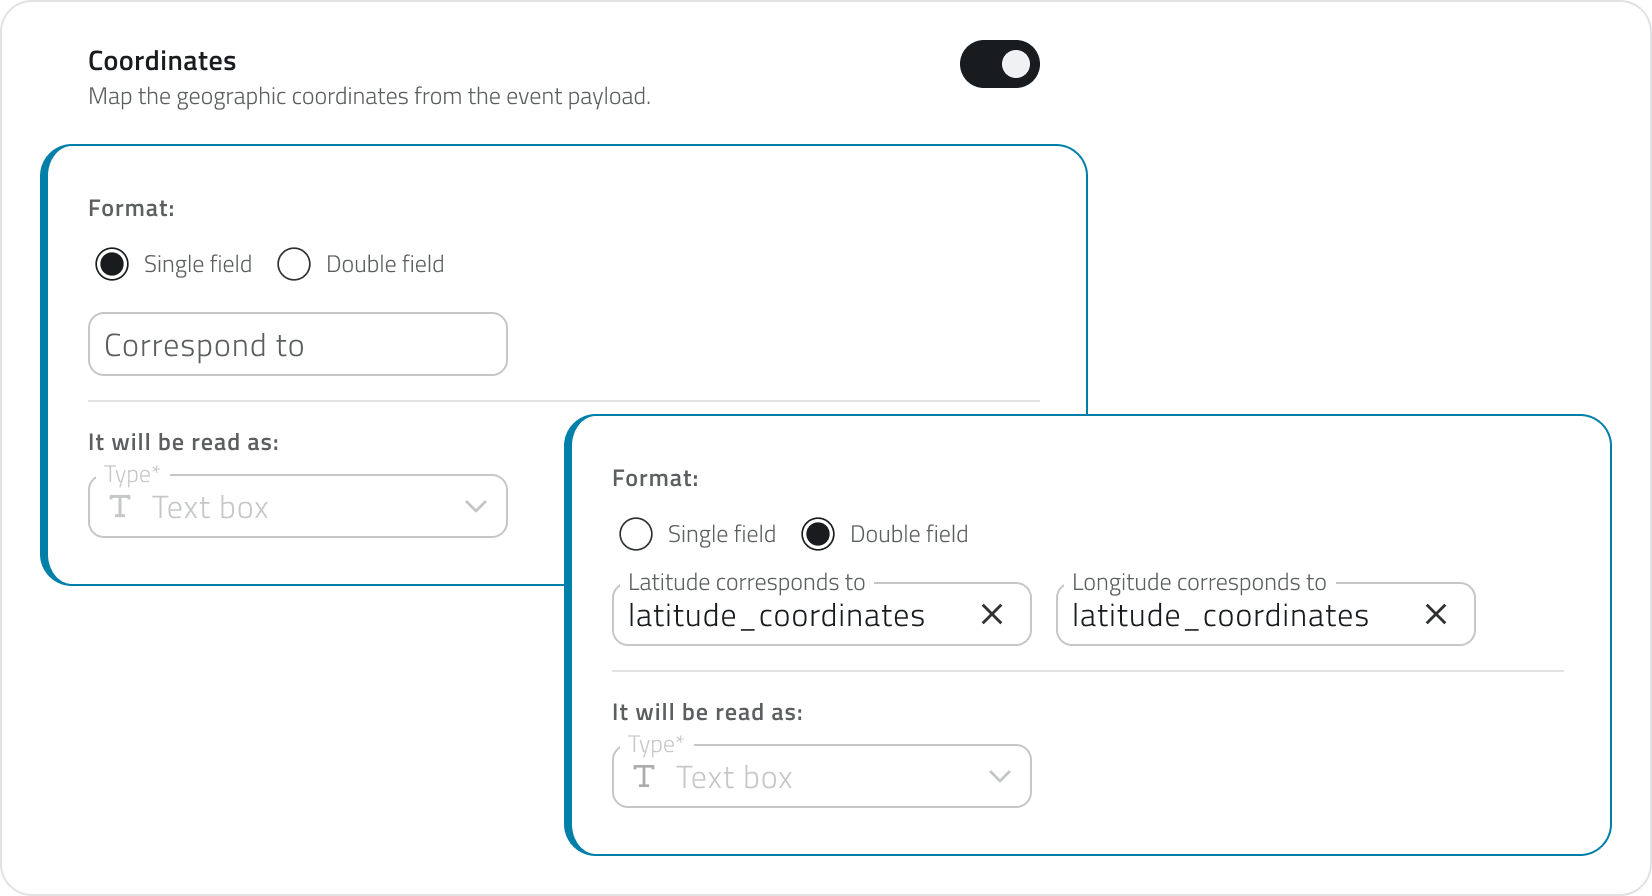
The Coordinates field is required to enable certain actions in Automations, such as the creation of an object of type Point or the launch of a robotic mission.
6. Clickclicking Save in the top-right corner.corner The(after buttonassigning remainsat disabledleast untilone user).
💡Tip: Use the name,search bar to filter users in both lists.
💡Tip: Make sure to assign only those users who need the linkedsame entity,level andof all required keys have been filled in.
Once saved, a URL link appears in the list. This link must be providedaccess to the external provider to enable data transmission.projects.
EditViewing and manageEditing eventsGroups
To edit ana eventgroup, click the blue button with the arrow icon that appears when hoveringyou hover over the item.
To duplicate ana eventgroup, select a singlean item from the list,list. thenOnce clickselected, the Duplicate button in the top-right corner.
To delete an event, select one or more items from the list, the Delete button will appear in the top-right corner. Hold CTRL and click to add items to the selection or remove them from it.appear.
To copy the URL of an event, use the dedicated button directly from the list.
💡 Tips:
When duplicating an event, update the mapping keys if the target provider uses a different JSON structure.Use descriptive names for events to make them easier to identify in the list.
Links
Crea e gestisci eventii gruppi
Un Eventogruppo consenteraccoglie allautenti piattaformacon lo stesso ruolo e permessi, consentendo loro di riceverelavorare esugli interpretarestessi informazioniprogetti (tipicamentecon JSON)un daset providerdi esterni,operazioni collegandolecoerenti.
Creare un gruppo serve a un'entitàassociare dellautenti piattaforma, come organizzazioni, progetti, oggetti, sensori e dispositivi.
Perloro usareun gli eventi per l'invio di notificheruolo, puoisemplificando configurarela gligestione outputdei dallapermessi sezionein Automazioni.modo scalabile.
Disponibile solo per utenti con permesso backoffice. Per creare un eventogruppo è necessario che nel sistema sianosia già presentipresente leil entitàruolo a cui l’eventoil gruppo deve essere collegato: progetto, oggetto, sensore o dispositivo.collegato.
Creare un nuovo eventoPassaggi
1. Accedi al Backoffice e apriclicca la sezionesu EventiGruppi dalnel menu lateralesul lato sinistro.
La lista mostra il nome, l'entità collegata, l'automazione collegata, la data di creazionecreazione, progetti associati, utenti aggiunti e unil bottoneruolo per copiare l'URL dell'evento.collegato.
2. Clicca susul pulsante Nuovo eventogruppo in alto a destra.
3.
Le opzioni disponibili sono:ruolo):
OrganizzazionePer eventi generali.ProgettoPer eventi specifici diInserisci unsingolo progetto.OggettoPer eventi legati a una classe e a una singola istanza.Sensore singoloPer eventi provenienti da un singolo sensore.DispositivoPer eventi generati da un insieme di sensori.
4. Nella sezione Mapping definisci come i dati in arrivo devono essere interpretati.
Se lo ritieni necessario, carica il payload di esempio: incolla o carica un file JSON nella casella di testo e clicca Conferma per generare le chiavi di mappatura.
Inserire il JSON non è obbligatorio, puoi inserire i campi anche manualmente.
Poi mappa le chiavi, associando le chiavi del provider ai campi richiesti dalla piattaforma:
Nome(obbligatorio)Ilnomedell'evento. Esempio:event_nameonotification_name.Event ID(obbligatorio)Identifica in modounivocoilneltipo di evento. Esempio:event_idotype_code.Tempo(obbligatorio)Indica il momento in cui l'evento si verifica. Esempio:timestampoevent_time.Livelli(obbligatorio)Definisce la tipologia o gravità dell'evento (info,warning,success,error).Ogni livello può avere uncampo Nomevisualizzatogruppo,.- Seleziona il
cursore sull'icona del livello. Esempio: una chiave comeseverityostatusmappata su "warning". DescrizioneRuolo(obbligatoria)Spiegadabrevementeassociare tramite ilcontenutomenuoalo scopo dell'evento. Esempio:messageodetails.Informazioni aggiuntive(facoltativo)Aggiunge dati supplementari, ciascuno con unNome visualizzatoopzionale. Esempio:temperature,battery_status,signal_strength.tendina.
InNome basee all'entitàRuolo colegata selezionata precedentemente, potrebbero aggiungersisono ulterioriobbligatori campiper obbligatori:
il salvataggio.
-
Project4.IDAggiungi o rimuovi gli utenti.CollegaLal'eventoconfigurazione del gruppo mostra due liste: aunsinistraprogetto.sonoEsempio:disponibiliproject_id -
ObjectPerIDaggiungere utenti al gruppoCollega,l'evento a un oggetto; è necessario selezionare prima laclasse oggetto. Esempio:object_idoentity_ref. Single Sensor IDIdentifica il sensore da cui proviene l'evento. Esempio:sensor_idosensor_name.Device IDIdentifica il dispositivo che raggruppaseleziona uno o piùsensori.nominativiEsempio:dalla lista a sinistra usandodevice_idControlcontroller_nameShift.
Per ogni chiave mappata è inoltre possibile assegnare una tipologia, che definisce come la piattaforma deve interpretare quel valore.Le tipologie disponibili sono:
Campo di testo:pervaloriletestuali.selezioni Data:multiple,selezionabilequindicometrascinalisolo data o come data e ora.Numero: selezionabile come numero intero o numero reale.Vero/falso: per valori booleani.
La tipologia assegnatanell’area a ciascundestra. campoCon influenzaControl le+ condizioniclic disponibilisu nellaun sezionenominativo Automazioni.già selezionato lo togli dalla selezione.
Per rimuovere utenti dal gruppo, seleziona i nominativi dalla lista a destra e trascinali nella lista a sinistra. Per rimuovere tutti gli utenti aggiunti, clicca Cancella.
5. SeSalva il payloadnuovo include dati geografici, è possibile mappare anche le coordinate. Attiva lo switch per configurare come la piattaforma deve leggere le coordinate in arrivo.
Una volta attivato, puoi scegliere il formato con cui le coordinate vengono trasmesse dal provider:
Campo singoloLe coordinate sono contenute in un unico campo del payload. Inserisci il nome del campo inCorrisponde a.Doppio campoLatitudine e longitudine sono trasmesse in campi separati. Inserisci i rispettivi nomi nei campiLatitudine corrisponde agruppoeLongitudine corrisponde a.
Il campo Coordinate è necessario per abilitare alcune azioni nelle Automazioni, come la creazione di un oggetto di tipo Punto o l'avvio di una missione robotica.
6. Per salvare, cliccacliccando Salva in alto a destra.destra Il(dopo bottoneaver rimaneassegnato disabilitatoalmeno finchéun nonutente).
💡Suggerimento: compilatiUsa illa nome,barra l'entitàdi collegataricerca eper tuttefiltrare gli utenti in entrambe le chiavi obbligatorie.liste.
Una💡Suggerimento: voltaAssicurati salvato,di nellaassegnare listasolo comparegli un link URLutenti che devedevono essereavere fornitolo alstesso providerlivello esternodi peraccesso abilitareai l'invio dei dati.progetti.
ModificareVisualizzazione e gestireModifica glidei eventiGruppi
Per modificare un eventogruppo, clicca sul bottonepulsante blu con l'l’icona frecciadi una freccia, che compareappare passandoal ilpassaggio del mouse sull'sull’elemento.
SePer vuoi duplicare un eventogruppo, seleziona un singolo elemento dalla lista,lista. poiDopo cliccala selezione, compare il bottonepulsante Duplica in alto a destra..
Per eliminare un evento, seleziona uno o più elementi dalla lista: comparirà il bottone Elimina in alto a destra. Tieni premuto CTRL e clicca per aggiungere elementi alla selezione o toglierli.
Per copiare l'URL di un evento, usa il bottone apposito direttamente dalla lista.
💡 Suggerimenti:
Quando duplichi un evento, aggiorna le chiavi di mappatura se il provider di destinazione ha una struttura JSON diversa.Usa nomi descrittivi per gli eventi per facilitarne il riconoscimento nella lista.
Collegamenti
Last updateupdate:: 2607 May 2026